Hexapod Simulation in MATLAB
Hello fiends, hope you all are fine and having fun with your lives. In today's tutorial, I am going to share a new project designed in MATLAB and named as Hexapod Simulation in MATLAB. We all know about the Hexapod, its a special kind of robot which has six legs. Hexa is used for six so its quite obvious that hexapod has six legs on it.
I have designed this project on a client's request and today I thought to share it with you guys. Because this Hexapod simulation in MATLAB is designed after a lot of efforts by our TEP team that's why this simulation is not free to download but we have placed a small price on it so that engineering students can buy it easily. So, let's get started with Hexapod Simulation in MATLAB.
Hexapod Simulation in MATLAB
- First of all, you need to buy this Hexapod Simulation in MATLAB by clicking the below button:
Buy This Simulation
- When you buy this project, you will get three files in it which are named as:
- Hexapod.m
- RobotMotion.m
- Robot Design.m
- You need to open the first one named as Hexapod.m, this is the Main file for this Hexapod Simulation in MATLAB.
- It has the below code in it:
clc;
clearvars;
close all;
imtool close all;
subplot(6,6,1:30)
xlabel('x'); ylabel('y'); zlabel('z');
axis([-150 200 -50 150 0 150])
grid on
hold on
Inc = 0;
firstLen = 50;
secondLen = 50;
stepSize = 20;
StepsTaken = 1;
y1 = 0;
y2 = 1;
RobotDesign(firstLen,secondLen)
subplot(6,6,31)
subplot(6,6,32)
subplot(6,6,33)
subplot(6,6,34)
subplot(6,6,35)
subplot(6,6,36)
OldInc = 0;
for b = 0:1:StepsTaken-1
subplot(6,6,1:30)
[Inc OldInc y1 y2]= RobotMotion(firstLen,secondLen,stepSize,Inc,OldInc, y1, y2);
end
- As you can see in the above code, we can set different parameters like lengths of legs and the steps it can take etc.
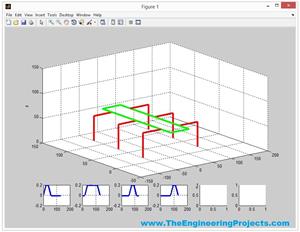
- Let me give a slight overview of Hexapod and how it works. So, have a look at below figure:
- I have designed a small hexapod and I have colored its legs.
- The red Color legs are called Gate 1 while the green color legs are called Gate 2.
- Now, when a Hexapod moves its first three legs (Gate 1) which I have designed in Red Color are first moved in upward motion and after that the Gate 1 moves in the Forward Direction and then finally Gate 1 moves in downward direction.
- After that the Gate 2 Legs are move in upward Direction and then Gate 2 Legs are moved in Forward Direction and finally Gate 2 moves in downward direction.
- Now when all legs are moved in Forward direction then finally the Robot Body is moved in Forward Direction.
- Let me summarize these steps:
- Gate 1 (Red Legs) moves in Upward Direction.
- Gate 1 (Red Legs) moves in Forward Direction.
- Gate 1 (Red Legs) moves in Downward Direction.
- Gate 2 (Green Legs) moves in Upward Direction.
- Gate 2 (Green Legs) moves in Forward Direction.
- Gate 2 (Green Legs) moves in Downward Direction.
- Robot Body moves in Forward Direction.
- These are the 7 steps a hexapod takes to move a single step Forward.
- Now in the above code, I have used some variables which are:
- firstLen = 50;
- secondLen = 50;
- stepSize = 20;
- StepsTaken = 1;
- firstLen is the length of Gate 1 legs which I have set 50 rite now.
- secondLen is the length of Gate 2 legs.
- stepSize is how big the step should be.
- StepsTaken is how much steps it should take.
- Now when you run the simulation then the first thing you will get is shown in below figure:
- AS I have given StepsTaken = 1 so it will just take one step, you can change it though and when it takes one step the final position of robot will be as shown in below figure:
- Now, if you compare the above two figures then you can see the starting position of Hexapod in x direction was 0 but when it took first step then now its position is 20.
- The below four graphs are showing the angles of your robot gates in radians.
- The below video will explain this project in detail:
That's all for today. I hope you have liked this Hexapod simulation in MATLAB. Before buying this project you must watch this video so that you have a clear overview of this Hexapod simulation in MATLAB.