Hey Guys! Hope you are doing well. Today, I'll discuss the detailed Introduction to Arduino IDE, where IDE stands for Integrated Development Environment - An official software introduced by Arduino.cc, that is mainly used for writing, compiling and uploading the code in almost all Arduino modules/boards. Arduino IDE is open-source software and is easily available to download & install from Arduino's Official Site.
In this post, I'll take you through the brief Introduction of the Software, how you can install it, and make it ready for your required Arduino module. Let's dive in and get down to the nitty-gritty of this Software.
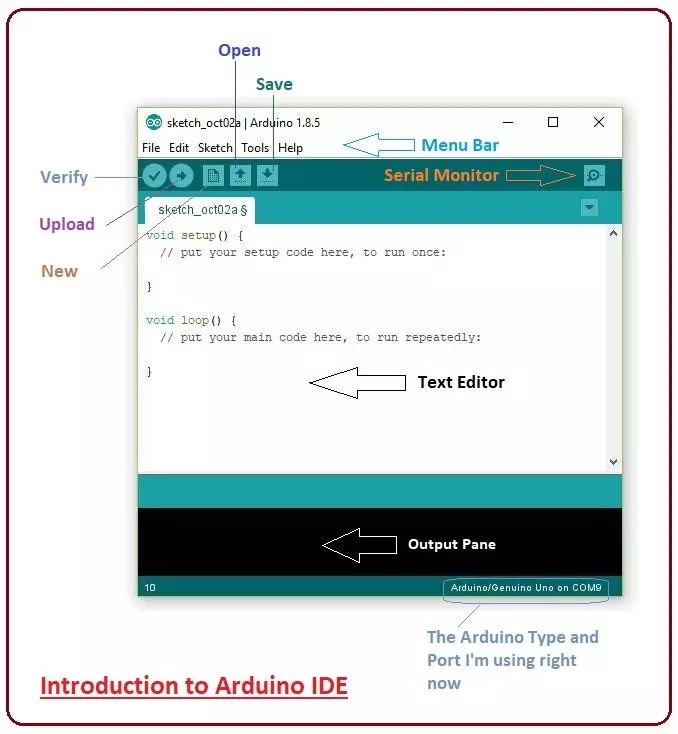
Introduction to Arduino IDE
Arduino IDE is an open-source software, designed by Arduino.cc and mainly used for wri ...
Hey Guys! Hope you are getting along with life pretty well. Welcome you onboard. Today, I'll unlock the details on the Introduction to Arduino Micro. It is a Micro board, based on the ATmega32U4 microcontroller and comes with built-in USB, making it easily compatible with the computer.
Arduino Micro, as the name suggests, is the smallest board in the Arduino Community. It is comparable to its counterparts like Arduino Nano and Arduino Promini.
In this tutorial, I'll discuss each and everything related to Micro board including its main features, pinout, pin description, the software used and applications. Let's dive in and explore everything you need to know about this tiny board.
Introduction to Arduino Micro
Arduino Micro is the smallest boa ...
Hi Friends! Hope you are doing well. Today, I'll give you a detailed Introduction to Arduino LilyPad. It is an Arduino Microcontroller Board, based on ATmega168/ATmega328 and is introduced by Leah Buechley and SparkFun Electronics.
This board is mainly developed for e-textiles and wearables projects. As per the designed purpose, it can be attached to fabric, sensors, power supplies, and actuators. You may need a conductive thread for joining this board with the required object.
In this post, I'll try to cover each and everything related to Arduino LilyPad, what is this about and how it is used for the development of desired projects. Let's jump right in and get down to the nitty-gritty of this board.
Introduction to Arduino LilyPad
Arduino Lil ...
Hey Friends! Hope you are doing well. Today, I'll discuss the details on How to use digitalWrite Arduino Command. The digitalWrite command in Arduino is used for writing the status of the digital Pin. The Pin assigned to this command must be an OUTPUT pin so that it can transfer data to other components like LEDs, motors, and actuators and use them as per your needs and requirements.
Arduino boards have always been a great choice for both experts and newbies, as they come with built-in peripheral functions, and no need of external components is required to drive automation and develop some basic functions on the relevant project.
Basic Arduino Software is used as a compiler and no separate burner is required to burn the required code into the boa ...
Hi Friends! Hope you are doing well. In this post, I'll uncover the details on How to use pinMode Arduino Command. The pinMode defines the Arduino Pins, if they are used as an input or output. The INPUT_PULLUP is another option achieved by pinMode, that is mainly used to place a virtual pull-up resistor to the input pins.
We have started Arduino Tutorials for Beginners quite a while now for the newbies, who are really interested to get a hands-on experience with Arduino. Generally, Arduino is known as a Microcontroller, but it is a step ahead of it. The PIC microcontrollers require some basic circuit to start with but Arduino brings revolution in the automation industry by removing the need of developing any basic circuit. Although Atmega328 is th ...
Hey Guys! Hope you are doing well. Welcome you onboard. Today, I'll discuss the details on the Introduction to CR2032 Battery. It is known as a coin cell or button cell that comes in cylindrical form and is mainly used in pocket calculators, wrist watches, artificial cardiac pacemakers, hearing aids, and automobile key-less entry transmitters.
Low self-discharge and an ability to retain a charge for a long time make this device a good pick for high power devices. More often than not, it is called a lithium energizer where high capacity is a major concern. It falls under the category of disposable primary cells, where common cathode material is a silver oxide, manganese dioxide, or carbon monofluoride and common anode materials are zinc or lithium ...
Hi Fellas! I am back to give you a daily dose of valuable information. Today, I'll give you a detailed Introduction to IRF3205. It is an N-Channel HEXFET Power MOSFET that comes in a TO-220AB package and operates on 55V and 110A. It is mainly used for dynamic dv/dt rating and consumer full bridge applications.
Additionally, it falls under the category of ultra LOW on-resistance devices based on Advanced Process Technology, making it a building block of the electronic applications where fast switching is a major concern.
In this post, I'll cover each and everything related to this transistor, its main features, working, pinout, and applications. Let's get down to the nitty-gritty of this tiny component.
Introduction to IRF3205
IRF3205 is an N- ...
Hey Guys! Welcome you onboard. Today, I'll discuss the details on the Introduction to IRF4905. It is a P-Channel HEXFET Power MOSFET available in a TO-220AB package and is based on Advanced Process Technology. It is mainly used for fast switching purpose, capable of providing ultra-low on-resistance.
This tiny device comes with three terminals called gate, drain and source where the gate terminal is used to control the current on remaining two terminals. The area between source and drain is known as a channel that is widely dependent on the voltage applied to the gate terminal.
In this post, I'll cover each and everything related to this P channel MOSFET, its main features, working, pinout and applications. Let's jump right in and explore everyt ...
Hey Fellas! I am back to give you a daily dose of useful information. Today, I'll uncover the details on the Introduction to Arduino Due. It is a microcontroller board based on Atmel SAM3X8E, 32-Bit ARM microcontroller. It is developed by Arcuino.cc with the intention to provide an easy pathway for the beginners to get a hands-on experience with the module without any prior technical knowledge. You can just plug the device into the computer through a USB cable and start playing with it right away.
Arduino Modules are a step ahead of a single microcontroller. If your project is mainly based on a microcontroller, you need to buy external peripherals and connect them with the controller in order to lay out an automation into your project. Arduino Bo ...
Hello friends! Hope you are doing well. Today, we will have a look at the detailed Introduction to ESP8266 WiFi module. ESP8266 is a very low-cost & user-friendly WiFi module, which develops a simple TCP/IP connection and can easily be interfaced with microcontrollers via Serial Port. The first chip in this series was ESP-01 which gained sheer attention in the market.
In this tutorial, we will discuss the ESP8266 WiFi module along with its pinout, features, specifications, applications and datasheet. Let's dive in and nail down everything related to this device.
ESP8266 WiFi Module
ESP8266 (also called ESP8266 Wireless Transceiver) is a cost-effective, easy-to-operate, compact-sized & low-powered WiFi module, designed by Espressif Systems, that supports both TCP/IP and Ser ...