Introduction to Arduino Pro Mini
Hey Friends! Hope you are doing well. Today, I am going to give you a detailed Introduction to Arduino Pro Mini. It's a microcontroller board developed by Arduino.cc and is based on the Atmega328 microcontroller.
Arduino Pro Mini is quite similar to Arduino UNO in overall functionality however the main difference lies in its size and built-in programmer. Arduino Pro Mini is very small in size & it lacks a built-in programmer & USB Port. Arduino Uno comes with two onboard voltage regulators (i.e. 5V and 3.3V) while Arduino Pro Mini comes with a single voltage regulator.
There are two versions of Arduino Pro Mini available, first one operates at 5V & runs at 16MHz while the second one is of 3.3V runs at 8MHz.
Arduino boards are mainly used for the development of automation, robotics, embedded systems and other electronics projects. These boards were developed with the intention of providing easy hardware and software combination that gives a quick pathway to people with no technical background.
Arduino Pro Mini Key Features
|
No. |
Feature |
Value |
1 |
Microcontroller |
ATmega328 |
2 |
Operating Frequency/Crystal Oscillator |
16MHz/8MHz |
3 |
Digital I/O Pins |
14 |
4 |
Analog Pins |
8 |
5 |
PWM(Pulse Width Modulation) Pins |
6 |
6 |
Built-in Programmer |
Not available. |
7 |
USB Port |
Not available. |
8 |
Flash Memory |
32KB |
9 |
SRAM |
2KB |
10 |
EEPROM |
1KB |
11 |
Bootloader |
0.5KB in Flash Memory. |
In today's tutorial, I'll discuss each and everything related to Arduino Pro Mini so you don't need to scrape through the internet and find all information in one place. Let's get started.
Where To Buy? |
---|
No. | Components | Distributor | Link To Buy |
1 | Arduino Pro Mini | Amazon | Buy Now |
Introduction to Arduino Pro Mini
- Arduino Pro Mini is a compact, small-sized & application-type microcontroller board, developed by Arduino.cc and comes with an Atmega328 microcontroller incorporated on the board.
- This board comes with 14 Digital I/O Pins, out of which 6 pins are used for providing PWM output.
- Arduino Pro Mini Pinout also consists of 8 Analog Pins.
- The size of Arduino Pro Mini is 1/6th of the size of Arduino Uno, so it's quite small as compared to Arduino UNO.
- Depending on operating voltage, Arduino Pro Mini is of two types:
- Operating Voltage: 5.0V, Crystal Oscillator: 16MHz, Voltage Regulator: KB33.
- Operating Voltage: 3.3V, Crystal Oscillator: 8MHz, Voltage Regulator: KB50.
- In order to reduce the size, the USB port & built-in programmer are removed from Arduino Pro Mini, so after uploading code you can simply place it in your application(that's why also termed as application-type).
- Official Arduino Software called Arduino IDE (Integrated development environment) is used to write & upload programming code. The code we write to program this board is normally called a sketch.
- Arduino Pro Mini also has a Reset Button and a small LED connected to pin number 13.
Arduino Pro Mini Memory Allocations
- Arduino Pro Mini comes with 3 types of built-in memories:
- Flash Memory of 32KB out of which 0.5KB is used by the bootloader code.
- SRAM of 2KB.
- EEPROM of 1KB.
Now let me give you a brief overview of these memories, I have explained them in detail here:
What is a Microcontroller?
- Flash Memory is a non-volatile memory and is used for storing the programming code. As it's a non-volatile memory so it stores information even if the connection with the power supply is lost.
- SRAM(Static Random Access Memory) usually referred to as RAM memory is a volatile memory and is used to store temporary data i.e. variables. It loses data if we cut off the power supply.
- EEPROM is a semi-volatile memory and thus can be erased by programming.
Arduino Pro Mini Specifications
Here, I have shared a few more specifications and functionalities of Arduino Pro Mini.
- This board doesn't come with connectors already soldered which gives you the flexibility to solder the connectors in any way you want, based on the requirements and space available for your project.
- There is only one voltage regulator incorporated on the board i.e 3.3V or 5V based on the version of the board.
- The labeling on the voltage regulator defines the version of the board i.e. KB33 represents 3.3V edition and KB50 represents 5V edition. However, the board version can also be indicated by measuring the voltage between Vcc and GND pin.
- Overcurrent protection is another feature available in Arduino Pro Mini.
- The following figure shows the specifications of the board.
Arduino Pro Mini Datasheet
- You can download Arduino Pro Mini Datasheet by clicking the below button:
Download Arduino Pro Mini Datasheet
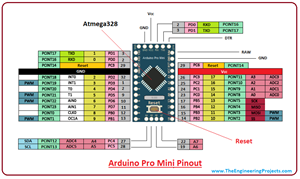
Now let's have a look at the Pinout of Arduino Pro Mini in detail:
Arduino Pro Mini Pinout
- As we know, each pin of the Microcontroller is assigned with multiple functions.
- In the below table, I have shared the key points of the Arduino Pro Mini pin diagram and labeled functions assigned to them:
Arduino Pro Mini Pinout |
No. |
Pin Number |
Pin Description |
1 |
Pins 0 - 13 |
14 Digital I/O Pins. |
2 |
Pins A0 - A7 |
8 Analog Pins. |
3 |
Pins 3, 5, 6, 9, 10 & 11 |
6 Pulse Width Modulation ( PWM ) Pins. |
4 |
Pins 0(RX) & 1(TX) |
Serial Communication Pins. |
5 |
Pins 10, 11, 12 & 13 |
SPI Communication Pins. |
6 |
Pins A4 & A5 |
I2C Communication Pins. |
7 |
Pin # 13 |
Built-In LED for Testing. |
8 |
Pins 4 & 5 |
External Interrupt Pins. |
- Here's the Circuit Diagram of Arduino Pro Mini Pinout:
Arduino Pro Mini Power Pins
- Vcc: Arduino Pro Mini Pinout consists of 2 Vcc Pins. It gives the regulated voltage i.e. 5V or 3.3V depending on the type of the board.
- GND: There are 3 GND(ground) pins incorporated on the board.
- RAW. This pin is used for supplying raw voltage to the board. You can power connect an external power supply ranging from 5V to 12 V.
- Reset: Pro Mini board comes with 2 Reset Pins, which comes in handy if the board hangs up in the middle of the running program, making this pin LOW will reset the board.
- In the below figure, I have highlighted the Power Pinout of Arduino Pro Mini:
Programming Header Pins
- Programming Header: FTDI six-pin programmer is connected with these pins and is used to upload programming code on the Pro Mini board.
Arduino Pro Mini I/O Pins
- Digital Pins: Arduino Pro Mini has 14 Digital I/O Pins in total labeled from 0 to 13, where Pin 0 is RX1 and Pin 1 is TX0.
- Analog Pins: It has 8 analog pins labeled from A0 to A7. These pins are used to input analog signals and come with a total resolution of 10bit.
I have encircled digital pins with green color and analog pins with orange color in the below figure:
Arduino Pro Mini Communication Pins
- Arduino Pro Mini supports 3 Communication Protocols for the transmission of data with other peripherals i.e. sensors, registers etc. and are named as:
- Serial Protocol.
- I2C Protocol.
- SPI(Serial Peripheral Interface) Protocol.
- TXD & RXD Pins: These pins are used for serial communication. TXD represents the transmission of serial data while RXD is used for receiving the data. Code is also uploaded through Serial Protocol.
- SPI Pins: Four pins 10(SS), 11(MOSI), 12(MISO), and 13(SCK) are used for communicating through SPI Protocol.
- I2C Pins: Two Pins(A4 and A5) are used for developing I2C communication. A4 is known as serial data line (SDA) which holds the data and A5 shows serial clock line (SCL) which provides data synchronization clock.
Other Pinouts
- PWM. There are 6 digital pins labeled as 3,5,6,9,10, and 11 available on the board that provide PWM (pulse width modulation).
- External Interrupts. There are two external interrupts available called T0(at Pin 4) and T1(at Pin 5). They are also known as hardware interrupts.
Arduino Pro Mini Vs Other Arduino Boards
- Most of the Arduino boards come with a USB port that is used to send the program from the computer to the board. However, in the case of Arduino Pro Mini, all of the USB circuitry is removed to make it as compact and small as possible. You can program the board using a USB to serial converter cable. The FT232RL USB serial module is very handy and preferable for programming this board. A six-pin FTDI header can be connected to a USB to serial converter that provides the USB power.
- If you have already worked on the Arduino Uno board, then no need to buy a USB to serial converter cable as you can program the Pro Mini using Uno board. Make sure, the Pro Mini version you are working on comes with 5V regulation as it runs at 16MHz like Arduino Uno board. Programming your 3.3V Pro Mini board will not be compatible with the Arduino Uno board, hence making it very difficult to program the 3.3V version of the Pro Mini board.
- The form factor is another major difference that makes this device unique.
- Pro Mini comes in a very small and compact size which makes this device suitable for most applications. But small size comes with one limitation i.e. it doesn't compatible with Arduino Shields unless you hard-wire the board with Arduino Shield.
Arduino Pro Mini Set Up
- First, you need to install the Arduino IDE software on your computer, which is the official software used to program Arduino boards.
- Connect the board with USB to Serial converter (FTDI serial module) that is used to transfer the program from computer to the board.
- Write the program in the IDE software in C language.
- No separate burner is required to burn the code. You can directly burn the code in the IDE software and transfer it to the board.
- Once you have burned and transferred the program to the board, the next step is to power the board to make it compatible with your project.
- Apart from using FTDI serial module, there are two ways to power the board. You can power the board through the RAW by setting the voltage range anywhere between 5V to 12V. It will automatically regulate to 3.3V based on the version of the board. However, if your project comes with a regulated voltage of 3.3V, then you can connect it directly to the Vcc pin of the board. Make sure, the board version is KB33 that runs at 3.3V, another version KB50 will run at 5V.
- These two ways of powering up the board are useful when you have disconnected the board with the computer and already burned the program using FTDI module.
Applications of Arduino Pro Mini
There are many applications of Arduino Boards, but the small size and ease of use make Arduino Pro Mini stand out from others, especially where space requirement of the project is highly concerned.
That's all for today. We always strive to give you quality work based on your needs and requirements. However, if you are unsure or have any question, you can approach me in the comment section below. I'd love to help you according to best of my knowledge. Keep your suggestions coming; they help us provide you best content so you keep coming back for what we have to offer. Thanks for reading the article.