ECG Digitization in MATLAB

Buy This Project Hello friends, I hope you all are doing great. In today's tutorial, I am going to show you How to do ECG Digitization in MATLAB. If you are new to ECG signals then you should have a look at Introduction to ECG. I have also posted many different simulations on ECG in which I have extracted different features of ECG signals but in today's tutorial, we are gonna extract the ECG signal itself from its image. I have also saved this ECG signal in a txt file so that you can use it. This code is not open source and you can buy it from our shop by clicking the above button. I have designed a GUI in MATLAB and it will take image of ECG signal as an input and then will give the digital form of that ECG signal as an output. There are few restrictions on this code and its not necessary that it will work on all images of ECG signal, but I am sure it will work on most of them. I have also added three images in the folder which works great with this code. You should also have a look at ECG Simulation using MATLAB and ECG Averaging in MATLAB. So, let's get started with ECG Digitization in MATLAB:

ECG Digitization in MATLAB

  • When you will buy this MATLAB code, you will get an rar file.
  • Extract this rar file and it will contain below files in it:
  • You need to run Main.m file which is a MATLAB file.
  • Open this file in MATLAB and run it.
  • If everything goes fine then it will open up as shown in below figure:
  • Click this button which says Load Image File.
  • When you click this button, it will open up a dialog box as shown in below figure:
  • Here you need to select the image of ECG signal, which you want to digitize.
  • So, I am selecting ECG1.png and the results are shown in below figure:
  • The first axes is showing the ECG Image file as it is.
  • I have converted this ECG Image File into Gray Scale which is shown in axes 2.
  • Further, I have converted this Dray Scale Image into Binary Image which is shown in axes 3.
  • If you have noticed we have a blue line in ECG Binary Image.
  • I have added this line and taken it as an x-axis, the algo is reading the values of black pixels and then subtracting it from this x axis line.
  • In this way, I am getting my complete ECG Signal and the Axes 4, which is named as ECG Signal, is displaying this digital ECG Signal.
  • I have converted pixels into mV, which you can change by yourself in the code.
So, that was all about ECG Digitization in MATLAB. If you got into any trouble regarding this project then you can ask in comments and I will try my best to resolve them. Thanks for reading !!! :)

How to Upload Files using FTP in LabView

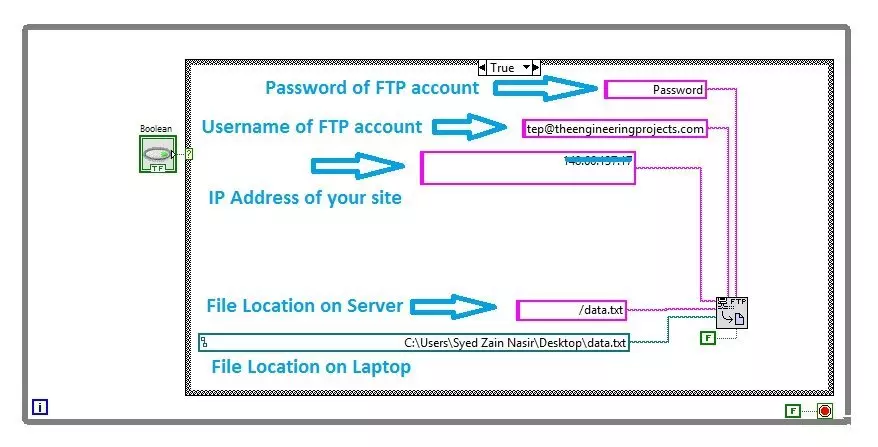
Hello friends, I hope you all are doing great. In today's tutorial, I am gonna show you How to upload Files using FTP in LabView. It's gonna be a quick tutorial as there's not much to do :) but you have to read and follow it carefully because if you made even a small mistake then it won't work. FTP is an abbreviation of File Transfer Protocol and using FTP we can easily upload or download files from our web server. We can use different FTP clients like FileZilla in order to do it manually but today we are gonna have a look at How to upload files automatically using FTP in LabView. So, let's get started with FTP in LabView:

How to Upload Files using FTP in LabView

  • When you are working on some Embedded project where you need to upload your sensor's data on some web server then you need to use FTP.
  • For example, if you are working on Home Automation or some security project and you want to display the values of your sensors on some online website, then in such situations you can easily use FTP and can upload your sensor's data.
  • There are many different ways to use FTP but if you are using LabView then here's how you are gonna upload it.
  • First of all, what you need to do is, you need to save your sensor's data in a txt or csv file.
  • After that simply Log in your FTP account and upload that file on your server.
  • Here's the screenshot of my LabView code which is uploading the data.txt file on my website using FTP.
  • In the first TextBox, you need to give the Password of your FTP account.
  • In the second TextBox, you need to give the Username of your FTP account.
  • In the third TextBox, you need to give the IP Address of your website, don't use the name of your site it doesn't work in LabView. You have to find the IP Address of your site which you can easily find using some online tool and place it in this TextBox.
  • In the fourth TextBox, you need to give the File Location, where you want to save your file on the server.
  • In the fifth TextBox, you need to give the File Location on your Laptop.
  • I have used FTP put File fuction of LabView and when you press the button Boolean, then it will automatically Log in to your FTP account and will upload the file.
  • It will hardly take 1 sec for the whole process.
  • You can download this LabView code by clicking the below button and don't forget to change all these values otherwise it won't work. :)

Download LabView Simulation

  • Once the file is uploaded on your server, you can then use PHP to extract and display it on some web page.
So, that was all today. I hope now you can easily upload your files via FTP in LabView. If you still got into some trouble then ask in comments and I will try my best to resolve them. Will meet you guys in the next tutorial. Till then take care and have fun !!! :)
Syed Zain Nasir

I am Syed Zain Nasir, the founder of <a href=https://www.TheEngineeringProjects.com/>The Engineering Projects</a> (TEP). I am a programmer since 2009 before that I just search things, make small projects and now I am sharing my knowledge through this platform.I also work as a freelancer and did many projects related to programming and electrical circuitry. <a href=https://plus.google.com/+SyedZainNasir/>My Google Profile+</a>

Share
Published by
Syed Zain Nasir