How to Prepare Screenshots For Your Posts
Hello everyone, I hope you all are doing great and having fun with your lives. Today, I am going to share a really cool tool with you guys and we will have a look at How to Prepare Screenshots For Your Posts with that tool, and it helped me a lot in my own blog posts and I am sharing it because engineers need to design their images for presentations, report etc. So, must have these tools with you so that you can make your tasks relatively easy. Moreover, if you are a blogger then it also comes in handy.
Accompanying your posts with screenshots can help to provide context, clarification or even just improve the aesthetics of the post. While it is easy enough to capture screenshots, before you include any in your posts it would be a good idea to prepare them beforehand. In order to prepare your screenshots, you should use a photo editor such as Movavi Photo Editor. It will allow you to tweak your photos in several ways, and prepare them by:
How to Prepare Screenshots For Your Posts
So, let's have a look at these steps one by one using which you prepare Screenshots for your Posts:
- Cropping and altering the frame
Sometimes you will want to crop your screenshots to alter the area of your screen that is displayed and how the elements are being framed. With Movavi Photo Editor you can easily crop out any parts of your screenshots, and also rotate, flip, or level them if need be.
- Improving the image quality
Generally, you shouldn’t have any problem with the quality of your screenshots, but if you do it helps to be able to improve it. Within Movavi Photo Editor you can choose to either adjust the color settings manually or use the automated features to do so.
- Removing unwanted elements
If there are any unwanted elements in your screenshot, you should remove them to make the screenshot less cluttered and emphasize the main elements more. That can be done easily with Movavi Photo Editor, and you can even replace the entire background if need be.
- Resizing screenshots to fit your posts
The size of your screenshots matters quite a bit, both because they will determine the file size of the image and as they should fit within a particular area in your post. Using Movavi Photo Editor you can quickly alter the size of your photo according to your needs, and may even want to come up with several different sizes if your website is responsive.
- Adding captions or titles
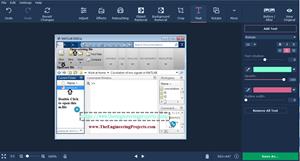
Including captions or titles in the screenshots that you publish can help to add information directly to them. Whether add text to photo to label elements, provide context, or even just explain the screenshot is up to you and Movavi Photo Editor will let you customize the text and make it look unique. Here's an example:
Make no mistake that is by no means all that Movavi Photo Editor is capable of, and if you explore its features further you’ll find that you’re able to apply artistic filters, utilize digital makeup, fix blurry images, and much more. All in all, however, you should now know what you need to do to prepare your screenshots for a post and because of how easy Movavi Photo Editor is to use, you should have no problem getting started and applying its features to the task at hand.