Servo Motor Control with PIC Microcontroller

Hello friends, hope you all are healthy, wealthy and wise. First of all, I am quite sorry about not posting for a long time, actually the load of work has really increased and I don't even have time to comb my hair.  Secondly, I have a really great news for you guys and the news is we have officially set up our office. Now, we will be more professional than ever and will respond to your queries quite fast now. I will update the photos of my new office soon INSHAHLLAH.

Let's come back to our topic. Previously, I have discussed the DC Motor control in Proteus ISIS and Stepper Motor Control in Proteus ISIS. So, now we are left with only one motor which is Servo Motor. Today's topic, as the name suggests is about the Servo Motor Control using PIC Microcontroller. The microcontroller, I am going to use in this tutorial is PIC16F877A. In this tutorial, I will design a circuit for Servo Motor Control and will also provide the code, which I have used for Servo Motor Control. If you are working on a Servo motor then you should also check Control Servo Motor with Arduino. in which I have design a servo motor control circuit using Arduino board. The code is also given there. Moreover, you should also check Angle control of Servo Motor with 555 Timer.

A Brief Intro About Servo Motor

  • Servo motor is simply another motor having a much better control system already installed in it.
  • The beaut of servo lies in its precise angular movement. In other words, you can move the motor at any angle you want. Like I want to move the motor to 30 degrees then I can do it quite easily in servo, which is not possible in DC or stepper.
  • Moreover, it has just 3 wires to control, one is GND, one is Vcc and the third one which is usually the middle one is for controlling purposes.
  • Now when you apply signal to the middle one, it starts moving. Now, how much it will move depends on the length of signal applied. If the signal applied is small, it will cover small distance.

Servo Motor Control Circuit in Proteus ISIS

  •  First of all select the below components from the Proteus library and add it in your workspace.
Components Used:
These components are used while designing this simulation:
  • PIC16F877a.
  • Servo Motor.
  • Crystal Oscillator. ( 16MHz )
  • Resistors. ( We need 3 resistors of 10k ohm )
  • Capacitors. ( We need 2 capacitors of 33pF )
  • Two Push Buttons.
Working Principle:
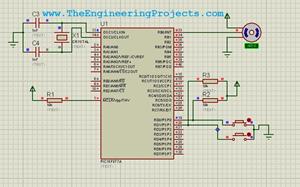
  • Now, design your circuit as shown in the below figure:
  • When I started this simulation the motor moved to the -90 degree angle. Now when I press the button, it will move in the opposite direction.
  • That's how it works. Just a simple motor nothing much complicated.

PIC Microcontroller Code for Servo Motor Control

  • Here's the code which I have used for controlling this servo motor. Burn this code in your PIC Microcontroller.
#define        M1     PORTB.F7
#define        M2     PORTB.F6
#define        B1     PORTD.F0
#define        B2     PORTD.F1

int a;

void main() {
TRISB=0;
TRISD=0xFF;
PORTB = 0;
a = 1;
while(1){
if((B1 == 0) && (a==1)){
PortB=0xFF;
delay_ms(100);
PortB=0x00;
delay_ms(1);
PortB=0xff;
a=0;
}
if(B2 == 0){
PortB=0x00;
}

}
}
  Note:
  • The code and the Proteus Simulation has already been emailed to all the subscribed members. If you are new here then subscribe to our newsletter and it will be emailed to you as well.
That's all for today. Hope I have helped you in some ways. In the next tutorial, we are gonna have a look at Relay Simulation in Proteus ISIS. Till then, Take care, Stay Blessed.
Syed Zain Nasir

I am Syed Zain Nasir, the founder of <a href=https://www.TheEngineeringProjects.com/>The Engineering Projects</a> (TEP). I am a programmer since 2009 before that I just search things, make small projects and now I am sharing my knowledge through this platform.I also work as a freelancer and did many projects related to programming and electrical circuitry. <a href=https://plus.google.com/+SyedZainNasir/>My Google Profile+</a>

Share
Published by
Syed Zain Nasir