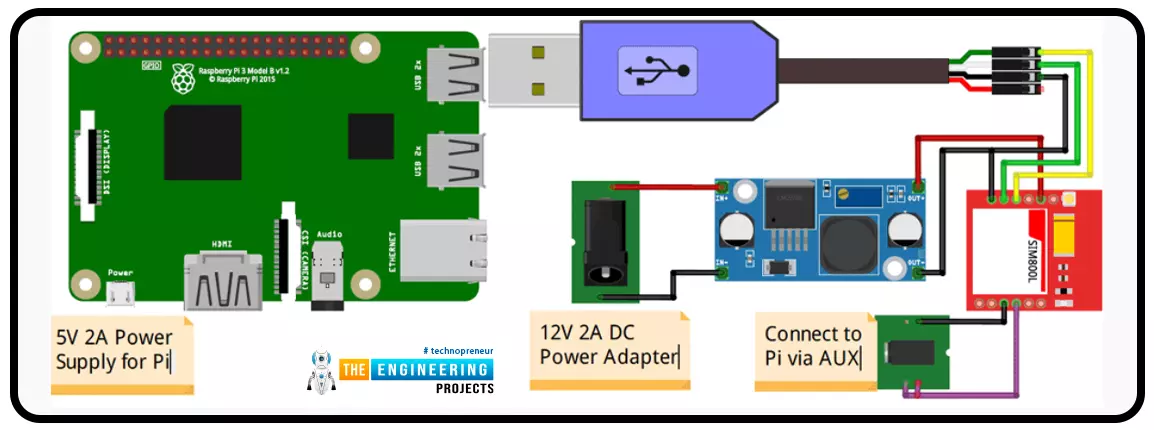
A low-literate audience can nevertheless have their voices heard and their questions answered by using an IVR system, as has been proven time and time again. However, achieving such aims in a development setting calls for a cheap system that welcomes input from various parties. RASP-IVR is an inexpensive IVR system that operates on a PI 4 and a local Global System for Mobile Communications modem. RASP-IVR was designed as an open-source, community-driven solution. It's unusual to find a customer-focused company that still uses human operators rather than an interactive voice response system. Credit card companies typically have IVR systems that can be used to make payments or file fraud reports. Airlines use elaborate IVR systems to schedule flights and check their current status. To facili ...
Hello Friends. I hope you are doing great. In this article, I will cover the nature of flow responsible for the changes in density. The nature of flows responsible for density change is known as compressible flows.
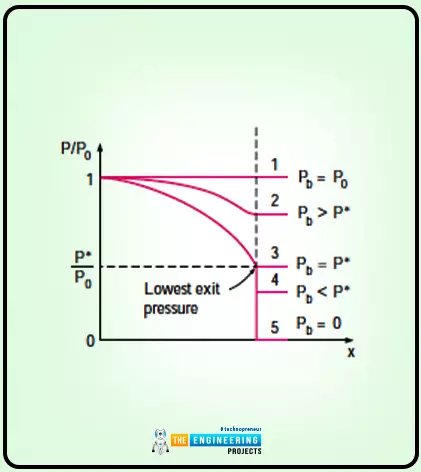
Fluid dynamics and thermodynamics combine for the theory of compressible flows. The compressible flow creates a relationship with the ideal gas. First, I will explain the stagnation state, speed of sound, and then the Mach number. This all comes under compressible flows. Then there come the static and stagnation fluid properties, shock waves, and variation of fluid properties in the case of regular and oblique waves. All of these are discussed in this article. So without wasting any time, let us start with the Stagnation property.
Stagnation Property
The definition of the sta ...
The first law of thermodynamics is also known as the Conservation of energy Principle. I will explain what is energy principle is and the following are some important points of the Energy Principle:
The energy principle can be described as the following equation:
Ein-Eout=∆E
I will exemplify the energy equation through a simple example. For instance, the rock fell from the cliff and while falling from the cliff the rock gained speed and the speed doubled while coming down. The potential energy is converted into kinetic energy as the rock is falling from height. Here the air resistance is negligible here. All these factors confirm the conservation of energy principle.
One of the simple examples of the Conservation of Energy Principle in our daily life is the man who has a lot of ...
The statement of Bernoulli’s Equation is as follows:
In fluid dynamics, Bernoulli’s Equation states about an increase in speed of fluid that occur simultaneously with the decrease in static pressure or decrease in fluid’s potential energy.
After reading the statement, you might have little idea what Bernoulli’s equation is about. Don’t worry. Here I am to explain that to you extensively.
Some of the important critical points related to Bernoulli’s equation are as follows:
Bernoulli’s equation is the relation between the pressure, velocity and potential energy.
This equation is only applicable for steady, incompressible flows. In this equation, all the frictional effects are neglected.
We will derive Bernoulli’s equation with the help of the Conservation of Linear Momentum ...
In this article, I will cover one of the essential topics of fluid mechanics as the title shows three crucial topics—the first concerns the conservation of mass and how it plays a critical role in our daily life. The next one involves the conservation of kinetic and potential energy and is all about the flow energy of a fluid stream. The Bernoulli equation is all about considering the energies, handling them of fluid, and neglecting the viscous forces. The last topic is energy equations, which is about the conservation of energy principle. As we know that while dealing with energy in fluid mechanics, the mechanical energy can be separated from the thermal energy and end, considering it an energy loss.
So without wasting time, let us start the article with the mass.
Conservation Laws
I w ...
Introduction
Welcome to the following tutorial in our raspberry pi four programming tutorial. In the previous tutorial, we learned how to build a raspberry pi four website monitoring tool. We say how beautiful soap is applied in browser automation tasks such as tracking website activities. But in this guide will discover how to utilize our Raspberry Pi 4 as a wifi repeater. If you want a lag-free wireless network, a wifi Wireless Adapter is exactly what you need. You may want to set up a wifi repeater if your signal is weak in certain rooms of your home or if you have entirely lost service in one or more rooms that are too small to accommodate your current network setup. If you want to increase the range of the wifi connection without breaking the bank or wasting a lot of energy, consider ...
Hi Friends! Hope you’re well today. Happy to see you around. In this post, I’ll walk you through How to Install PCBWay Plugin for KiCAD PCB Software.
Before we move further, let’s get a brief overview of KiCAD PCB Software.
KiCAD is a free and open-source electronic design application mainly developed to draw schematics and PCB layouts. It is open-source which means anyone can use it to develop and modify electronic designs. The tool can effortlessly run on Windows, macOS and Linux. The main window of the application comes with 8 different software tools used to make PCB layouts and schematics.
Hope you’ve got a sneak peek at the software. Now we’ll get to know how to install the PCBWay Plugin for KiCAD.
How to install PCBWay Plugin for KiCAD PCB Software?
When you install ...
Introduction
Welcome to the next tutorial in our raspberry pi programming. In the previous tutorial, we learned how we could run Xbox cloud on our pi 4. We found that we can run any game easily without lag or having raspberry pi shut down, proving that pi 4 is quite a powerful minicomputer. However, this tutorial will demonstrate how to use Python on raspberry to monitor websites. This Python program will execute on Pi 4 and watch over a website, alerting you whenever it changes or goes down. This is accomplished by keeping a straightforward webpage duplicate locally and monitoring for updates. This webpage monitor is straightforward, so it should work well on pi Zero. Throughout this tutorial, we will demonstrate how to develop your custom code to monitor a webpage. With this information ...
Hi Guys! hope you are doing great today! We come this time with a complete project to work out together starting from the point at which we sit with the client and receive the logical narratives that represent what they want to implement. We are going to start with a simple project this time and continue increasing the scale and complexity of the requirements through the incoming tutorials. The project we are going to implement today is one of the most common tasks that we can find in every place in our real life which is the control of the garage door. That could be found in private property or commercial buildings or public garages. Too many things need to be controlled in garage doors and several scenarios could come to your mind. However, take it as a rule of thumb that we design our p ...
Hi friends, today we are going to learn one of the most important instructions in the PLC ladder which is MOVE instruction by which we can move data between different memory storage including input, output, marker, and variables. Also, data of different data types and sizes can be transferred from source to destination and source memory locations. For example data types including char, string, integer, floating, time and date can be transferred between source and destination. Memory location like input, output, and marker memory area can be acting as source or destination. Furthermore, a mask can be utilized to customize and control the part of data to be transferred between source and destination. In that move with a mask, the instruction uses a source address, a destination address, and ...