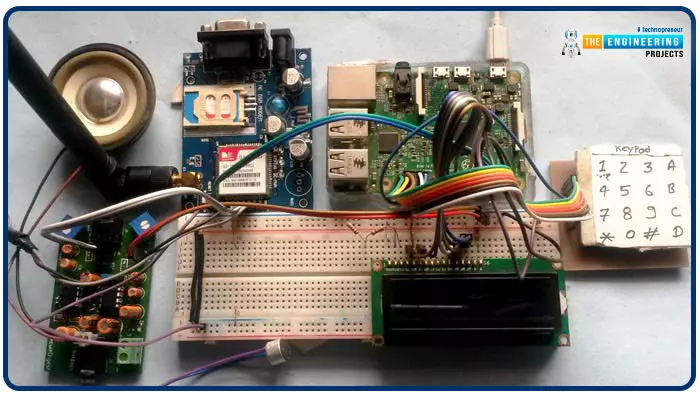
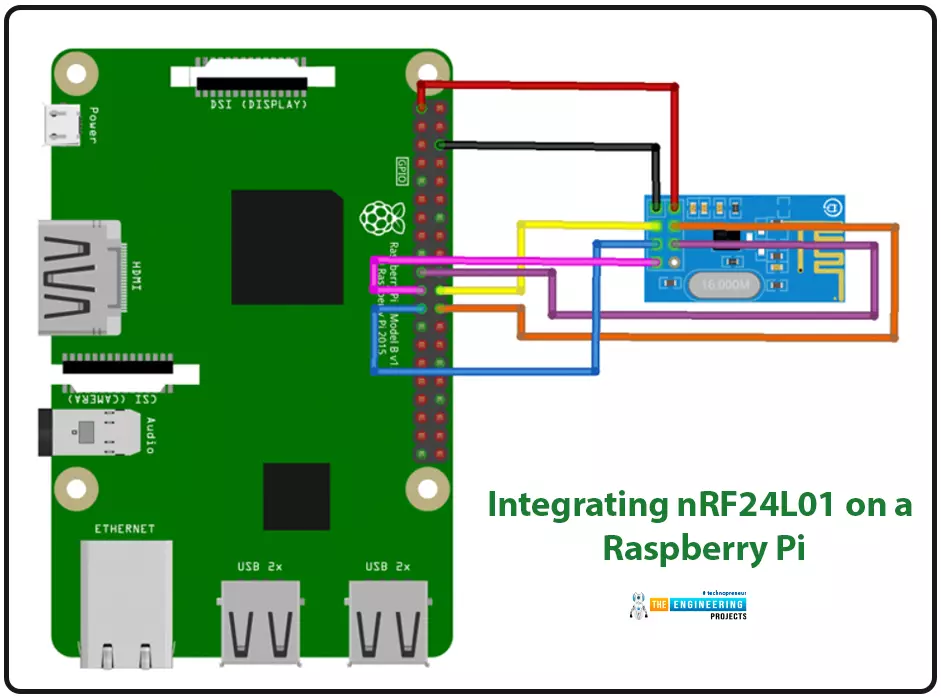
Hi Guys! Happy to see you around. Thank you for clicking this read. In this post today, I’ll walk you through Types of Cloud Computing.
Cloud computing is not a new term. Companies have been using this infrastructure for the past two decades. You might be familiar with this term, in case you don’t, cloud computing is the on-demand availability of computing resources over the internet. Simply put, you can process, store and manage a large amount of data using this architecture. The companies offering these services to end-users are called Cloud Service Providers (CSP). And most of these services offer the pay-as-you-go model which means you can ask for only those computing resources required for your business; you don’t pay for the resources you don’t use in the cloud computing model. This liberates you from using on-site data centers for managing data, and you get computing resources online including storage, processing power, and databases.
I suggest you read this post all the way through as I’ll thoroughly cover the Types of Cloud Computing and how they can be used for improving the activities of any business.
Scroll on.
Earlier on-site data centers were a norm for the management of large amounts of data, but cloud computing has gained momentum due to its ability to effectively manage and store the onslaught of data online. Moreover, since these resources are available online, you don’t need hectic IT drills to install, manage, scale or update traditional data centers. These data centers over the cloud are globally managed to give you access from anywhere in the world.
The following are the main types of cloud computing.
1: Public Cloud
2: Private Cloud
3: Hybrid Cloud
4: Community Cloud
No two clouds are the same and picking the cloud type is dependent on the business needs and requirements. Every cloud enables computing power over the network and allows the running of workloads within that system. These cloud models differ in terms of storage capacity, location, and accessibility but they all work on the same principle of virtualization. There is a lot of confusion in each type and I’ll try my best to remove these confusions so you can better understand what each type is all about. We’ll discuss them one by one in the section below.
Public clouds are typically created for businesses but they are not owned by the individual business. Public cloud providers manage and run these clouds and offer services to organizations based on their current needs and requirements. The common public cloud providers include:
This is the most cost-effective option for organizations that don’t have enough capital to invest in the development of IT infrastructure. Public cloud resources are shared by a variety of end-users which means this model is not made for a specific business. Instead, computing resources are shared among businesses of all sizes.
Although this is the preferably best option for businesses to handle a large amount of data, this model doesn’t guarantee the security of sensitive data since this architecture is shared by multiple organizations.
Moreover, this infrastructure offers less customization options and the service providers hold the main authority. A single tweak from the provider’s side can drastically impact your business. For improved security and better control over data, a private cloud is used.
In a private cloud, computing resources are owned by a single organization. This model offers two options: resources can be hosted on-site IT infrastructure or businesses can hire a third party to host their computing resources.
Compared to the public cloud, this model is a bit expensive since it gives you more customization power with improved security. Companies dealing with sensitive data can pick this model since here resources are not shared by a variety of businesses.
Private cloud, if hosted on on-site data centers, gives you the power to fully control the computing resources and make the adjustment based on your internal processes and preferences. Even though this model gives you more control, you require professional IT experts to handle and manage the private cloud on-site. If you don’t want to involve yourself in the nitty-gritty of handling complex IT infrastructure required for private cloud, you can get services from a third party to host and manage your resources on their system. This way you still own the private cloud but you require less technical expertise for handling this model.
Better security is another advantage that comes with a private cloud. Companies require a large amount of data to be handled and stored and in the public cloud that data is vulnerable to cyber-attacks since the computing resources are shared by multiple end-users. To prevent your sensitive data from being compromised or deleted, it is better to keep this type of data within your private security boundary so no one can manipulate your data for their advantage.
Hybrid cloud combines both private cloud and public cloud. You can share data and applications between two clouds using this cloud deployment model. This way workload is not handled by a single cloud architecture, instead, it is shared by two different cloud models.
For instance, organizations need unlimited storage capacity to store a large amount of data, public cloud comes in handy for this purpose for handling non-sensitive data. While, on the other hand, if companies want the processing of sensitive data on the premises of their business, the private cloud is the solution.
Hybrid models are common since they set you free from the long-term investment on a specific cloud model, instead, you can use the combination of both models and ask for required computing resources valuable for your business.
Community cloud is valuable for those sharing common business goals. A variety of businesses use cloud computing models including healthcare, education, manufacturing industries, IT sector, and more. Community cloud is suitable for companies falling under the same business model. For instance, organizations falling under the education sector can pick for community cloud with similar computing resources and storage power. Cost is another factor behind the popularity of this model. The resources cost is split between the organizations picking this cloud model.
If you’re still reading this post, it means you have got a clear idea about the four main types of cloud models. However, there are also less common cloud types used for specific purposes. These types include:
Don’t get confused. This is different from hybrid cloud. In a hybrid infrastructure, companies can get computing resources from both the private and public cloud. While Multicloud is not the combination of different clouds, instead it’s the provision of computing resources from two different cloud service providers. For instance, you can ask for public cloud resources from two different providers to avoid dependency on one single provider.
At its core, a distributed cloud is an architecture that runs from multiple locations but is not owned by a single organization. This model is used to meet the company’s specific performance and compliance needs and it does support edge computing but essentially is managed and controlled by the public cloud provider.
This model is particularly developed to support high-performance computing applications. This model is useful if you want to perform research on a large scale and are looking for a solution for advanced computing problems.
Every business is unique.
It’s your job to carefully monitor the activities of your business and put dedicated thought to pick the particular cloud computing model for your business.
How you want your data to be managed, processed, and stored does matter. If you want to handle a large amount of data, the public cloud is a valuable solution. And if you want the sensitive data to be processed locally, the private cloud is the answer.
And the best part?
You can deploy both private and public cloud models to selectively handle sensitive and non-sensitive data.
And if you don’t want to remain dependent on a single service provider, you can leverage the services of two providers and use them to your advantage.
Make sure you consider the proper security protocols before picking up the right architecture. A single mistake in the initial steps of choosing the cloud model can drastically impact your business in the long run. So be careful.
That’s all for today. Hope you’ve enjoyed reading this article. Share your experience with cloud computing in the section below. If you’re unsure or have any questions about cloud computing, ask me in the comment section. I’d love to help you the best way I can. Thank you for reading this article.
So far, the 2020s are turning out to be an era when engineering advances have come to the rescue of everyday consumers. That's true when it comes to convenience, safety, comfort, saving money, and efficiency. How can you make a plan to acquire your favorite tech products for the home? Start by choosing a few that are suited for your house or apartment, and then make a detailed budget to cover all the costs. Here's how to get started, along with a short listing of the current top selling favorite items.
The most appropriate way to upgrade your home's technology profile is to select several products that fit in with your lifestyle, personal preferences, and budget. Depending on where you live and how large your dwelling is, some items will make more sense than others. There are many real-life products of Internet of Things that pertain to your home. If you're not sure about how much energy it takes to operate your home annually, check with your utility company before selecting an energy-saving device. As well, evaluate your need for things like robo-vacuums, shower meters, and walkway lights. Some homes just aren't good candidates for every gadget that comes along. After making a plan, move on to the budgeting phase of the operation.
Unless you have enough cash on hand to finance a major purchase, it's wise to consider taking out a personal loan to cover all the costs of upgrading your living space. Keep in mind that unless you're exceptionally handy, you'll likely need to hire professional installers for some tech products. When creating a budget, include the cost of both the item and installation. If you intend to purchase extended warranties, add that cost in too. Working with a lender to apply for a personal loan is the most efficient way to deal with home improvement costs like security systems, specialized lighting, and others. Many consumers are surprised to realize how easy it is to pay for everything at once with a loan.
Cutting water use is easy with modern engineering on your side. Everyone has encountered the motion activated faucets in public restrooms. Now, you can install these same money saving devices in all your bathrooms, kitchens, and wherever there's running water. It might seem like a small issue, but smart faucets cut household water usage by as much as 10 percent for the average family. That means cutting utility bills significantly and saving money year-round.
If you like the ambiance and attractiveness of a lighted walkway in front of your house, check out some of the solar offerings available at improvement retailers. You can go small or extravagant with this project, but the upshot is that there's no wiring or electrical cost because the entire arrangement uses solar power. Some homeowners choose to line every cement or paved area with these lights. Not only do they look great and make your home literally shine after dark, but they help prevent falls.
Robo-vacs have been on the market for nearly two decades, but today's versions are better than ever. For one thing, they're quieter. They also use less energy, can monitor their paths with more precision, and come with high-tech filters as well as larger dust containers. For apartment residents, there are smaller vacs that are easier to store and don't take up much space. The high-end robo-vacs are lightweight powerhouses that do an excellent job of cleaning hardwood floors, linoleum, thick rugs, and numerous other surfaces. Some can automatically change their power levels based on the surfaces they detect.
Recent breakthroughs in engineering made these clever gadgets possible. Not only do they measure the amount of water you're using or have used, but they also monitor the temperature to deliver a total readout of how much energy and water you use when showering, washing hands, or taking a bath. Meters are a convenient way to become aware of precisely what it costs to do ordinary daily chores and adjust your activities accordingly. For large families, cutting water usage in baths and showers can chop a sizeable chunk off the monthly bills for water and the electricity used to heat it.
For those who like to minimize electricity use, the newest smart power strips can work in any room where you use multiple appliances. These days, that means pretty much every room in the house. Each strip includes several smart outlets that use motion detection to turn off things like lamps, TVs, and audio systems when they sense no human presence for a specified amount of time. Some of the outlets are standard, always on versions like you already have on your walls. The beauty of smart strips is that you'll never have to worry about leaving the lights on again.
The latest security devices are all-around wonders that can detect any movement of windows and doors all through the house. Plus, you can monitor the entire system via an app on your phone, desktop computer, or from any remote device. Whether you're taking a nap or away on vacation, it's easy to set alarms that tell you when someone is attempting to enter your home. These ingenious products are ideal for any owner but especially for families who have small children and for adults who live alone.
Hello Folks! Glad to have you on board. Thank you for clicking this read. In this post today I’ll walk you through What is Cloud Computing?
Cloud computing is not a buzzword anymore. Even though most companies are familiar with this term, they don’t know what it does and how it works. If you’re one of them, this read is for you. In simple terms, cloud computing allows you to use computer system resources over the internet. This means you can manage your data remotely over the internet from anywhere in the world. We’ll touch this further in our article.
I suggest you read this post all the way through as I’ll cover what is cloud computing, how does it work, the types of cloud computing, the advantages of cloud computing, and the future of cloud computing.
Let’s get started.
Cloud computing is a way of storing, processing, and managing data over the internet. Simply put, it’s the on-demand availability of IT resources online. These resources include data storage, computing power and databases. This way you don’t need to worry about handling data over the computer’s hard drive or on-site data centers. This liberates you from managing hardware circuits, software patching, and on-site IT drills, giving you online access over data centers through which you can efficiently manage and process your data.
With the onslaught of IT workloads, companies harness the power of cloud computing. It’s not only fast, economical, and secure, it also gives better control over data. No matter your location, as long as you have access to the internet, you can control your information online.
Google Drive and Dropbox are the best examples of cloud computing where you can access and manage your information online. Companies can use it for regular tasks like data processing, data management, software development, data protection, backup and disaster recovery, server virtualization, data analytics, and other real-time applications.
There are three basic parts of cloud computing.
1: Device (like computer, tablets, smartphones) through which you access data
2: Cloud with data centers where data is stored and processed
3: Internet which connects cloud with the device
You might be familiar with the term client-server model. Here user with the device is the client and the cloud with data centers are the servers while the internet connects the users with data centers.
Prior to cloud computing, handling and storing data was challenging. Companies used to install their own data centers that required proper maintenance and regular on-site check-ups to make sure they were running well, which resulted in more oversized bills and more space to accommodate them. It was impractical, expensive, and less efficient.
But cloud computing has dramatically changed this behavior. Now companies don’t need to worry about maintaining, scaling, securing, and managing their IT infrastructure, instead, they can focus on providing a better user experience with quality products. The organizations get these reousrces with pay-as-you-go terms which means the more resources they use the more they pay over time.
Companies that provide cloud computing services often offer monthly subscriptions and give users access to their computing resources. They don’t need to get in the hassle of updating servers, buying software, getting more machines to back up the data, and updating software to avoid potential security threats. The service provider takes care of all of that for them.
Cloud computing is perfect for businesses that have a lot of data to deal with. Cloud computing is mainly divided into three major types.
The public cloud offers compute resources like storage, memory, networking, and CPU. Public cloud vendors host these resources with globally and fully managed data centers. You can pay the vendors and rent these resources to develop your IT infrastructure.
The managed services in the compute resources include security systems and database servers that set you free from the hectic drill of managing and installing the whole solution into your local and on-site data centers.
The common leading providers of cloud computing services include Amazon Web Services (AWS), Google Cloud Platform (GCP), and Microsoft Azure. You can hire the compute resources from these vendors as per the needs and complexity of your business operations.
The public cloud is shared by a range of organizations while the private cloud, on the other hand, is specifically developed to meet the business needs of a single organization.
Some businesses don’t feel comfortable working with the public cloud. They want their separate and private cloud on their on-site data centers. Private cloud is perfect and ideally suited for single private organizations.
Two options there: companies can host private cloud or they can involve third-party vendors to host their private cloud on their system. This gives them the ability to immediately get access to the compute power based on their businesses. This setup is best for businesses that are a bit obsessed with the security of their systems.
Hybrid cloud gives you the ability to combine both public and private cloud and use them to your advantage. You can use either of them for a specific purpose. For instance, you may want to get unlimited storage space from the public cloud but you want to process the sensitive data on your private cloud.
This means if you running out of computing resources from the private cloud you can get the services of the public cloud to fulfill your business needs. It gives businesses advanced flexibility to move data across both clouds without a full commitment to the public cloud’s vendor.
And cost management is another blessing that comes with hybrid cloud. If you own a private cloud you need to install data centers on-site which require proper care and a capital expense. But with the public cloud, you only pay for resources without having to worry about the management of data centers.
Now you know what is cloud computing and how does it work. Perfect. There are several advantages of cloud computing. A few of them include:
Cloud computing becomes a necessary part of the business as the requirement to manage and store a large amount of data grows. And this trend will definitely increase as managing data in on-site data centers is not only expensive, it requires a lot of IT drills to properly install and maintain machines handling and storing data.
We can expect the following future trends in cloud computing.
Digital transformation is on the rise. And in this era where technology is changing at an accelerated pace, it’s necessary to come up with advanced solutions to manage, store and process your data.
Cloud computing is now a part and parcel of successful organizations. But still, companies, who have reservations about the security of cloud computing, hesitate to transfer their data to a remote location.
For those hybrid model gives the perfect solution where you can get the advantage of both cloud services. For sensitive data, you can pick the private cloud while for the storage of regular and less sensitive data you can choose the private cloud. This way you can move your data and scale your compute resources as per the complexity of your business.
Not to mention, cloud computing has just started. And as the requirements and demands of businesses go complex, companies need powerful systems that not only store their data but also offer advanced processing capabilities. With new advancements in IoT technology and Artificial Intelligence, more businesses will likely adopt cloud computing for the years to come.
That’s all for today. Hope you’ve enjoyed reading this article. If you are unsure or have any questions about cloud computing, feel free to ask me in the section below. I’d love to help you the best way I can. Thank you for reading this article.
Welcome to chapter 8 of our python tutorial. In the previous chapter, we learned about Python numbers and how to use them in expressions. Throughout this chapter, you'll look at frequent examples of incorrect Python syntax and learn how to fix them.
At the end of this tutorial, you will:
Before transforming your Python code to Python byte code, the interpreter parses it. The parsing stage is where the interpreter searches for any instances of improper syntax in the program. Using the wrong syntax in your Python code will lead the interpreter to be unable to decipher it. The interpreter will try to show you exactly where the issue occurred.
Learning Python and encountering a SyntaxError can be a frustrating experience. If you're having trouble figuring out where the grammatical errors are, Python can provide you with a traceback that can be helpful. It's not uncommon for the resulting code to be nothing short of spectacular.
Please keep in mind that even if your code is syntactically valid, you may encounter other issues.
In Python, unlike other exceptions, improper syntax cannot be tolerated. Even if a try and except block was used to enclose code with incorrect grammar, the interpreter would still throw a SyntaxError.
When an erroneous syntax in Python code is encountered by the interpreter, SyntaxError is thrown, and a traceback is supplied with some important information to aid in tracking the issue. Here's a Python script using the wrong syntax:
Line 4 of the dictionary literal contains a syntax error. There is no comma after 'Jim' in the second entry. Running this code in its current form would result in the following error message:
According to the traceback message, the fault does not line 4, but line 5. The Python interpreter highlights any errors in the syntax. However, it can only accurately pinpoint the moment when a problem was first discovered. If you receive a SyntaxError traceback and the code it refers to appears to be correct, works backward until you figure out what is wrong in your code.
In the example above, depending on what comes after it, it is not an issue to leave out the comma. A missing comma following the name of the person in line 5 ('michael') is not an issue. The interpreter, on the other hand, can only point you in the direction of the first thing it couldn't understand.
A SyntaxError traceback contains a few features that can assist you to figure out where your code has the incorrect syntax:
There was a caret in the dictionary key at the end of Michael's closing quotation in file name theofficefacts.py, line number 5. The SyntaxError traceback may not be the root cause of the problem, but it will be the first time the interpreter fails to understand the syntax.
Python also throws two additional exceptions. They're similar to SyntaxError, but they're called something else:
Both of these exceptions derive from the class named SyntaxError, although they only apply in special cases involving indentation. When your code's indentation levels aren't aligned, an IndentationError is thrown. When tabs and spaces are used together in the same file, a TabError is thrown. A detailed discussion of these exclusions will be provided in the next section.
When you first run into a SyntaxError, it's a good idea to look into what went wrong and how you may correct the Python code's syntax. Some of the most common causes and fixes for SyntaxErrors are covered in the following sections.
In Python, there are several situations where you won't be able to assign values to objects. Assigning to literals and calling functions are two instances. You can see a few examples of this in the code block below, along with the SyntaxError tracebacks that result:
In the first example, the value 5 is assigned to the len() method. In this case, the SyntaxError warning is really valuable. It notifies you that you can't give a function call a value.
In the third and second examples, literals are assigned a string and an integer, respectively. For other literal values, the same rule applies. According to the traceback messages, the issue appears to be caused by trying to set the value of a literal to a specific value.
Take notice that the traceback fault isn't indicated in the previous samples by caret () and repeated code line. You'll notice a different error and traceback depending on whether REPL is being used or running the code from a file. As you've seen in earlier examples, an error caret would indicate where the problem would be in the file if the code was contained therein.
Using a function or assigning a literal value is extremely unlikely. This can be caused by removing one equal symbol (=) from the expression, which transforms the assignment into a comparison. A comparison like the one that follows might be useful:
A Boolean expression may be the cause of Python's warning that you're assigning a value to a variable that cannot be assigned to. While assigning an object's value (which you'll learn about in the next section), you may encounter this same problem.
When using Python, you'll want to stick to terms that have a specific meaning. Identifiers, variables, and function names cannot contain any of the words listed below. The only environment in which they can be utilized is within Python.
There are three typical ways that you might improperly utilize keywords:
If you misspell a term in your Python code, then you’ll get a SyntaxError. For instance, this happens when you spell the keyword "for" wrong:
There is a notification that reads "SyntaxError: incorrect syntax," but it doesn't provide much assistance. Using the traceback, you can go back to the point where Python first discovered an issue. To fix this problem, check your Python code to make certain that all of its keywords are spelled correctly.
Another typical issue with keywords is when you overlook them altogether:
Because of this, traceback does its best to direct you to where you should be looking. You'll see that the for-loop syntax lacks the in keyword when you step back from the caret.
You could potentially make a mistake with a Python keyword that is protected. The use of keywords is restricted to specific contexts. The incorrect syntax will result if you use them incorrectly.
'Continue' or 'break,' for example, are frequently used outside of a loop. When you're working on something and move logic out of a loop, it's easy to run into this problem:
Python does an excellent job of describing what's wrong in this scenario. The messages "'break' outside loop" and "'continue' not suitably in the loop" will guide you to the next step. Python would have the caret pointing to the incorrect sentence if the code was stored in a file instead.
Another possibility is to use a keyword to construct a function or to attach a Python keyword to a variable:
If you attempt to set the value of pass or create a new function called pass, you will receive a SyntaxError and an "invalid syntax" message.
Because the code appears to be fine from the outside, it may be tough to correct this type of poor syntax with Python programming. A SyntaxError may occur even if your code appears to be correct. In this case, look up the variable or function name in the Python version's keyword list.
Every time a new version of Python is released, the list of protected keywords grows. The term "await" has been introduced to the list of keywords in Python 3.7 and is now available as a variable or function name in Python 3.6. Any attempt to use await as an object name in Python 3.7.1 or later will result in an error.
Another difference between Python 2 and Python 3 is the print function:
A value can't be provided for print in Python 2, since it is a keyword. The built-in function can take values in Python 3, though.
Running the following command in any Python version will return a list of keywords.
In addition, the keyword offers the relevant keyword .iskeyword(). Using the one-liner below, you can rapidly verify the value of the pass variable.
Your identification will be immediately flagged as either keyword or not by this code.
A missing or mismatched terminating parenthesis, bracket, or quotation is frequently the root of erroneous syntax in Python code. As a result, it may be difficult to tell nested parentheses from the rest of the text, especially in long lines. It is possible to discover mismatched or missing quotations with the use of tracebacks provided by Python.
The traceback leads to the wrong code, which includes a t' after a single closing quotation. One of two adjustments can be made to correct this:
The failure to terminate the string is also a common problem. Regardless of whether a string is double-quoted or single-quoted, the following is true:
In the traceback, the caret now points straight to the incorrect code. "EOL during scanning string literal" is explicit and helpful in identifying the issue in the SyntaxError notice. Before a string may be ended, an interpreter must reach the end of a line. To remedy this, add a quote at the end of the string that is identical to the one you used at the beginning. In this scenario, there would be a double quotation (").
Syntax errors can also be caused by missing quotes from statements within the f-string:
An error has occurred when it comes to f-string output. The double quotation marks at the end of the age dictionary reference have been left out. The resulting traceback is as follows:
The f-string contains the problem, and Python tells you about it. The error message "unterminated string" also clarifies the situation. The caret simply symbolizes the beginning of the f-string in this example.
This isn't as beneficial as when the caret points to the f-issue string's area, but it does assist narrow down where you need to search. Inside that f-string, there's an unterminated string. All you have to do now is figure out where. Remove the error by including all of the f-string quotes and brackets inside.
Except for removing parenthesis and brackets, the scenario is essentially the same. An error message will appear if the ending square bracket of a list is left out in Python. There are, however, several variations on this theme. The first option is to leave out the final bracket:
There will be an error message when you run the above code when there is a problem with the print() call.
Print(foo()) returns a list with three items: 1, 2, and 3 according to Python. It employs whitespace to logically order things, and because 3 and print(foo()) don't have a comma or bracket between them, Python combines them as the list's third entry.
After the final item in the list, you can use a trailing comma instead of a closing square bracket:
Now you receive a different traceback
Previously, 3 and print(foo()) were combined into one component, but now there is a comma between them. The print(foo()) command has been added to this list because Python has reached its conclusion of the file without a final encasement. An EOF error was returned by Python, which was expecting a different outcome.
The repeated line and caret aren't very useful in this scenario because Python was anticipating a closing bracket (]). Python has a hard time detecting missing brackets and parenthesis. Starting with the caret and working backwards is sometimes the only way to figure out what's missing or incorrect.
Congratulations! You've made it to the end of this tutorial. You've been exposed to a few reasons why you may face syntax problems when programming in Python, and so in the following chapter, we will look at a few additional reasons for syntax issues. With this, you can create Python code with fewer syntax problems. Let's meet in the next tutorial for more.
There are many comparator operations like equal (==), not equal (<>), less than (<), greater than (>), less than or equal (<=), greater than or equal (>=). All these comparator operations might be used in different logic scenarios while writing a ladder logic program. In this tutorial, we are going to go over each operator showing the input operators and output as well. In addition, we will practice some examples with the simulator to familiarize how to use them flexibly while developing ladder logic programs.
Because they are used for comparing two the value of input variables, there will be two operators which are being compared. these input variables could be of any data type i.e. integer, real, boolean, character, string et cetera. And the output will be a boolean data type which denotes true or false, or “0” or “1”. As shown in Fig. 1 a typical comparator operator has two operands and one output which is called the result of logic (RLO).
Fig. 1: Comparator operation bock diagram
Table 1 lists examples for one of the comparisons between two variables of different data types and their output. In table 1, a typical example of “==” comparator operation between two strings considering the case sensitivity. The first column shows the values of the first operand and the second column shows the values of the second operand while the result of a logical operation (RLO) is represented in the third column. Now let us go over the station of each comparator operation for elaborating their operators, result, and give an example with simulation.
Table 1: example of comparator operation’s operands and RLO
The equal operator is used to check if two operands are equal or not. The input operands’ datatype could be any of the possible data types in the language you are using. For example, Table 2 shows the parameters of the Equal operator in siemens S7. As you can notice, the input operand’ datatype can be any of the listed data types in the third column. One thing we need to highlight here is that datatype could be an array or structure of elements of the basic datatypes. For example, it could be an array of integers. In this case, the comparison will be conducted between every single element in the array of both operands. And if any of these elements have been found not match their equivalent in the other operand, the RLO will be false. Furthermore, the comparison not only does it apply to variables but also could be conducted between memory areas as shown in the third column. It can be used to compare input, output, marker, counter, timer memory data.
Table 2: the parameters of the Equal comparator operator
Figure 2 depicts an example of an Equal comparator operation. .it compares literal constant with the variable of type integer saved in marker memory MW4 which is the location of a memory word.
Fig. 2: Example of Equal comparator operator
Figure 3 shows the simulation result of an example of an equal comparator operator. In the case of operands are not equal as in the example shown by fig. 3. The first operand is equal to 5 while the second operand is “0”. So the RLO shows false or “0”.
Fig. 3: simulation result of equal comparator operation when its operands are not equal
Figure 4 shows the simulation of an equal comparator when its operands are equal. The RLO is true or “1”. So the output coil is TRUE.
Fig. 4: simulation result of an equal operator when operands are equal
This operator is used to compare two operands. When they are not equal it produces positive RLO with High logic and when they are equal it returns false or “0”. Figure 5 shows the test result on the simulator of the NOT operator when the operands are equal. It returns RLO with “0” or false.
Fig. 5: simulation result of Not equal operator when operands are equal
On the other hand, fig. 6 shows the result of the simulation of the NOT operator when its operands are not equal. It gave RLO with logic Tru or “1”.
Fig. 6: simulation result of an equal operator when operands are equal
The greater than comparator operator is used for checking if operand 1 is greater than operand 2 or not. Figure 7 shows the rung of a ladder logic program that utilizes greater than comparator operation in which two operands of the integer data type are compared using the greater-than operator. The first operand is at memory location MW4 and the second operand is at memory location MW2. And the RLO represents the retuned result of the greater than comparator operation.
Fig. 7” ladder logic rung example of usage of greater-than comparator operation
Figure 8 shows the results of greater than comparator operation when operand one B is not greater than operand A. on the left side of the figure, it shows the case when both operands are equal and the right side shows the case when operand one is less than operand 2. In both cases, greater than operator sees its condition is not fulfilled so it returns false or “0” at the RLO and hence the output is false.
Fig. 8: simulation results of a greater-than operator when operand 1 is not greater than operand 2
The less than comparator operator is used for checking if operand 1 is less than operand 2. Figure 9 shows a rung of a ladder logic program that utilizes less than comparator operation “A<B” in which two operands of the real data type are compared using the less-than operator. The first operand is at memory location MD8 and the second operand is at memory location MD12. And the RLO represents the retuned result of the greater than comparator operation. Also, it shows that, when oper1 is not less than oper 2, the result of logic output RLO is false and output is not activated.
Fig. 9: ladder logic rung example of usage of less-than comparator operation
Figure 10 shows the results of less than comparator operation when operand “oper1” is less than operand “oper2” the returned RLO is high or “1” and the output is activated. Now, one may question the case if the two operands are equal? Well that is is a good question and the case of equality between the two operands is considered false for both less than and greater than comparator operations.
Fig. 10: simulation results of less than operator when operand “oper1” is less-than operand “oper2”
Please see fig. 11 which shows the less comparator operation returns false when the two operands are equal. The next section will show the case of greater than or equal comparator operators “>=” and the less-than or equal comparator operator “<=”. In those cases, the equality between the two operands is included and the returned RLO is True or “1”.
Fig. 11: the less-than operator returns false when the two operands are equal.
Figure 12 shows a run in a ladder logic program that uses greater-than or equal “>=” operator. As you can see, the output shows true when the two operands are equal.
Fig. 12: greater-than or equal “>=” when two operands are equal
Figure 12 shows a run in a ladder logic program that uses less than or equal “<=” operator. As you can see, the output shows true when the two operands are equal.
Fig. 12: the less-than or equal “<=” when two operands are equal
Do all comparator operations take two operands? The answer is almost yes. However, there are very few operators that take only one operand. For example, the in-range operator compares the input operand with upper and lower limits to check if it is located within a specific range or not. Figure 13 shows a ladder logic rung uses that comparator operator to check operand oper1 of type real to see if it is in the defined range which is between 0 to 10.0. because the value of the operand oper1 is 11.5 which is out of the defined range. The RLO shows false or zero. Therefore, the output is deactivated.
Fig. 13: in-range comparator operation for the real data type variable
Figure 14 shows the RLO is true when the operand’s value is located between the defined limits of the in-range block. Also, there is out range comparison operator that is the opposite of the in-range operator about the logic.
Fig.14: in-range comparator operation returns true when operand located in the range
In this section, we want to show you how these comparator operators can be combined to achieve a logical expression in ladder logic programming. let us imagine a scenario that we have a garage with a full capacity of 100 parking spots and we utilize a counter to count up cars get in and count down the cars that get out of the garage. Figure 15 shows a very simple logic of the validation and comparison to decide if the garage has room for a further car or it is full and no further car is allowed at present. Assume that the output of the counter is an integer data type variable that is stored in memory location %MW20. Now you can see the logic is straightforward. In the first step, the counter output is validated to make sure that it plays in a valid range which is from 0 to 100 which denotes empty to full capacity of the garage. It applies the limit function to the counter in case it is out of range to reset it to be within the designed range. Then program checks in the second step the value if it is less than the full capacity of the garage which is designed to be one hundred cars, it states true indicated with green lamp output meaning there is still room for cars to get in the garage; otherwise, it checks if it is greater than or equal of the maximum limit meaning there is no room for further cars to enter, it shows false meaning garage is full at the current time by activating a red lamp.
Fig. 15: garage status ladder logic example
Figure 16 shows the case when the garage still has room for further cars and the green lamp is activated for incoming cars.
Fig. 16: when the garage has room for further cars
Figure 17 shows the case when the garage is full and has no room for further cars. So the red lamp is activated for telling users no further empty spots available at the moment.
Fig. 17: when the garage is full
As usual, I want to express my delight in your following up our tutorial, and let me take this chance to announce one of the most important and exciting tutorials which are about processing the analog inputs and how to scale the analog inputs. Did I tell you my friends that will be the next chapter? So be ready for enjoying processing analog inputs with practicing real-life situations in the industry.
We'll go over a couple more arithmetic functions and complex numbers in this lesson. I will try my best to keep it simple. Let's get started!
As an added bonus, you'll discover how to test for the existence of an integer value using a floating-point number.
It's possible to round a number with round():
Round() acts strangely when the integer ends in .5.
2.5 is reduced to 2, and 3.5 is increased to 4. We'll dig a little deeper into this because most people assume that a decimal number ending in .5 is rounded up.
Python 3 uses a mechanism known as rounding ties to round numbers. The term "tie" refers to any number with a fifth digit. 1.37 is the only one that is not a tie.
One decimal place left of the last digit is all that is needed to break even integers down into their constituent parts. You round to the nearest whole number if the digit is even in this case. When an odd-numbered digit is entered, you round up. Hence, a reduction of 2.5 rounds to 2 and a rise of 3.5 rounds to 4.
When dealing with floating-point numbers, the IEEE advises against using anything but rounding ties because of their reduced influence on procedures involving a large number of values.
With over 350,000 members from over 150 countries, the IEEE is the biggest technical professional society in the world. An organization committed to the advancement of electrical and electronic engineering and computer science theory and practice has been established.
IEEE 754 is an IEEE-maintained standard for using floating-point integers on computers. It was first published in 1985, and is still widely used by hardware manufacturers today.
In order to round a value to the desired number of decimal places, a second argument to round() might be utilized.
3.142 and 2.72 is the result of rounding the numbers 3.14159 and 2.71828 to three decimal places, respectively.
There must be an integer as the second argument to round() Python raises a TypeError if it isn't.
In some cases, round() does not get the answer quite right:
Because it is exactly halfway between 2.67 and 2.68, the number 2.675 is a tie. The expected result of round(2.675, 2) would be 2.68, but Python produces 2.67 instead since it rounds to the nearest even value. Errors in floating-point representation are to blame, not a rounding problem ().
Floating-point numbers are irritating, but this isn't a problem specific to Python. C/C++, Java, and JavaScript are all affected by the same flaws in the IEEE floating-point standard.
Although floating-point numbers have a small amount of error, the outputs for round() are still useful in most cases.
If n is positive, n`s absolute value is n, and if n is negative, it is -n. Examples include 3 and 5, which each have their own distinct absolute values.
In Python, abs() is used to get the number's absolute value.
A positive integer of the same type as its input is returned by the abs() function every time it is invoked. To put it another way, when it comes to absolute values of integers and floating points, they are both always positive integers.
The ** operator was previously used to raise a number to a power. If you want, you can use the pow() function instead.
There are two arguments to pow().
In order to raise 2 to its exponent 3 in the following example, we can utilize the pow() function.
It is possible to have a negative exponent in pow():
** and pow() are two different functions, so what's the difference between them?
With a third optional input, the pow() function takes the first number as a modulo, and then computes the second number's power. If (x ** y)%z is what you're looking for, then Pow(x, y, z) is the same thing. To illustrate, consider the following scenario:
Eight is the result of raising two to the power of three. 8 % 2 returns reminder 0 since 2 divides 8 by itself.
Functions like .lower(), .upper(), and .find() may be familiar to you. There are also ways for converting between integers and floating-point numbers, as well.
There is a handy number approach that isn't utilized very often .is_integer() method of floating-point numbers. In this case it returns True, otherwise it returns False.
.is_integer() can be used to verify user input. When placing an order for pizza, you'd need to make sure that the customer entered the correct amount of pizzas in the order form.
Using the built-in functions round(), abs(), and pow() does not require any additional imports. But these are just three of the many functions available in Python for manipulating numbers.
In order to get user input, use input():
A last blank space can be seen at the conclusion of the prompt string, for your convenience. This guarantees that the colon in the prompt is separated from the user's input when they begin typing.
It is necessary to first convert the input() value to float before rounding it:
If the user input string does not contain a numerical number, the above code thinks that it does.
The value can now be rounded to two decimal places using the round() method.
To round an integer, pass it as the first parameter to the round() function. You can choose how many decimal places you wish to round to in the second input field.
Using an f-string, enter the rounded number to print the result.
Even though round() is fantastic, if you're only interested in rounding numbers for display purposes, you'd be better off utilizing the methods mentioned below.
Languages for document formatting determine how printed text and visuals should be organized. Text formatting notation, page description languages, and, most broadly, markup languages are all subclasses of markup languages that specify the intended purpose of a document.
When a user requests a list of numbers, they must first enter those values into a string. To do this using f-strings, you can use curly brackets to surround the variable assigned to a number:
A simple formatting language is supported by those curly brackets, which can be employed to change the appearance of the final formatted string.
Instead of using curly brackets to format n to two decimal places, use n:.2f instead.
An extra colon (:) indicates that everything following it is part of a special formatting rule. As you can see, the.2f standard is used in this case.
A fixed-point number is displayed in Python using .2f since the .2 will truncate the result to the nearest tenth of a decimal place. If the number is less than two decimal places, there will still be two decimal places displayed.
The answer to n:.2f is 7.12 when n is 7.125. Python rounds to the nearest integer, just like round() does, when it comes to formatting integers in strings. If you substitute n = 7.126 for n = 7.125 in n:.2f, you get 7.13:
Replace .2 with .1 to get the decimal rounded up to one place:
Your chosen decimal place count is always displayed in the fixed-point number.
The , option allows you to use a comma for separating the integer portion of huge integers by thousands:
The , should be included before the .in in your formatting specification when rounding off or grouping by thousands.
Currency values can be displayed by using .2f.
% Is a useful option for displaying percentages.
Using the percent option at the conclusion of your formatting specification is mandatory, and you cannot use the f option with it. As an illustration, .1% shows a number with one decimal place exactly:
Group thousands by commas when printing the number 150000. There should be two decimal places on all currency displays, and the dollar sign should always appear first.
One step at a time, let's build up our F-string.
F-string 150000 without any formatting looks like the following:
Set yourself prepared to add the formatting specifiers by putting this in place first.
It is possible to display the value as float by using a colon (:) after both 150000 and letter f.
A precision of six decimal places is the default setting in Python. There should only be two decimal places in your currency, so you may just add . 2 between the : and the f:
Make sure the number is shown in its entirety by including a colon (:) after the number and before the period (.).
There should also be dollar signs ($) to indicate that the price is in US dollars.
Because it is so uncommon in other programming languages, Python has support for complex numbers right out of the box. Python's support for complex numbers, while uncommon outside of scientific computing and computer graphics, is a major plus for the language.
It is common knowledge that a complex number contains two components: a real component and an imaginary component.
When writing complex numbers in Python all that is required is to write the real component, the plus sign, and then the imaginary section with the letter j after them.
This is what we see when we look at the number n in Python's code:
Thus, the output is no longer misinterpreted as a mathematical expression when it is shown in this way.
The real and imagistic components of an imaginary number can be retrieved using the .real and .imag characteristics:
Even though the real and imaginary components were defined as integers, Python nevertheless delivers them as floats.
The conjugate of a complex number can be found using the .conjugate() method.
Find the complex number whose real part and imaginary portion are the same as the opposite-sign complex number's conjugate.
Unlike .conjugate(), the .real and .imag properties do not require parentheses following their names.
Instead of calculating a complex number, the .conjugate() method returns data about the number, while the .real and .imag methods just provide information.
In object-oriented programming, the distinction between methods and properties is critical.
Float and integer arithmetic operators, with the exception of the floor division operator (//), all function with complex numbers. For the sake of keeping things simple, complex arithmetic's mechanics are outside the scope of this article. Rather, consider the following arithmetic examples that demonstrate the use of complex numbers and operators:
The .conjugate() method for int and float objects is interesting, but not surprising, from the perspective of mathematics.
Conjugated numbers are returned when using .real and .conjugate(). However, while using .imag, it always returns 0. As long as the number is an integer, .real and .imag will return integers; if it is an unsigned int, they will return floats as long as it is an integer.
It's possible that you're wondering when you'll actually need to employ complex numbers. In Python, you may never have to deal with complex numbers unless you're doing data analysis or web development.
Science and computer graphics necessitate complex numbers for computation. Because of this, when dealing with complex numbers, Python's built-in support is handy.
What you'll learn in this tutorial is how to:
With this in mind, let`s start.
Integers can be created by simply inputting a number. For example, the tutorial variable is assigned the integer 6 in the following way:
>>>Tutorial = 6
In this case, the integer literal is 6 since it is written into the code exactly as it appears. Using int () and str (), you can turn a string containing an integer into a number (). Commas or decimal points are commonly used to separate digits in huge quantities written by hand. When compared to 1000000, the value 1,000,000 is easier for reading. Use underscores (_) instead of the commas (,) if you want to separate digits in an integer literal. Integer literals of one million can be expressed in one of the following ways:
There is no limit to the size of an integer, which may seem unexpected given that computers have a finite quantity of storage. Atom`s interactive window may be used to enter in the largest number you can think of and Python will be able to run it with no problem.
Numbers having decimal places are called floating-point numbers. -1.75 is a floating-point number, just like 1.0. float is the name of the data type for floating-point numbers:
>>> type (1.0)
<class 'float'>
A floating-point literal or a text converted to a float using float () may be used to construct floats, much like integers.
It is possible to express a floating-point literal in any one of three ways. There are various ways to construct a float literal with a value of one million.
To produce integer literals, you can utilize the first two techniques. An E notation float literal is also used in the third technique.
Numerical values that might otherwise result in a lengthy string of digits in decimal form can be expressed using the E notation.
You can use E notation to write a floating-point literal by starting with an integer and ending with a value. The number before e is multiplied by 10 raised to power the value that is after e. This means that 1e6 is comparable to 1×10⁶.
Displaying very big floating-point integers with E notation is also possible in Python.
It is true that floats have a maximum size, unlike integers. Your system's maximum floating-point number will vary, but a value like 2e400 should be much beyond the capability of the majority of PCs. 2e400 is equal to 2×10⁴°°, which is a staggeringly large digit!
When you get close to maximum allowed float value, the specialized float inf is returned by Python.
The symbol "inf" represents infinity, and it simply indicates that the number you're attempting to compute exceeds the computer's maximum supported floating-point value. Inf is still a float type:
A negative floating-point value that exceeds your computer's minimum floating-point number is represented by the -inf keyword in Python.
If you're a coder, you're unlikely to see inf and -inf unless you deal with exceedingly high numbers.
Exercise 1: Create two variables, num1 and num2, by writing a python program. Integer literals 25000000 should be allocated to both num1 and num2, one written with underscores and the other without. Two distinct lines should be used to print num1 and num2.
In this session, Math operations such as multiplication, subtraction, addition and division will be covered. We'll also pick up a few coding standards for expressing mathematical ideas.
Anywhere you can, keep your whitespace free of trailing spaces. A backslash, space, and newline do not constitute a line continuation indication because they are both hidden. Pre-commit hooks in many projects including CPython itself reject it, and some editors do not save it.
Assigning (=), augmenting (+=, -=, etc.), comparing (==,!=, >, =, >=), Booleans, and comparison operators (is, isn't, is, isn't), as well as any other binary operators, should always be enclosed in a single space on either side (and, or, not).
If operators of the lowest priority are used, consider separating them with whitespace. Each binary operator should have precisely the same number of whitespaces on either side.
The + operator is used to perform addition operations:
>>> 1 + 2
"Operands" refers to the values placed before and after the plus sign (+). This example uses two integers, but the type of operands does not have to be the same.
Adding an int to a float is as simple as this:
The sum of 1.0 and 2 is a float, as shown is 3.0. When a float is multiplied by another float, the output is always another float. It is always an int when two integers are added together.
PEP 8 proposes using a space to separate the operands of an operator.
Despite the fact that Python is capable of evaluating 1+1, many programmers prefer the more readable 1+1. All of the operators in this section should follow this general rule of thumb.
To perform subtraction, you need to use the - operator between the integers.
An int is always produced when two integers are subtracted. The outcome is always a float when one of the operands is a float.
To express negative values, the - operator can be used as follows:
>>> -3
Output: -3
Even though it may appear to be strange, subtracting a negative from another number is possible.
The first of the four instances are the most in line with PEP 8. It's possible to make it extra clear that the second - is altering 3 by placing parenthesis around it.
In order to make your code clearer, it is recommended that you utilize parenthesis. Despite the fact that computers are able to run code, humans are only able to read it. Your code should be as readable and understandable as possible.
Use the * operator to multiply two numbers:
There are no exceptions to this rule when it comes to multiplication. When you multiply two integers, you get an int, and when you multiply a float by a number, you get a float.
When two numbers are to be divided, the / operator is used:
The / operator always returns a float, unlike addition, subtraction, and multiplication, which yield integers. You may use int () to ensure that the result of dividing two numbers is an integer:
It is important to note that the int () function discards any fractional parts of the number
The floating-point number 2.5 is obtained by dividing 5.0 by 2, while the integer 2 is obtained by subtracting .5 from the result of int (2.5).
The operator (//), often known as the floor division operator, can be used instead of the cumbersome int (5.0 / 2):
First, the / operator splits the numbers on each side of it, and then rounds down to an integer. When one of the values is negative, you may not get the expected result.
For instance, -3 / 2 produces -2. The first step is to divide -3 by 2 to get -1.5. Then -2 is rounded to the nearest -2. -1.5. 3 / 2 returns 1, on the other hand, since both values are positive.
A float number is returned if one operand is a float value, as seen in the preceding example. And that's why 9// 3, and 5.0// 2, respectively, return the integers 3 and 2.0, respectively.
When you divide a number by 0, the following happens:
If Python encounters a ZeroDivisionError, it warns you that you've just attempted to violate a universal law.
When you use the ** operator, you can multiply an integer by a power.
Integers are not required to be used as exponents. Floats are another option:
Raising a number to power 0.5 implies taking the square root of that number. The square root of nine is a float, thus even though nine`s data type is an int, Python generates a float 3.0. If both operands of an expression are integers, the ** operator returns an integer and if one of the operands is floating-point number it returns a float.
It's also possible to raise numbers to negative powers like shown below:
If you divide a number raised to a positive power by 1, then you have raised the number to the negative power. As a result, 2 ** -1 equals 1 / (2 ** 1), which is equal to 1 / 2 or 0.5. It's easy to see how 2 ** -2 may be represented as 1 / (2 ** 2), 1 / 4 or 0.25.
5% of 3 is 2, so 3 divides 5 once and gives a remainder of 2. Seven also divides 20 twice, leaving 6 as a remainder. In the previous example, 16 divided by 8 is 0, thus 16 % 8 equals 0. The outcome of dividing the value to the right of % by the number to the left is always 0.
Determining the divisibility of two numbers is a typical use of percent. Number n, for example, is only an odd number when n % 2 is zero. What do you suppose is returned by 1% 0? Let's give this a try.
When you divide one by zero, you get 1 which is the remainder of 1 % 0. Nevertheless, Python throws a ZeroDivisionError since it is impossible to divide 1 by 0.
An error like ZeroDivisionError has little impact on your project in interactive window of IDLE. Even if a prompt window will pop up, you can continue to write code in your editor until the error is fixed.
The execution of a script is halted if Python discovers an error while running it. The software crashes in other words.
When you use the percent operator with negative values, things get a little more complicated:
Python has a well-defined behavior that produces these outcomes, even if they appear surprising at first. To find an integer's residual after multiplying it by another number, Python utilizes the formula r = x- (y * (x / y)).
Complex expressions can be created by combining operators in new and interesting ways. Python can calculate or evaluate an expression to yield a result made up of integers, operators, and parentheses.
An example of an arithmetic expression is shown below.
Evaluating expressions follows the same set of guidelines as performing standard arithmetic operations. These rules were presumably taught to you as the sequence of operations in school.
Among the operators that have equal precedence are these operators "*," "/," "%," and "%". Thus, 2*3 - 1 yields 5, rather than 4, when divided by 3. Because the * operator takes precedence over the - operator, 2*3 is evaluated first.
In the above example, you may have noticed that the requirement requiring a space before and after each operator was not followed. Whitespace in complex expressions is addressed in PEP 8:
If the operators with the lowest priority are being used, then whitespace should be added around them. Using a single space and the equal number of whitespaces on both sides of a binary operator is perfectly acceptable.
Even if parenthesis isn’t essential, it's always good to include them to indicate the order in which steps should be taken.
In this lesson, you've learned how to use Python's numbers with expressions. In the next chapter, you'll learn how to employ math functions and number techniques and learn how to avoid typical mistakes that might lead to program failures.
Welcome back! This is the fifth lesson in our Python programming course. In the last chapter, we discussed how string data types are used in Python. In this tutorial, we’re going to discuss variables in python and the rules for naming them in Python. In addition, you'll learn the fundamentals of working with numbers and strings.
All programming languages use variables as a fundamental building block of their language. It is the allocation of memory that is dedicated to data storage and manipulation. Variables are program elements that keep track of data. The following is an example of a variable.
x = 100
It's called x in the diagram below, and it has a value of 100 in it. In this case, the variable name is x, and the data it contains is the number.
For a variable, its data type is just the type of data it contains.
If a variable has a certain data type, it can be used with any mathematical, relational, or logical operation without resulting in an error; this is known as the data type in programming. There are many different types of data, such as strings and integers, that are used to categorize different kinds of information.
As a Python programmer, we don't have to do anything to free up space. Garbage collection handles this.
There are two types of memory:
Stack memory is used to hold all functions and their calling references. The lifo rule governs how a stack operates. Continuous blocks make up the stack memory. When a function is called, the variables it returns are kept in the program's call stack, where they can be freed upon function completion and the program's exit successfully.
Heap memory refers to the memory allocated at run time when each instruction is performed. A heap is used to store global variables, which can be shared by all functions in the program, rather than the local variables defined within a function. Here, x = 23 is an example.
Integers, floats, and complex numbers are all available as numeric types in Python. In this tutorial, we'll learn about integers because we'll be using them to show how variables work.
For simplicity's sake, an integer is a number that does not include a decimal point or fraction. They might be both positive and negative at the same time. For example, the numbers 1, 2, 3, 500, and 10000000.
The int class contains all integer variables. The class name can be found using the type () method, as illustrated in the example below.
A variable refers to an item's specific name. Instead of having to declare or specify a variable like in other programming languages, Python simply uses the equals (=) sign to create a variable and assign a value.
As stated, "n is allocated the value of 300" in the example above. You can then use n in a statement or expression, and its actual value will be substituted for n.
Just like with a literal value, variables can be shown directly from the interpreter prompt in a REPL session, without the usage of print ().
In the future, if you use n again and alter its value, the new value will be used:
Chained assignment in Python allows the same value to be assigned to many variables at the same time:
The above-chained assignment gives the variables a, b, and c the value 300 at once.
Python has two types of variables: global variables and local variables. To utilize the variable in other parts of your program or module, you need to declare it as a global one. It is common practice in Python to use local variables when creating new variables.
Using the following program, you can see how Python variables function by comparing the local and global variables.
You can utilize a global variable in a function in Python if you include the global keyword in the variable definition.
Variables are statically typed in many programming languages. A variable's data type is specified when it is created, and any value that is assigned to it must always be of the same type.
However, Python variables are exempt from this rule. It is possible in Python to give a variable a value of one type and then change it to another type later on:
This is an important subject in many programming languages, but the answer in Python is a little different.
Since Python is a highly object-oriented language, every piece of data in a program is an object of some type or class. This will be brought up again and again in the course of these tutorials.
Take a look at the following coding:
Translators are instructed to perform the following actions when provided with a statement print (300).
As you can see, the built-in type () function creates an integer object.
An object can be referenced by a Python variable's symbolic name, which serves as a pointer or reference. After assigning a variable name to an object, you can use that name to refer to the object. However, the object itself still contains the data. For instance,
An integer object with the value of 300 is created and the variable n is assigned as an identifier.
n is a pointer to an integer object, and the following code confirms that:
Then consider the following assertion:
What happens if it is executed? A new object is not created. Since n points to the same item, m points to a new symbolic name or reference.
Next, you may try something like this:
Python now constructs a new integer object named m, which has a value of 400.
Finally, let's consider that the following statement is executed:
As a result, Python generates a string object named "foo" and uses that as a pointer in n.
The integer object 300 is no longer mentioned anywhere. There is no way to get in touch with it.
The lifespan of an item will be mentioned at various points in this series of tutorials. When an item is first created, at least one reference to it is made, which marks the beginning of its life. A reference to an object can be added or destroyed at any moment during its lifetime, as you saw in the example above. As long as there is at least one reference to the thing, it lives on.
Objects are no longer accessible when the number of references to them reaches zero. Its time had come to an end at that moment. The allocated RAM allocated to Python will eventually be reclaimed so that it can be utilized for something else. Garbage collection, as it's called in computer jargon, is a very simple way to manage your own memory.
Every Python object is assigned a unique identifier number when it is created. No two objects will ever share an identifier, even if their lives overlap for a period of time. It is not possible to utilize the same identifier for an object after its reference count reaches zero and it is garbage collected.
A Python object's id can be obtained using the id () function, which is part of the standard library. Id () can be used to verify that two variables are actually pointing at one another:
Even after an assignment such as this, which results in the same number being returned for id(n), it is clear that these two numbers point to the same thing. As soon as m is reassigned to the value 400, they no longer point to the same item, but rather to different things, take into account the following:
M and n are both 30-valued integers in this example. The id(m) and id(n) are identical in this example, While running the program, the interpreter makes use of previously created objects for numbers in the [-5, 256] range. As a result, if you assign different integer values in this range to different variables, they will all refer to the same thing.
Python variables can also be deleted by use of function del "variable name". Python's error "variable name is not defined" indicates that you've erased the variable in the following example of the language's delete variable function.
Test the concatenation of several data types such as string and integer. The number "99" will be added to the word "Guru," for example, A Type Error will arise if the number is not expressed as a string when declaring variables in Python. This differs from Java, which does not require the number to be declared as a string.
You will obtain an undefined result if you run the following code.
a="Guru"
b = 99
print a+b
Use print(a+str(b)) to concatenate both a and b into a string.
This is the process of changing one data type to another. Data type conversion is necessary in some scenarios. For instance, you may want to combine two numbers where one of the variables' existing values is an integer and the other is a string. Python typecasting is required before addition, as it must transform a string's data type to an integer.
Type casting in Python can be done using a variety of functions.
Data types in Python are implicitly converted by the Python interpreter, which means that the user is not required to intervene in the process. See the examples below for a better understanding of the subject.
Congratulations! Your perseverance has paid off. The focus of this session was on Python variables, object references, and identity, as well as the naming conventions for Python identifiers and a brief discussion of integers. Let’s meet in our next tutorial as we discuss about Python data types and how they're put to use.
The rapid developments that have been achieved in the Light Emitting Diode industry more so in the area of high-power LEDs, have brought up a challenge on heat dissipation. The LEDs are always mounted on the printed circuit boards and they might end up bringing a lot of problems, especially on the heat generated from them. Without proper laid down structures to dissipate the excess heat will end up damaging the board. To solve this, designers have chosen to implement the use of metal core PCBs.
Metal core PCB boards are special types of PCBs that have a metallic layer that is made up of copper or aluminum. This metallic layer is what gives it this name.
There are many online PCB companies offering Metal Core PCB manufacturing. We are going to take the example of JLCPCB, a China-based online PCB Fabrication House. JLCPCB offers competitive rates and provides excellent results and is considered one of the best PCB manufacturers. You can place a PCB order on JLCPCB's official website.
So, it's quite easy to order for manufacturing of Metal Core PCB on JLCPCB.
When you compare the metal core PCB with other traditional standard PCBs you will realize that it has special layers. The total number of these layers on the PCB will be determined by the total number of conductive layers that you really need. They can be of single or multiple conducting layers. The layers can be categorized into three types
There are three major categories of the MCPCB as discussed below;
This type of metal-core PCB has the copper traces printed on one side of the board and the board comprises of the following;
The single-sided board also has a dielectric layer that is sandwiched between the copper and the metal core layer.
It comes with over two layers hence having a structure that looks like the FR-4 type of PCB materials.
Let us have a look at the steps that can be followed in the design of the metal core printed circuit boards as listed below;
After this step, you now need to confirm the digital image that you have with the original Gerber files from the designer using an inspection laser to confirm if you have done the right thing.
After the confirmation that you have done the right thing, now the design can be moved to the final process of the design. This final step involves the unpacking of the PCB layers accordingly. We are supposed to locate the drill points and this can be done by the use of the x-ray locator.
Now the board is supposed to undergo the process of plating and deposition of copper where the whole PCB is electroplated with the copper layer before the board is taken through the final process of v-scoring and profiling.
The PCBs that are made out of aluminum offer very smart heat dissipation and a good heat transfer mechanism. Aluminum PCBs are very light in weight and are used in LED lighting applications, electronic communication and audio frequency equipment. Listed below in the characteristics of the aluminum substrate;
PCBs made out of the copper core have better performance than those made out of aluminum. But aluminum is preferred to copper by most clients because copper is more expensive. Another disadvantage of copper core over aluminum is that copper boards are heavier and involve a tough process of machining. Copper has a higher rate of corrosion as compared to the aluminum core.
This type of board finds great use in the field of LED technology. Some of the applications are listed below;
ESP32 module comes with multiple inbuilt features and peripheral interfacing capability is one of those features. ESP32 module also consists of an inbuilt temperature sensor, but that can only measure the temperature of the ESP32 core not the temperature of the surrounding environment. So it is required to use a peripheral sensor to measure the temperature of the surrounding environment like home, garden, office etc.
Hello readers. I hope you all are doing great. In this tutorial, we will learn how to interface DHT11 (temperature and humidity sensor) with the ESP32. Later in this tutorial, we will discuss how to share the sensor readings obtained from the DHT11 sensor to a web server.
Before moving towards the interfacing and programming part, let’s have a short introduction to the DHT11 sensor, its working and its connections.
Where To Buy? | ||||
---|---|---|---|---|
No. | Components | Distributor | Link To Buy | |
1 | ESP32 | Amazon | Buy Now |
Fig. 1: DHT11 sensor
DHT11 is used to measure humidity and temperature from its surrounding. It monitors the ambient temperature and humidity of a given area. It consists of an NTC (negative temperature co-efficient) temperature sensor and a resistive type humidity sensor. It also consists of an 8-bit microcontroller. The microcontroller is responsible for performing ADC (analog to digital conversion) and provides a digital output over the single wire protocol.
DHT11 sensor can measure humidity from 20% to 90% with +-5% (RH or relative humidity) of accuracy and can measure the temperature in the range of 0 degrees Celsius to 50 degrees Celsius with +-2C of accuracy.
DHT11 sensors can also be used to implement a wired sensor system using a cable length of up to 20 meters.
There are two DHT modules (DHT11 and DHT22) available in the market to measure temperature and humidity. The purpose of both module are same but with different specifications. Like DHT22 sensor provides broader temperature and humidity sensitivity ranges. But DHT22 is costlier than DHT11. So you can prefer to use any of the module, as per your requirements.
Table: 1
Note: Connect a 10K resistor between data and power (+5V) pin of DHT11 sensor module.
Fig. 2: ESP32 and DHT11 connections/wiring
We are using Arduino IDE to compile and upload code into ESP32 module. To know more about Arduino IDE and how to use it, follow our previous tutorial i.e., on ESP32 programming series. Link is given below:
https://www.theengineeringprojects.com/2021/11/introduction-to-esp32-programming-series.html
DHT11 sensor uses single wire protocol to communicate data which requires a precise timing. In order to interface DHT11 sensor with ESP32 module it is required to add necessary libraries. To install the DHT11 sensor library;
Fig. 3: manage libraries
Fig. 4: Install DHT sensor library
#include "DHT.h"
#define DHTPIN 4 // Digital pin connected to the DHT sensor
#define DHTTYPE DHT11 // DHT 11
// Initializing the DHT11 sensor.
DHT dht(DHTPIN, DHTTYPE);
void setup() {
Serial.begin(115200);
Serial.println(F("DHT test string!"));
dht.begin();
}
void loop() {
// Wait a few seconds between measurements.
delay(2000);
// Reading temperature or humidity takes about 250 milliseconds!
// Sensor readings may also be up to 2 seconds 'old' (its a very slow sensor)
float h = dht.readHumidity();
// Read temperature as Celsius (the default)
float t = dht.readTemperature();
// Read temperature as Fahrenheit (isFahrenheit = true)
float f = dht.readTemperature(true);
// Check if any reads failed and exit early (to try again).
if (isnan(h) || isnan(t) || isnan(f)) {
Serial.println(F("Failed to read from DHT sensor!"));
return;
}
// Compute heat index in Fahrenheit (the default)
float hif = dht.computeHeatIndex(f, h);
// Compute heat index in Celsius (isFahreheit = false)
float hic = dht.computeHeatIndex(t, h, false);
Serial.print(F("Humidity(%): "));
Serial.println(h);
Serial.print(F("Temp.: "));
Serial.print(t);
Serial.println(F("°C "));
Serial.print(F("Temp.: "));
Serial.print(f);
Serial.println(F("°F "));
Serial.print(F("Heat index: "));
Serial.println(hic);
Serial.println(" ");
Serial.print(F("°C "));
Serial.print(hif);
Serial.println(F("°F"));
}
Fig. 5: Add necessary libraries
Fig. 6: Global declarations
Fig. 7
Fig. 9
Fig. 10
Fig. 11
Fig. 12: Heat index
Fig. ESP32 and DHT11 interfacing
Fig. 13: Readings observed from DHT11 sensor
The IoT is the interconnection of physical objects or devices with sensors and software accessing capabilities to communicate data or information over the internet.
To build an IoT network, we need an interface medium that can fetch, control, and communicate data between sender and receiver electronics devices or servers.
Espressif Systems created the ESP32 Wi-Fi chip series. The ESP32 module is equipped with a 32-bit Tensilica microcontroller, 2.4GHz Wi-Fi connectivity, an antenna, memory, and power management modules, and much more. All of these built-in features of this ESP32 module make it ideal for IoT applications.
It is an open data platform for the Internet of Things (Internet of Things). ThingSpeak is a MathWorks web service that allows us to send sensor readings/data to the cloud. We can also visualise and act on the data (calculate the data) sent to ThingSpeak by the devices. Data can be stored in both private and public channels.
ThingSpeak is commonly used for internet of things prototyping and proof of concept systems requiring analytics.
Fig. 14: Getting started for free
Fig. 15: Create new account
Fig. 16: MathWorks Sign in
Fig. 17: New Channel
Fig. 18: Fill the channel details
Fig. 19: Field Chart Edit
https://github.com/mathworks/thingspeak-arduino
Fig. 20: Adding ThingSpeak library
To check whether the library is successfully added or not:
Fig. 21: manage libraries
Fig. 22: Arduino IDE Library manager.
//------style guard ----
#ifdef __cplusplus
extern "C" {
#endif
uint8_t temprature_sens_read();
#ifdef __cplusplus
}
#endif
uint8_t temprature_sens_read();
// ------header files----
#include <WiFi.h>
#include "DHT.h"
#include "ThingSpeak.h"
//-----netwrok credentials
char* ssid = "replace this with your SSID"; //enter SSID
char* passphrase = "replace this with your password"; // enter the password
WiFiServer server(80);
WiFiClient client;
//-----ThingSpeak channel details
unsigned long myChannelNumber = 3;
const char * myWriteAPIKey = "replace this with your API key";
//----- Timer variables
unsigned long lastTime = 0;
unsigned long timerDelay = 1000;
//----DHT declarations
#define DHTPIN 4 // Digital pin connected to the DHT sensor
#define DHTTYPE DHT11 // DHT 11
// Initializing the DHT11 sensor.
DHT dht(DHTPIN, DHTTYPE);
void setup()
{
Serial.begin(115200); //Initialize serial
Serial.print("Connecting to ");
Serial.println(ssid);
WiFi.begin(ssid, passphrase);
while (WiFi.status() != WL_CONNECTED) {
delay(500);
Serial.print(".");
}
// Print local IP address and start web server
Serial.println("");
Serial.println("WiFi connected.");
Serial.println("IP address: ");
Serial.println(WiFi.localIP());
server.begin();
//----nitialize dht11
dht.begin();
ThingSpeak.begin(client); // Initialize ThingSpeak
}
void loop()
{
if ((millis() - lastTime) > timerDelay)
{
delay(2500);
// Reading temperature or humidity takes about 250 milliseconds!
float h = dht.readHumidity();
// Read temperature as Celsius (the default)
float t = dht.readTemperature();
float f = dht.readTemperature(true);
if (isnan(h) || isnan(t) || isnan(f)) {
Serial.println(F("Failed to read from DHT sensor!"));
return;
}
Serial.print("Temperature (ºC): ");
Serial.print(t);
Serial.println("ºC");
Serial.print("Humidity");
Serial.println(h);
ThingSpeak.setField(1, h);
ThingSpeak.setField(2, t);
// Write to ThingSpeak. There are up to 8 fields in a channel, allowing you to store up to 8 different
// pieces of information in a channel. Here, we write to field 1.
int x = ThingSpeak.writeFields(myChannelNumber,
myWriteAPIKey);
if(x == 200){
Serial.println("Channel update successful.");
}
else{
Serial.println("Problem updating channel. HTTP error code " + String(x));
}
lastTime = millis();
}
}
Fig. 23: Libraries
Fig. 24
Fig. 25: server port
Fig. 26
Fig. 29
Fig. 30: connect to wifi
Fig.31: Fetch and print IP address
Fig. 32
Fig. 33
Fig. 34
Fig. 35
Fig. 36: Displaying humidity on thingSpeak server
Fig. 37: Displaying Temperature on ThingSpeak server
This concludes the tutorial. I hope you found this of some help and also hope to see you soon with new tutorial on ESP32.