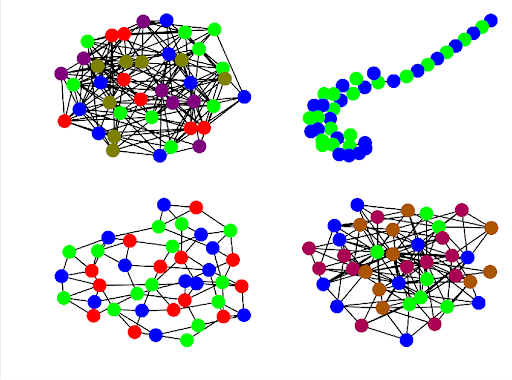
Hi readers! I hope you are doing great. We are learning about modern neural networks in deep learning, and in the previous lecture, we saw the capsule neural networks that work with the help of a group of neurons in the form of capsules. Today we will discuss the graph neural network in detail.
Graph neural networks are one of the most basic and trending networks, and a lot of research has been done on them. As a result, there are multiple types of GNNs, and the architecture of these networks is a little bit more complex than the other networks. We will start the discussion with the introduction of GNN.
Introduction to Graph Neural Networks
The work on graphical neural networks started in the 2000s when researchers explored graph-based semi-supervised learning in the neural network. The ...
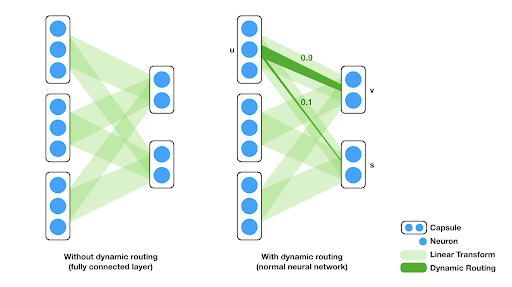
Hey pupil! Welcome to the next lecture on modern neural networks. I hope you are doing great. In the previous lecture, we saw the EffcientNet neural network, which is a convolutional Neural Network (CNN), and its properties. Today, we are talking about another CNN network called the capsule neural network, or CapsNets. These networks were introduced to provide the capsulation in CNNs to provide better functionalities.
In this article, we will start with the introduction of the capsule neural network. After that, we will compare these with the traditional convolutional neural networks and learn some basic applications of these networks. So, let’s start learning.
Introduction to Capsule Neural Networks
Capsule neural networks are a type of artificial neural network that was introduc ...
The last decade brought about a lot of advancements that we didn’t think would even be possible. In the case of business communication, the biggest benefit next to the internet is VoIP. Thanks to this technology, all business owners (even those whose budgets are extremely meager) can set up a strong communication system on par with their more established counterparts.
But when talking about how helpful VoIP can be, the conversation is always focused on calls. People always talk about how Telnum and other telecom providers are able to slash their phone bills, enhance the communication features they enjoy, and many more.
What about SMS? Unfortunately, the advantages in this area are unknown to many users. There are so many benefits If you want to fully harness the capabilities that are ass ...
Technology has moved steadily ahead over the years, but it has evolved by leaps and bounds in the past decade or so. Smartphones have been a revolution and a revelation. Even video games have become increasingly sophisticated and have overtaken the movie industry in value.
If technology keeps developing on this trajectory in the future, the next generation of coders will need online lessons today. Before signing up for your child, here’s what to look for in a program.
Fun is Everything
For now, put lofty things like your child’s eventual career or the fate of future technology out of your mind. The extracurricular programs kids sign up for need to be fun! Industry leaders like Real Programming 4 Kids
make their courses revolve around teaching students to create their own video games.& ...
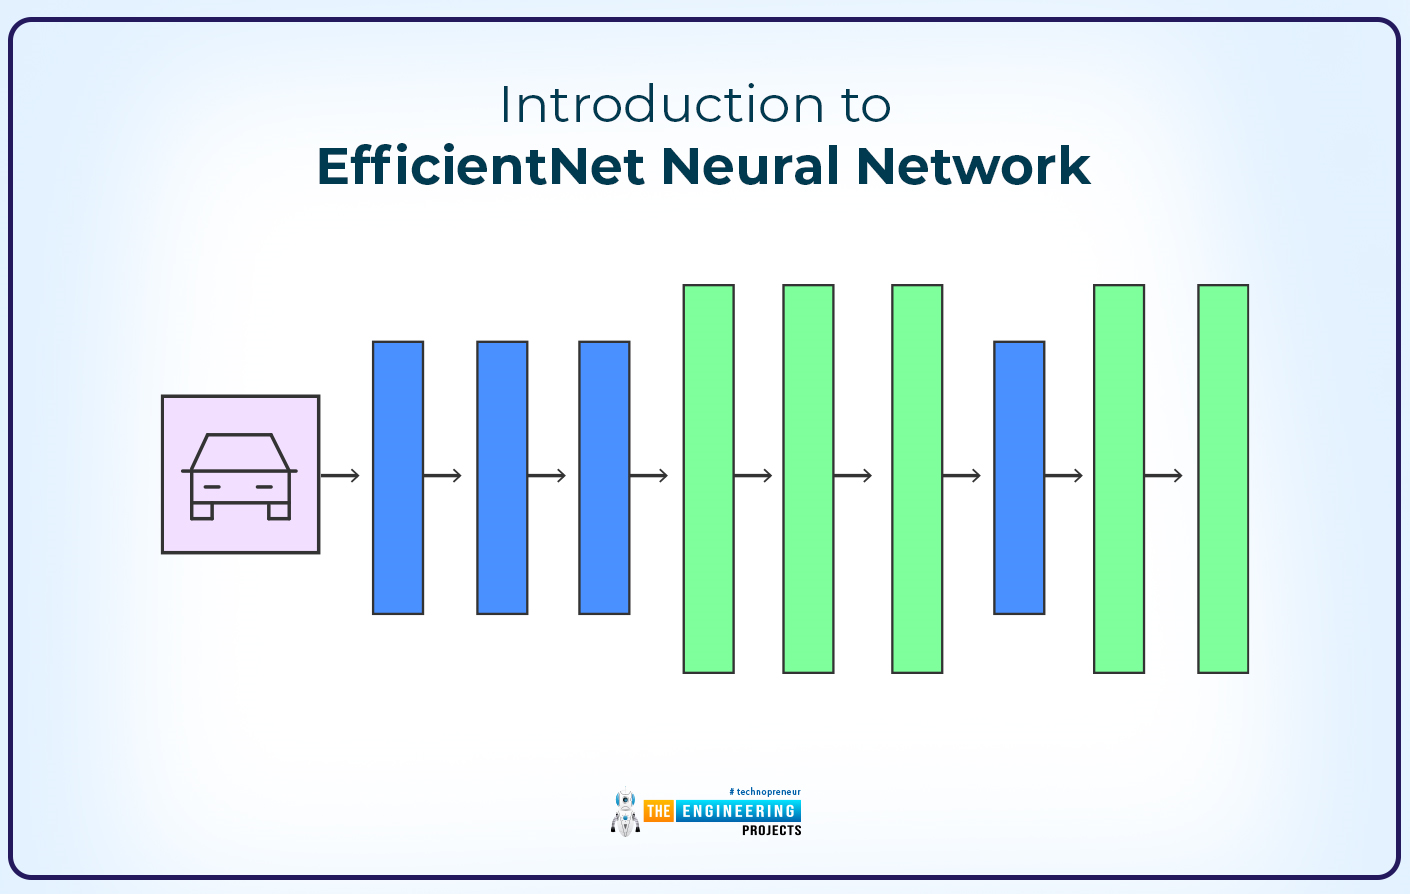
Hi learners! I hope you are having a good day. In the previous lecture, we saw Kohonen’s neural network, which is a modern type of neural network. We know that modern neural networks are playing a crucial role in maintaining the workings of multiple industries at a higher level. Today we are talking about another neural network named EfficientNet. It is not only a single neural network but a set of different networks that work alike and have the same principles but have their own specialized workings as well.
EfficentNet is providing groundbreaking innovations in the complex fields of deep learning and computer vision. It makes these fields more accessible and, therefore, enhances their range of practical applications. We will start with the introduction, and then we will share some usefu ...
DevOps engineers have a challenging job to do. They are responsible for managing servers, code, and many other components in a software project. They routinely employ numerous tools and calculators to facilitate their daily activities.
Engineers working in DevOps employ a range of calculators to reduce the complexity of any given issue. These tools facilitate and speed up the work. Planning, risk management, and performance optimization can all benefit from them.
Here are some tools that can be useful to a DevOps engineer.
Calculators for time estimation:
Time is money! Estimating how long a task will take is crucial. This calculator is used by DevOps engineers to estimate various calculations. This tool aids in making time estimates for projects. To predict the amount of time ne ...
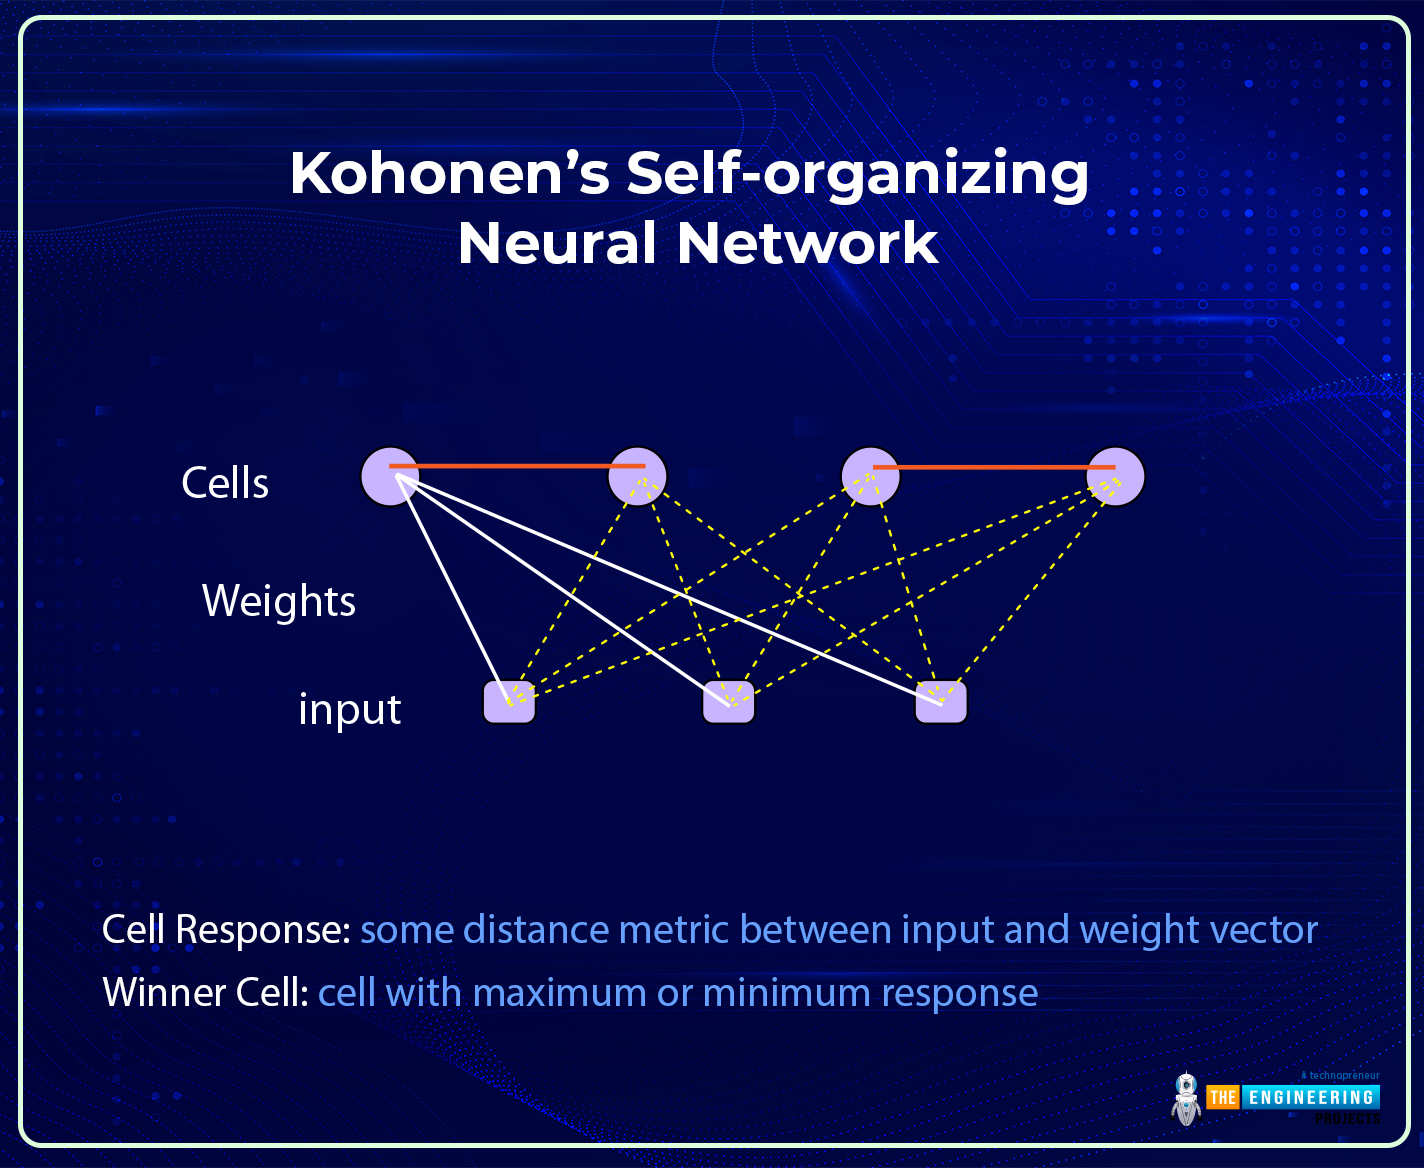
Hi there! I hope you are having a great day. The success of the field of deep learning is due to its complex and advanced neural networks. These networks can be broadly divided into traditional and modern neural networks. We have seen the details of traditional neural networks, and in the previous session, the basic introduction of modern neural networks and the details of their features were discussed. Today, we will talk about one of the most famous modern neural networks, the Kohonen Self-Organized Neural Network.
Modern neural networks are more organized and developed than traditional neural networks, but that does not make traditional neural networks less efficient than modern ones. All the networks are introduced for specific tasks, and this is one of the main reasons behind t ...
In a world captivated by the allure of cutting-edge technology and automation, it's easy to overlook the enduring importance of skilled trade jobs
. Yet, these professions are not just surviving, they're thriving, as the demand for trade experts is not only robust but also projected to soar in the years to come.
Offering lucrative salaries, rock-solid job security, and abundant opportunities for career growth, trade jobs are the unsung heroes of the modern workforce.
In this article, we'll lift the curtain on 10 high-paying trade jobs of the future and give you the inside scoop on how to make one of these rewarding careers your own.
Solar Photovoltaic Installer
As the world races to embrace cleaner, greener energy solutions, solar photovoltaic installers are the trailblazers l ...
In the subject of electrical engineering, having precise calculations is essential to the process of creating systems that are both effective and safe. One such calculation that is extremely significant is called the voltage drop, it refers to the decrease in voltage that occurs when electric current flows through a circuit.
A great number of electrical engineers rely on a voltage drop calculator
to ensure that the circuits they design match the necessary criteria. This page provides an overview of the many approaches to calculating voltage drop, making it simpler for engineers to select the strategy that is most suited to their individual projects.
Voltage Drop Formula:
It is vital to have a solid understanding of the voltage drop formula before moving on to the automated approaches. ...
Financial security is one of the fundamental attributes of happiness, as it allows one to feel free in the ever-changing world. However, making a decent living goes beyond standard working conditions, and requires more prompt actions, like investments. One of the most accessible forms of investments is Forex trading, as you can start even when having modest financial funds, yet, decent knowledge on the matter. If you are ready to take decisive steps toward a better future, let’s clarify what you need to know about Forex Trading.
What is Forex Trading?
Forex trading, or foreign exchange currency trade, is a kind of financial investment, where the traders choose the currencies and try to predict their behavior against each other - increase or decrease in the rate. Depending on the co ...