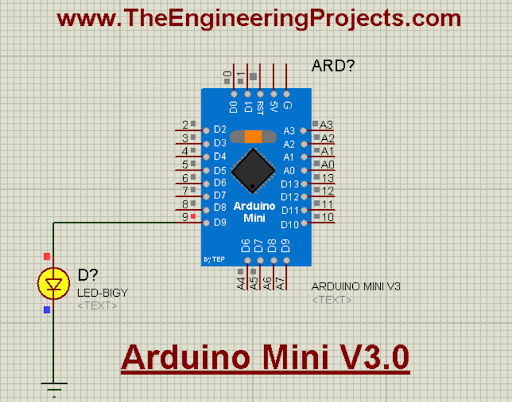
Hello friends! I hope you are doing great. Today, we are discussing the most upgraded version of the Arduino Mini in Porteus. Before this, we have shared the Arduino Mini library for Proteus and the Arduino Mini library for Proteus V2.0 with you. The Arduino Mini Library for Proteus V3.0 has a better structure and has some other changes that make it even better than the previous ones. This will be clear when you see the details of this library.
In this article, I will briefly discuss the introduction of Arduino Mini. You will learn the features of this board and see how to download and install this library in Proteus. In the end, I will create and elaborate a simple project with this library to make things clear. Let’s move towards our first topic:
Introduction to the Arduino Mini
The A ...
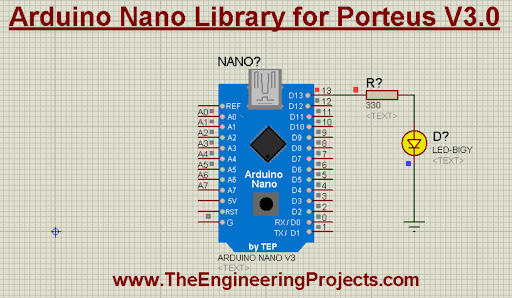
Hello friends! I hope you are doing great. In this tutorial, we are discussing the upgraded version of the Arduino Nano. Before this, we discussed the Arduino Nano library for Proteus and the Arduino Nano library for Proteus V2.0. The new version of the Arduino Nano library for Proteus V3.0 has a better structure and is working better. We will discuss it in detail in just a bit.
In this article, I will discuss the basic introduction of Arduino Nano. We will learn how to download and install this library in Proteus and will create a simple project with this library. Let’s move towards our first topic:
What is the Arduino Nano?
The Arduino Nano was released in 2008 by Arduino. cc and it is an open-source microcontroller board that has a great scope in the embedded industry.This boar ...
Hi friends! I hope you are having a good day. Today, I am presenting the Arduino UNO library for Proteus V3.0. You should have a look at the previous versions of this library i.e. Arduino UNO library for Proteus(V2.0) and the Arduino UNO library for Proteus(V1.0). The warm response of the students to these libraries has motivated them to upgrade the library. The latest version of this library has better design and functionality, which I will discuss in detail with you.
In this article, we will discuss the basic introduction to the Arduino UNO library, its simulation, and its working. Moreover, we will discuss a small project to show you the functionality of this library. Here is the introduction to the library:
What is the Arduino UNO?
The Arduino UNO was released in 2010 by Arduino. c ...
Printed circuit boards are the most important and basic component of the electronic industry. These boards have made it possible to create and run circuits on every level and have served as the backbone of any electronic device. With the growing demand for technology, PCBs have gone through multiple evolutions. The transformation of PCBs has made it possible to create innovative and better electronic circuits.
Today, we are talking about the emerging trends in PCB that are reshaping electronic circuits and the components used in innovative designs. But before this, it is important to understand the importance of using the emerging trends for the circuits.
Importance of Using Trending Technologies in PCBs
PCBs are versatile components, and not all PCBs are ideal for a particular type ...
It is so convenient to store data in the cloud, most people do the same. It is accessible. It is easier. And there are a lot of benefits cloud computing offers. It stores information on the cloud rather than the local servers, making it cost-effective.
With that, the use of Big Data is getting popular each day. The data sets are huge and complex in volume, speed, and variations. All these links give adequate performance, all-time accessibility of resources, swift implementation, and cost-efficiency.
The whooping utilization of the tech also increases the risk and doubts about data security. With the growing prevalence of cloud computing and its remarkable ability to improve your activities' reach and efficiency, it is a big win.
In 2023, a study forecasted that cybercriminals will ...
Robotics and engineering have been connected for a long time, but it’s only now that we’re beginning to see the true impact that industrial-scale implementations of this technology can have in this context.
To illustrate the scope of the revolution in engineering that’s being enabled by robots, here is an overview of the main things you need to know.
What Are Industrial Robots?
Industrial robots are autonomous machines capable of performing tasks without human intervention. These versatile tools are widely applied across various industries, including in manufacturing and assembling processes.
The magic of these mechanical maestros lies in their programmability, as you can reassign them to perform different functions according to your engineering needs. This is particularly important in ...
With cloud computing effectively becoming the norm in the world of IT over the past decade, it’s no surprise that the management of the diverse infrastructures and resources it represents has risen to prominence as a process and a professional calling.
So what is cloud management exactly, what does it involve, how can it be handled efficiently, and what are the career prospects for anyone who flirts with this field?
Understanding the Basics: What is Cloud Management?
Cloud management refers to the administrative control over public, private and hybrid cloud services. Its primary purpose is to optimally manage scalability, workload make-up, performance and security so that these services run as intended.
In short, it's about utilizing various tools and technologies to maintain order acr ...
Launching a new field service business will be the most exhilarating and intimidating thing you do. And your path to success depends on smart decision-making right from the start.
To help you achieve this, here are some tips and best practices that will iron out the potential wrinkles and lead your fledgling firm towards steady growth sooner.
Choosing the Right Software Tools
Kick-starting your field service business requires thorough planning. Top of your checklist should be selecting the optimal software tools, personalized to your unique operational needs.
For instance, small business FSM software
(Field Service Management) can bring numerous efficiencies into daily operations. Consider these three major benefits:
Operational Efficiency: Streamlines processes and optimizes team p ...
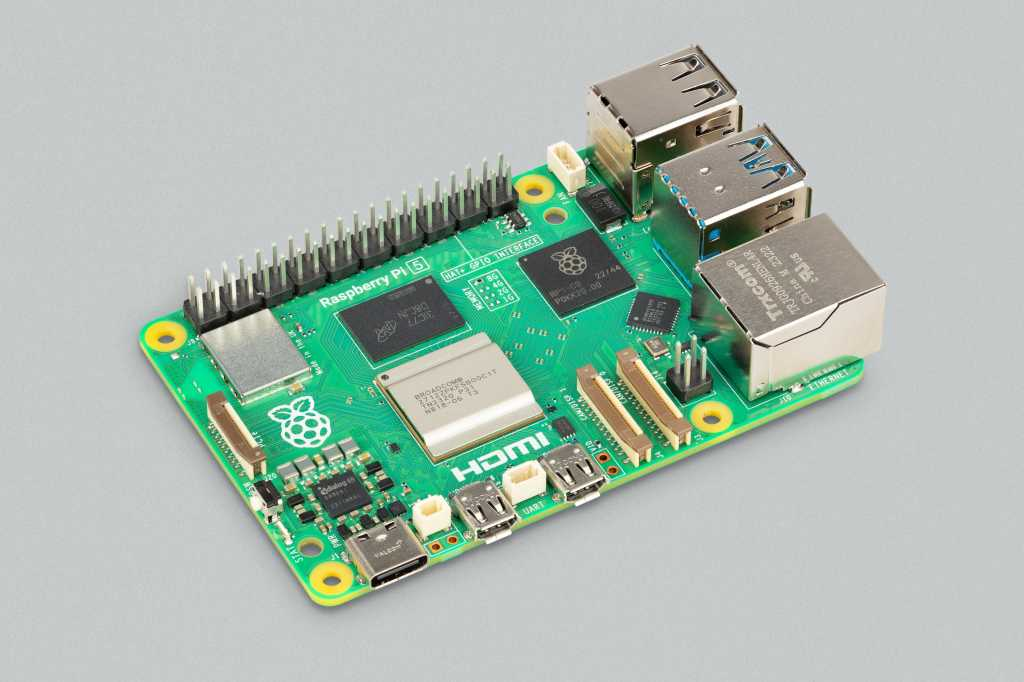
Hello everyone, I hope you all are doing great. In today's lecture, we will discuss one of the most advanced Embedded Microprocessors i.e. Raspberry Pi 5. At the time of this writing, Raspberry Pi 5 is the latest board designed in the Raspberry Pi series. Raspberry Pi 5 is designed by a UK-based charity foundation named Raspberry Pi Foundation. Initially, these boards were designed for students and hobbyists but because of their compact design and advanced features, they became popular among embedded engineers, especially for IoT Systems. Raspberry Pi boards can be used for simple tasks i.e. word processing, web browsing etc., and in the complex fields of robotics, multimedia
centers, home automation, etc.
In today's lecture, we will first dis ...
Moving complex machinery across the country is no small feat. It demands meticulous planning, organization, and utmost caution throughout each step of the process. To that end, let’s discuss eight best practices that can streamline your move and ensure your equipment arrives at its new home intact and functional.Understanding Your Equipment
When gearing up for a cross-country move of complex machinery, the importance of gaining deep insights about your equipment cannot be overlooked. Here are several points you need to consider:Identify sensitive components: Knowing which parts of your machinery are delicate or more vulnerable can help avoid potential damage during transit.Analyze dismantling options: In some instances, disassembly may simplify transportation and reduce risks.Evaluate wei ...