In today's digital age, remote workers are on the frontlines of an invisible war, battling unseen cyber threats. As they maneuver through the complex terrain of remote work environments, they're confronted with potential hazards at every turn.
From a compromised network and data breach to phishing attacks, remote workers are tasked with safeguarding the organization's digital fort.
Building a cybersecurity culture
The remote workforce is instrumental in building a cybersecurity culture where everyone becomes their own expert, advocating for security measures and promptly reporting suspicious activities. This culture is particularly significant in virtual office environments, where workers are the custodians of sensitive data.
As remote employees constantly face cybersecurity challenges ...
By using CNC-machined parts for your next engineering project, you can ensure precision, quality, and speed. So, let us take a look at three options for creating custom parts.
What Is CNC Machining?
Before we look at the three options available to you, it is worth briefly explaining what CNC machining is. CNC machining is short for Computer Numerical Control. It is a modern manufacturing method that involves the use of computer-controlled machinery to make custom parts.
The process begins with creating a CAD design
of the part you want to make. The design is then translated into g-code
and fed into the item of CNC machinery.
The machine then simply gets to work at creating your design with the utmost precision and consistency. The types of CNC machines
range widely – from mil ...
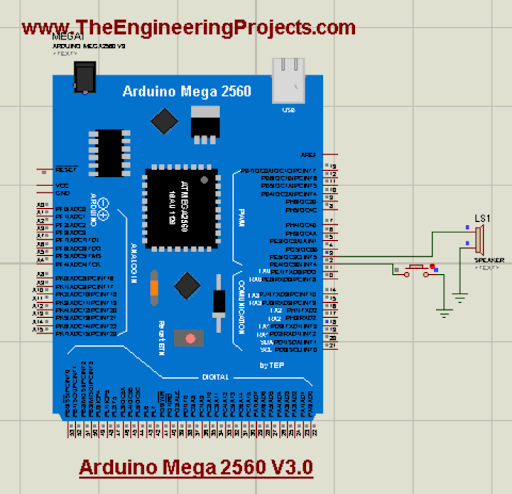
Hello readers! I hope you are doing great. Today, we are discussing the latest library for proteus. In the tutorial, we will look at the Arduino Mega 2560 library for Porteus V 3.0, which is one of the most versatile and useful microcontrollers from the Arduino family. We have shared the previous versions with you before this; these were the Arduino Mega 2560 library for Proteus and the Arduino Mega 2560 library for Proteus V2.0. The current version is better in structure and does not have a link to the website so you may use it in your projects easily.
Here, I will discuss the detailed specifications of this microcontroller. After that, I will show you the procedure to download and install this library in the Proteus and in the end, we’ll create a mini project using this microcontroller ...
Hello friends! I hope you are doing great. Today, we are discussing the latest version of the Arduino Mega 1280 library for Proteus. This can be used in both versions (Proteus 7 and Proteus. We have shared the previous versions, which are the Arduino Mega 1280 library for Proteus and the Arduino Mega 1280 library for Proteus V2.0 with you. With the advancement in the version, these microcontrollers have a better structure and the design is closer to the real microcontrollers.
In this article, I will discuss the introduction of the Arduino Mega 1280 in detail. Here, you will learn the features and functions of this microcontroller. Then, we’ll see how to download and install this library in Proteus. In the end, we’ll see a mini project using the Arduino Mega 1280 V3.0. Let’s move towards ...
Hello friends! I hope you are doing great. Today, we are presenting another version of the Arduino Pro mini library. We have seen the Arduino Pro Mini library for Proteus and the Arduino Pro Mini library for Proteus V2.0 with you. As expected, the Arduino Mini Library for Proteus V3.0 has a better structure and size that make it even better than the previous ones. We will go through the details of the features to understand the library.
In this article, I will briefly discuss the introduction of Arduino Pro Mini V3.0. You will learn the features of this board and see how to download and install this library in Proteus. In the end, I will create and elaborate on a simple project with this library to make things clear. Let’s move towards our first topic:
Introduction to the Arduino Pro Mi ...
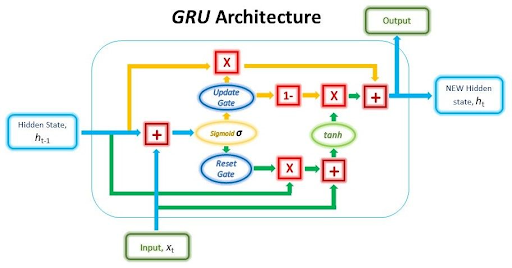
Hello! I hope you are doing great. Today, we will talk about another modern neural network named gated recurrent units. It is a type of recurrent neural network (RNN) architecture but is designed to deal with some limitations of the architecture so it is a better version of these. We know that modern neural networks are designed to deal with the current applications of real life; therefore, understanding these networks has a great scope. There is a relationship between gated recurrent units and Long Short-Term Memory (LSTM) networks, which has also been discussed before in this series. Hence, I highly recommend you read these two articles so you may have a quick understanding of the concepts.
In this article, we will discuss the basic introduction of gated recurrent units. It is better ...
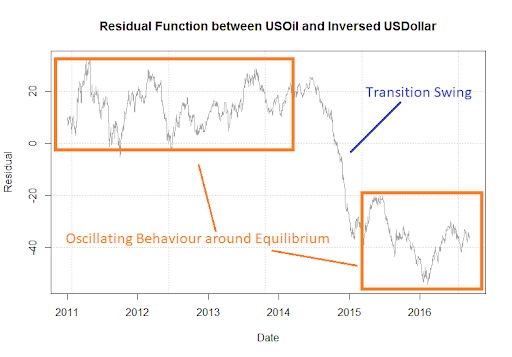
Hey readers! Welcome to the next lecture on neural networks. We are learning about modern neural networks, and today we will see the details of residual networks. Deep learning has provided us with remarkable achievements in recent years, and residual learning is one such output. This neural network has revolutionized the design and training process of the deep neural network for image recognition. This is the reason why we will discuss the introduction and all the content regarding the changes these network has made in the field of computer vision.In this article, we will discuss the basic introduction of residual networks. We will see the concept of residual function and understand the need for this network with the help of its background. After that, we will see the types of skip connec ...
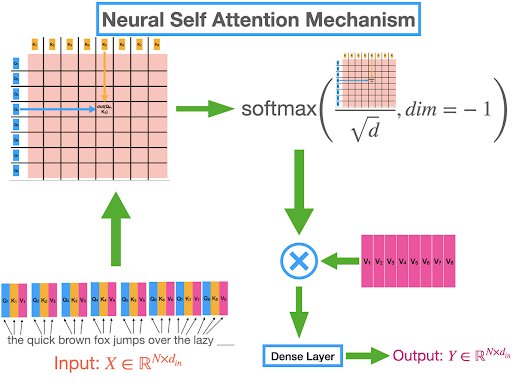
Deep learning is an important subfield of artificial intelligence and we have been working on the modern neural network in our previous tutorials. Today, we are learning the transformer architecture neural network in deep learning. These neural networks have been gaining popularity because they have been used in multiple fields of artificial intelligence and related applications.
In this article, we will discuss the basic introduction of TNNs and will learn about the encoder and decoders in the structure of TNNs. After that, we will see some important features and applications of this neural network. So let’s get started.
What are Transformer Neural Networks
Transformer neural networks (TNNs) were first introduced in 2017. Vaswani et al. h ...
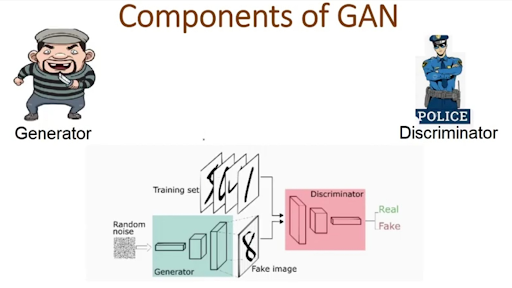
Deep learning has applications in multiple industries, and this has made it an important and attractive topic for researchers. The interest of researchers has resulted in multiple types of neural networks we have been discussing in this series so far. Today, we are talking about generative advertising neural networks (GAN). This algorithm performs the unsupervised learning task and is used in different fields of life such as education, medicine, computer vision, natural language processing (NLP), etc.
In this article, we will discuss the basic introduction of GAN and will see the working mechanism of this neural network, After that, we will see some important applications of GANs and discuss some real-life examples to understand the concept. So let’s move towards the introduction of GANs ...
Meeting project deadlines doesn't have to feel like a race against time. With meticulous planning, effective communication
, innovative tools, and realistic expectations; you can consistently meet your project deadlines without anxiety and ensure smooth project execution.
This article will walk you through the solutions and strategies necessary for overcoming challenges that are thrown your way while working toward a deadline. It won’t matter if you’re on your final year project
or providing a small deliverable to a client, as the subsequent sections offer insights that should help everyone achieve these ends more efficiently and stress-free.
10 Solutions to Challenges Regarding Meeting Project Deadlines
Navigating through project management can be a challenging task. Let's delve i ...