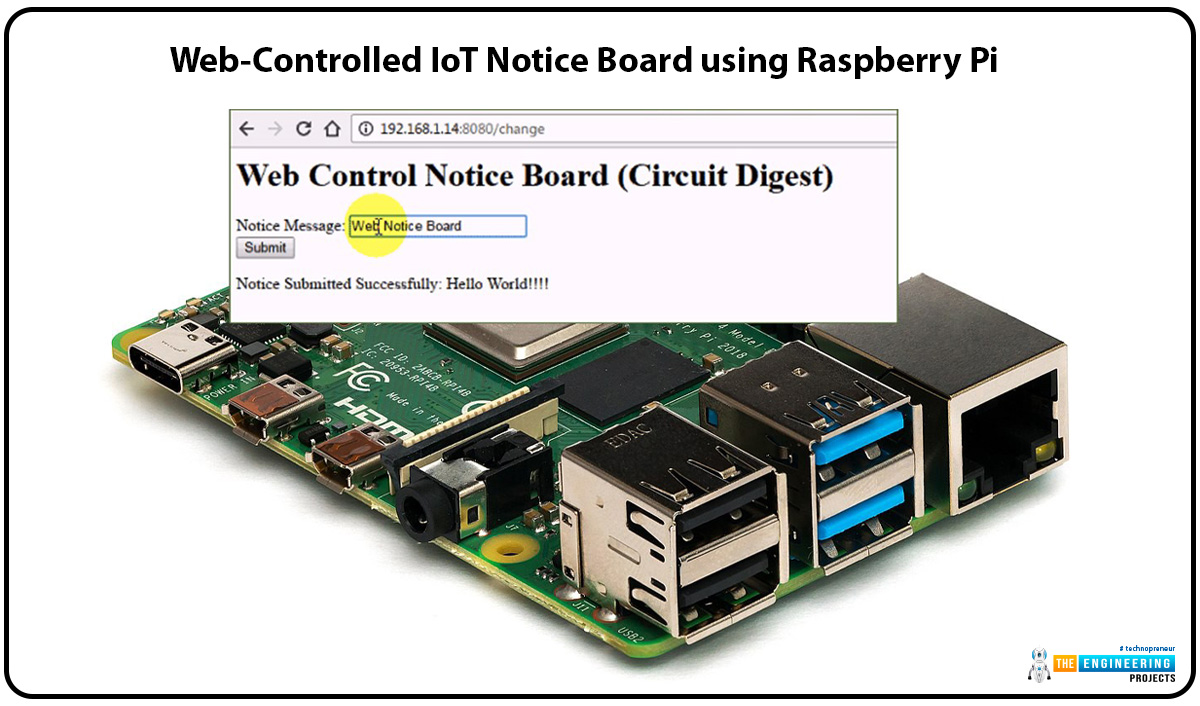
Welcome to the next tutorial of our Raspberry Pi programming tutorial. The previous tutorial showed us how to Interface weight sensor HX711 with pi 4. We learned that a weight sensor HX711 and load cell could be easily interfaced with a Raspberry Pi 4 with careful attention to wiring and software configuration. However, now we're one step ahead of that by using the Internet as the wireless medium to transmit the message from a Web browser to an LCD screen attached to a Raspberry Pi. This project will be added to our collection of Internet of Things (IoT) projects because messages can be sent from any Internet-connected device, such as a computer, smartphone, or tablet.
A bulletin board serves as a vital means of communicating and collecting information. Notice boards are common at many public and private establishments, including schools, universities, train and bus stations, retail centers, and workplaces. You can use a notice board to get the public's attention, promote an upcoming event, announce a change in schedule, etc. A dedicated staff member is needed to pin up the notices. It will take time and effort to fix the problem. Paper is the primary medium of communication in traditional analog notice boards. There is a limitless amount of data available to use. As a result, a lot of paper is consumed to show off those seemingly endless numbers.
We set up a local web server for this demonstration for the Web Controlled Notice Board, but this could be an Internet-accessible server. Messages are shown on a 16x2 LCD connected to a Raspberry Pi, and the Pi uses Flask to read them in from the network. In addition, raspberry will update its LCD screen with any wireless data it receives from a browser. In this piece, I'd like to talk about these topics.
Components Required:
Raspberry Pi 4
Wi-Fi USB adapter
16x2 LCD
Bread Board
Power cable for Raspberry Pi
Connecting wires
10K Pot
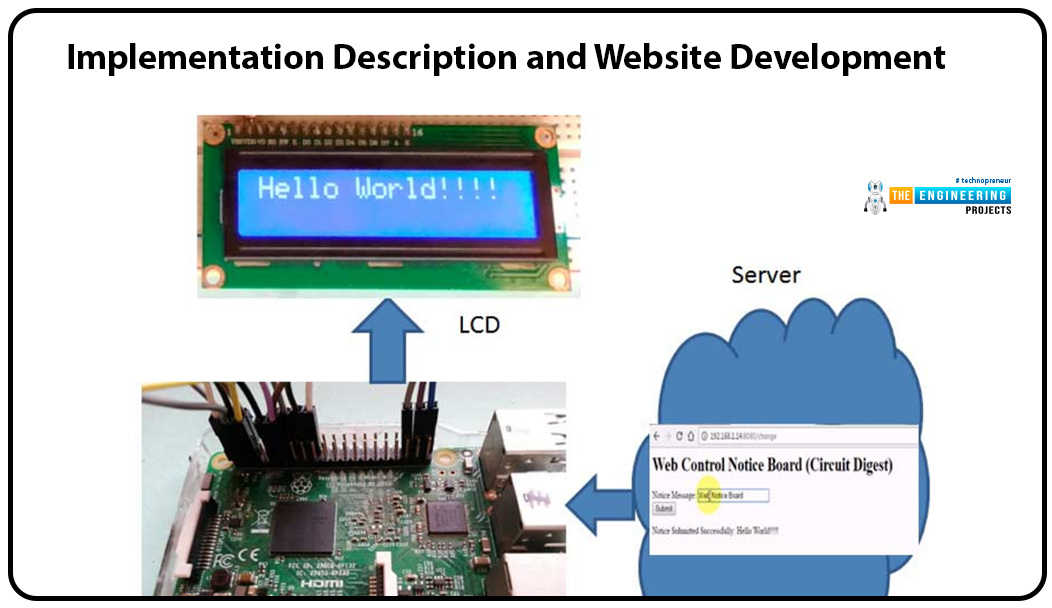
Implementation Description and Website Development
Raspberry Pi is the central component in this project and is utilized to manage all associated tasks. Such as operating an LCD screen, getting server-sent "Notice messages," etc.
Here we will learn how to use Flask to set up a web server that will allow you to send a "Notice Message" from your browser to a Raspberry Pi. In Python, the Flask serves as a miniature framework. Designed with the hobbyist in mind, this Unicode-based tool includes a development server, a debugger, support for integrated unit testing, secure cookie support, and an intuitive interface.
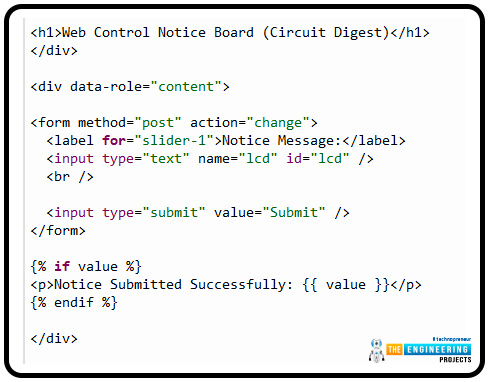
We have built a simple web page with a message box and a submit button so that users can type in their "Notice Message" and send it to the server. HTML was used extensively in the creation of this web app. The source code for this page is provided below and is written straightforwardly.
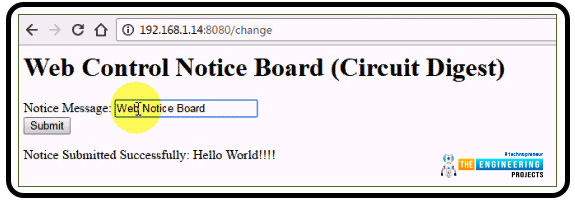
A user can create an HTML file by pasting the code above into a text editor (like notepad) and saving the file as HTML. It is recommended that the HTML file for this Web-based message board be placed in the same folder as the Python code file. Now you can execute the Python code on your Raspberry Pi, navigate to the IP address of your Pi:8080 URL in your web browser (for example, http://192.168.1.14:8080), type in your message, and hit the submit button; your message will immediately appear on the LCD screen attached to the Pi.
The webpage is coded in HTML and features a textbox, submit button, and heading (h1 tag) labeled "Web Control Notice Board." When we hit the submit button, the form's "change" action will be carried out via the post method in the code. However, the "Notice Message" label on the slider blocks its use.
We may add a line after that to display the text that we've transmitted to the RPi over the server.
The text box is checked to see if it contains any data, and if it does, the content is printed on the webpage itself so the user can view the provided message. In this context, "value" refers to the text or notification message we enter in the text box or slider.
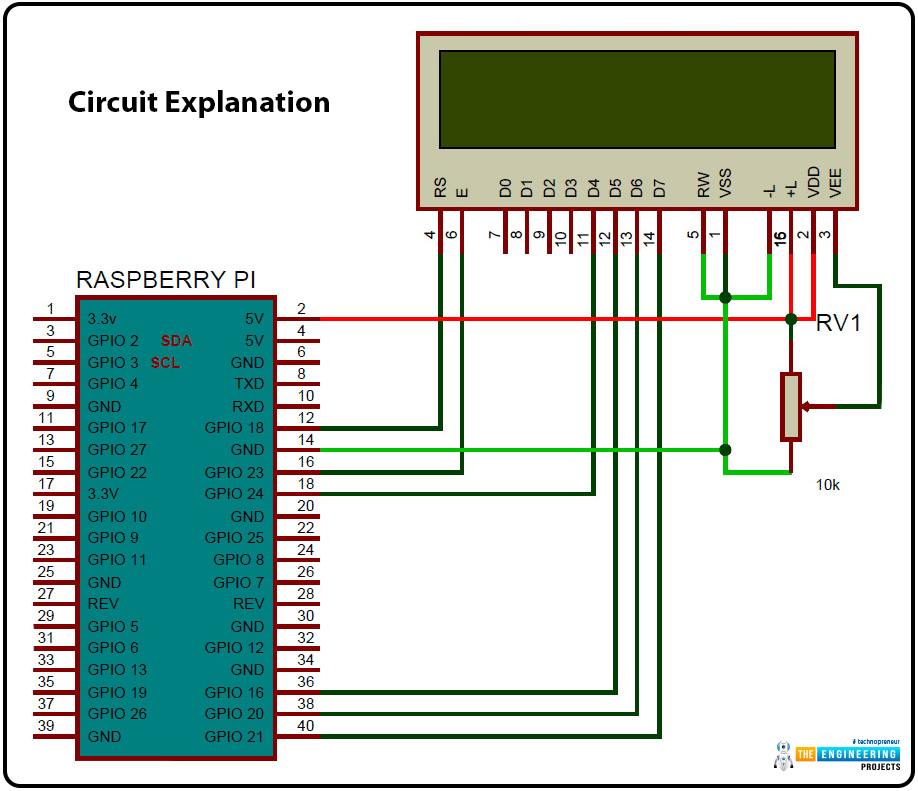
Circuit Explanation
To assemble this wireless bulletin board, you need to use a few connectors on a breadboard to link an LCD to a Raspberry Pi board. The PCB count for user connections can be zero. Pins 18 (GND), 23 (RS/RW), and 18 (EN) are hardwired to the LCD. The Raspberry Pi's GPIOs (24, 16, 20, 21) are linked to the LCD's data ports (D4, D5, D6, D7). The LCD backlight may be adjusted with a 10K pot.
Remember that earlier versions of the Raspberry Pi do not include Wi-Fi as standard; therefore, you must connect a USB Wi-Fi adapter to your device if you do not have a Raspberry Pi 3.
What is Flask?
A web framework, Flask. That's right; Flask gives you everything you need to make a web app: tools, libraries, and technologies. A web application might be as small as a few pages on the Internet or as large as a commercial website or web-based calendar tool.
The micro-framework includes the category "flask." Micro-frameworks, in contrast to their larger counterparts, typically have, if any, reliance on third-party libraries. Like with anything, there are benefits and drawbacks to this. Cons include that you may have to do more work on your own or raise the number of dependencies by adding plugins, despite the framework's lightweight, low number of dependencies, and low risk of security vulnerabilities.
What are template engines?
Do you have experience creating websites? Have you ever found that you needed to write the same thing several times to maintain the website's consistent style? Have you ever attempted to modify the look of a site like that? Changing a website's face with a few pages will take time, but it is manageable. But, this can be a daunting effort if you have several pages (like the list of products you sell).
You may establish a standard page layout with templates and specify which content will be modified. Your website's header may then be defined once and applied uniformly across all pages, with only a single maintenance point required in the event of a change. Using a template engine, you may cut down on development and upkeep times for your app.
With this new knowledge, Flask is a micro-framework developed with WSGI and the Jinja 2 templates engine.
Key benefits of Flask include:
Setup and operation are simple.
Independence in constructing the web application's architecture.
Because it lacks "flask rules" like other frameworks like Django, Flask places a more significant burden on the developers to properly structure their code. This framework will serve as the basis for the growing complexity of the web app.
Explanation of Code with Flask
The programming language of choice for this project in Python. Users must set up Raspberry Pi before writing any code. If you haven't already, look at our introductory Raspberry Pi guide and the one on installing and setting up Raspbian Jessie on the Pi.
The user must run the following instructions to install the flask support package on the Raspberry Pi before programming it:
pip install Flask
It is necessary to change the Internet protocol address in the Program to the Internet address of your RPi before running the Program. By entering the ifconfig command, you may see your RPi board's IP address:
Ifconfig
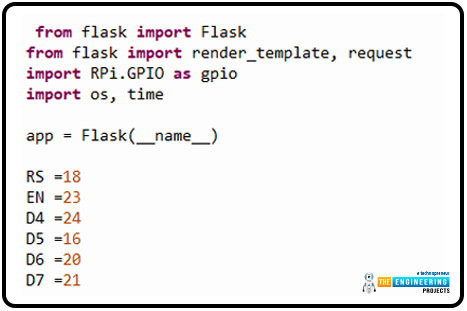
To carry out all of the tasks, the programming for this project is crucial. We begin by including the Flask libraries, initializing variables, and defining LCD pins.
from flask import Flask
from flask import render_template, request
import RPi.GPIO as gpio
import os, time
app = Flask(__name__)
RS =18
EN =23
D4 =24
D5 =16
D6 =20
D7 =21
Call the def lcd init() function to configure an LCD in four-bit mode. Next, to send a command or data to an LCD, call the def lcdcmd(ch) or the lcddata(ch) functions. Finally, to send a data string to an LCD, call the def lcdstring(Str) function. The provided code allows you to test each of these procedures.
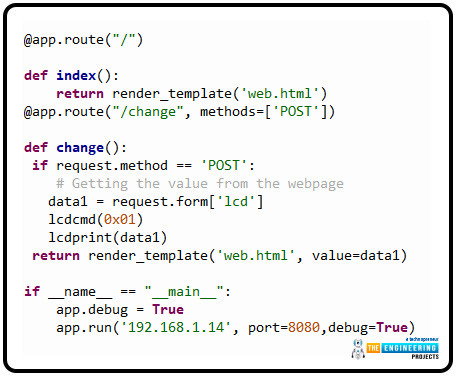
The code snippet below is used to communicate between a web browser and Raspberry Pi through Flask.
@app.route("/")
def index():
return render_template('web.html')
@app.route("/change", methods=['POST'])
def change():
if request.method == 'POST':
# Getting the value from the webpage
data1 = request.form['lcd']
lcdcmd(0x01)
lcdprint(data1)
return render_template('web.html', value=data1)
if __name__ == "__main__":
app.debug = True
app.run('192.168.1.14', port=8080,debug=True)
This is how we can create an Internet of Things–based, Web–controlled wireless notice board using a Raspberry Pi LCD and a web browser. Below is a video demonstration and the complete Python code for your perusal.
Advantages IoT Bulletin Board Managed Using Web Interface
There are numerous benefits to using the Internet for message delivery. The benefits are multiple: a faster data transfer rate, higher quality messages, less time spent waiting, etc. Using user names and passwords provides a more robust level of security. Here, a raspberry pi can serve as a minicomputer's brain. This means we can now send high-quality picture files such as Jpg, jpeg, png, and pdf documents in addition to standard text communications.
The delete option contributes to the new system's ease of use. This makes it possible to undelete any transmission at any moment. This method is the initial step in realizing the dream of a paperless society. Communities that use less paper have a more negligible impact on the environment. Adding visuals to screens is now possible thanks to the benefits of Raspberry Pi. Including visuals increases readability and interest.
All different kinds of bulletin boards have the same overarching purpose: to disseminate information to as many people as possible. This device can reach more people than traditional bulletin boards made of wood. Data downloaded from the cloud can be kept in the Raspberry pi's onboard memory. The system's stability will be ensured in this manner. The data is safe against loss even if the power goes out. These benefits allow the suggested method to be expanded to global, real-time information broadcasting.
Complete code
from flask import Flask
from flask import render_template, request
import RPi.GPIO as gpio
import os, time
app = Flask(__name__)
RS =18
EN =23
D4 =24
D5 =16
D6 =20
D7 =21
HIGH=1
LOW=0
OUTPUT=1
INPUT=0
gpio.setwarnings(False)
gpio.setmode(gpio.BCM)
gpio.setup(RS, gpio.OUT)
gpio.setup(EN, gpio.OUT)
gpio.setup(D4, gpio.OUT)
gpio.setup(D5, gpio.OUT)
gpio.setup(D6, gpio.OUT)
gpio.setup(D7, gpio.OUT)
def begin():
lcdcmd(0x33)
lcdcmd(0x32)
lcdcmd(0x06)
lcdcmd(0x0C)
lcdcmd(0x28)
lcdcmd(0x01)
time.sleep(0.0005)
def lcdcmd(ch):
gpio.output(RS, 0)
gpio.output(D4, 0)
gpio.output(D5, 0)
gpio.output(D6, 0)
gpio.output(D7, 0)
if ch&0x10==0x10:
gpio.output(D4, 1)
if ch&0x20==0x20:
gpio.output(D5, 1)
if ch&0x40==0x40:
gpio.output(D6, 1)
if ch&0x80==0x80:
gpio.output(D7, 1)
gpio.output(EN, 1)
time.sleep(0.0005)
gpio.output(EN, 0)
# Low bits
gpio.output(D4, 0)
gpio.output(D5, 0)
gpio.output(D6, 0)
gpio.output(D7, 0)
if ch&0x01==0x01:
gpio.output(D4, 1)
if ch&0x02==0x02:
gpio.output(D5, 1)
if ch&0x04==0x04:
gpio.output(D6, 1)
if ch&0x08==0x08:
gpio.output(D7, 1)
gpio.output(EN, 1)
time.sleep(0.0005)
gpio.output(EN, 0)
def lcdwrite(ch):
gpio.output(RS, 1)
gpio.output(D4, 0)
gpio.output(D5, 0)
gpio.output(D6, 0)
gpio.output(D7, 0)
if ch&0x10==0x10:
gpio.output(D4, 1)
if ch&0x20==0x20:
gpio.output(D5, 1)
if ch&0x40==0x40:
gpio.output(D6, 1)
if ch&0x80==0x80:
gpio.output(D7, 1)
gpio.output(EN, 1)
time.sleep(0.0005)
gpio.output(EN, 0)
# Low bits
gpio.output(D4, 0)
gpio.output(D5, 0)
gpio.output(D6, 0)
gpio.output(D7, 0)
if ch&0x01==0x01:
gpio.output(D4, 1)
if ch&0x02==0x02:
gpio.output(D5, 1)
if ch&0x04==0x04:
gpio.output(D6, 1)
if ch&0x08==0x08:
gpio.output(D7, 1)
gpio.output(EN, 1)
time.sleep(0.0005)
gpio.output(EN, 0)
def lcdprint(Str):
l=0;
l=len(Str)
for i in range(l):
lcdwrite(ord(Str[i]))
begin()
lcdprint("Circuit Digest")
lcdcmd(0xc0)
lcdprint("Welcomes You")
time.sleep(5)
@app.route("/")
def index():
return render_template('web.html')
@app.route("/change", methods=['POST'])
def change():
if request.method == 'POST':
# Getting the value from the webpage
data1 = request.form['lcd']
lcdcmd(0x01)
lcdprint(data1)
return render_template('web.html', value=data1)
if __name__ == "__main__":
app.debug = True
app.run('192.168.1.14', port=8080,debug=True)
Conclusion
We accomplished our goal of constructing a minimal IoT-based bulletin board. The world is becoming increasingly digital; thus, new methods must be applied to adjust the currently used system. Wireless technology allows for quick data transfer even across great distances. It reduces setup time, cable costs, and overall system footprint. Information transmission is global in scope. There is a password- and username-based authentication mechanism available for further fortifications. Before, a Wi-Fi-enabled bulletin board served this purpose. While coverage was restricted in the former, in the latter, we make use of the Internet as a means of communication. Hence, the scope of coverage is smooth. A chip or an SD card can be used to store multimedia information. The speed and quality of receiving and viewing text and multimedia data are maximized.


