Following this, we will configure bitwarden and host it on our Raspberry Pi 4. The last tutorial discussed utilizing a Raspberry Pi to install and run zeroTire on pi 4. By the end of the project, you will have learned how to set up a Raspberry Pi 4 with the necessary software for password management, including bitwarden, docker containers, and portainer, and how to configure their respective user interfaces.

| Where To Buy? | ||||
|---|---|---|---|---|
| No. | Components | Distributor | Link To Buy | |
| 1 | Raspberry Pi 4 | Amazon | Buy Now | |
Why Would You Do This?
An effective password manager is a must-have. For the past decade-plus, I've relied on a password manager. The catch is that not all security-focused apps are created equal. Initially, I relied on password managers in my browser, but I soon switched to KeePass. It was an intelligent move ten years ago. The export features of my browsers allowed me to import all of my passwords into a single KeePass database, where I could then construct a system to keep track of them. However, technology has advanced, and now there are safer alternatives to these password managers. Once I discovered I could self-host Bitwarden, I felt it was my best option. I had been using LastPass with Mobile, but as they introduced sync limits into their free tiers, I decided to uninstall it. YubiKey compatibility is one of the features that Bitwarden lacks compared to LastPass, but which I was able to implement thanks to self-hosting. KeePass's lack of support for statistics on hacked, weak, and recycled passwords is disappointing. Most people agree that Bitwarden is the most excellent free password manager.
Components
Raspberry pi 4
Power supply
Ethernet or wifi
Preparing your Raspberry Pi for Bitwarden
To host our Bitwarden server on our domain, we must first take care of a few technical details. Setting up Docker is a necessary first step.
If we like, we can also decide to use Portainer for Docker container management. Either we can run it from the command-line interface or incorporate it into Portainer. A Bitwarden container can be managed with Portainer's user-friendly online interface.
We can then upgrade our operating system once Docker has been installed and a decision has been made regarding using Portainer. After applying the latest updates, our Raspberry Pi should be in peak running condition and ready to host Bitwarden.
Installation of Docker on a Raspberry Pi 4
It's no exaggeration to say that Docker is a powerful piece of software because it enables OS-level virtualization to distribute software applications within containers. When running inside a container, the software is restricted from accessing any resources that weren't explicitly allocated by the Docker runtime. Since everything is contained within the containers the runner installs, Docker makes it easy to distribute your software to devices. What's more, Docker accomplishes all of this with minimal extra effort. The software's low overhead makes it possible to function on a Raspberry Pi, which has little RAM and processor power.
The Docker team has made it easy to set up their container program by creating a handy installation script. Connecting via SSH to your RPi is an option for completing the tasks below.
The following command will fetch and run Docker's official installation script.

curl -sSL https://get.docker.com | sh
The code will be inserted into the command prompt if you use this command. Usually, you shouldn't, but you can trust Docker, so we'll make an exception here. You can view the script at get.docker.com if you are hesitant to run it before inspecting it. Time should be allowed for this code to finish as it will autodetect and install all requirements to run the Docker container on the RPi.
Portainer setup on a Raspberry Pi 4
The container management tool Portainer is small, accessible, and open-source. You may use this program to efficiently build, manipulate, and remove Docker containers on your Raspberry Pi. The software is simple to operate and requires no configuration outside of a Docker container, making it a breeze to set up.
Due to its lightweight design, Portainer doesn't significantly slow down your computer's performance. It's the best option for controlling your containers without messing with the command-line interface.
Once Docker has been installed and configured, Portainer can be installed on the Raspberry Pi. The newest version of Portainer can be obtained by using the command below, as it is hosted as a container on the public Docker hub.

sudo docker pull portainer/portainer-ce:latest
The docker file will be downloaded to your device after running this command. We tell it to get the ARM versions of the container by adding ":Linux-arm" to the conclusion of the pull request.
To begin using Portainer, wait for Docker to complete downloading the file to your RPi. We need to supply some more parameters when telling Docker to launch this container. Launch Portainer on your Pi by typing the command below into the console.

sudo docker run -d -p 9000:9000 --name=portainer --restart=always -v /var/run/docker.sock:/var/run/docker.sock -v portainer_data:/data portainer/portainer-ce:latest
The most important things we accomplish here involve defining which ports Portainer should have access to. For us, it means using port 9000. Assigning the name "portainer" to this docker container facilitates easy recognition in the event of an emergency. If this Docker goes offline for whatever reason, the Docker management is instructed to start it up again.
Accessing Portainer with its Web-Based UI
You must establish a connection to the program's graphical interface before we can proceed with any tasks. You'll need access to an internet browser and the IP address of your RPi to complete this. The local IP address of your Raspberry Pi may be easily retrieved if you have forgotten it. The IP address allotted to our Pi locally can be shown by entering the hostname command.
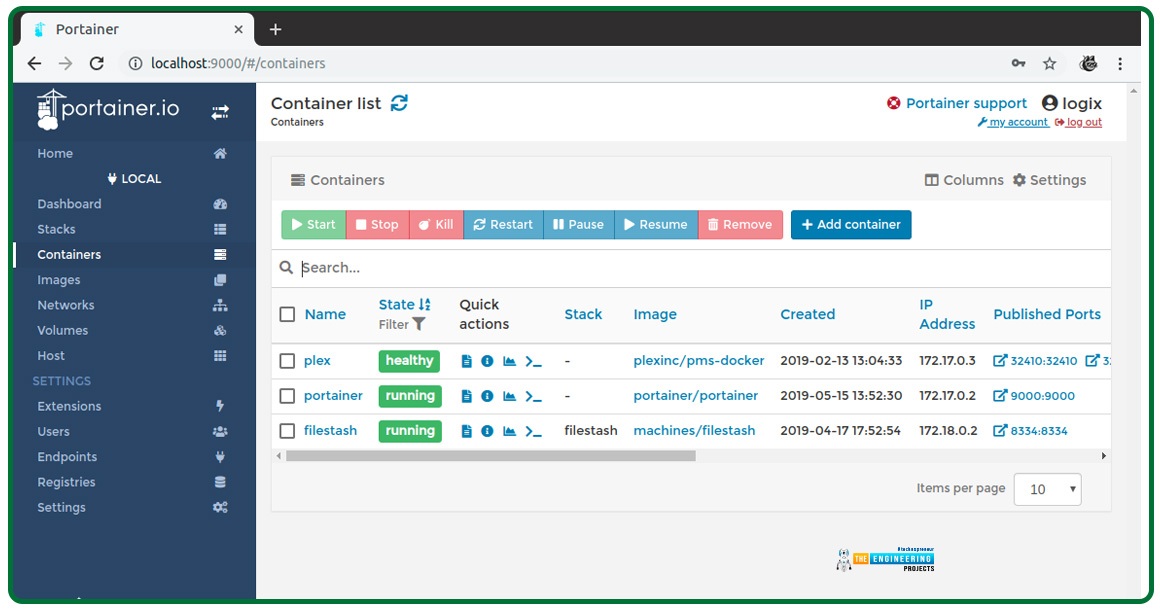
hostname -I
For the quickest and easiest access to Portainer, simply type the following into your browser. You see that the port ":9000" is explicitly specified at the end of the address. The location at which Portainer can be accessed is this port.

http://[PIIPADDRESS]:9000
Always change "[PIIPADDRESS]" to your RPi's private IP address. This IP address was part of the previous steps' necessary actions.
How to set up Portainer on Pi 4?
When you first access the online interface for Portainer, you'll be prompted to make an administrator account. Specifying a username is required to establish this administrator account. Next, create a password for the new version. Passwords for Portainer must be a minimum of 12 letters in length. After entering the desired username and password, you can create the user by clicking the "Create user" button.
Now we can tell Portainer what kind of container ecosystem to maintain. The Docker option is the best fit for our needs. After making this selection, hit the Connect button.

The Portainer installation on your RPi should now be complete. Now you may use it to control the containers on any computer or mobile device.

Raspberry Pi 4 Bitwarden Setup
Now that our RPi is ready, we can proceed with installing the Bitwarden application. The availability of Bitwarden RS as a container in Docker makes its setup a breeze.
To set up Bitwarden with Portainer
The first part of this section will explain how to set up Bitwarden on Pi 4 using the Portainer online interface. We've already established that Portainer is an excellent option for managing Bitwarden on your RPi without using Secure Shell.
Bitwarden Container Preparation
First, we'll need to have Portainer set up so we can deploy the Bitwarden container. A few simple steps are required, but the total time is relatively short.
To get started, launch the Portainer web UI. The IP address of your Pi 4, followed by port 9000, will give you access to this.

Make sure that "[PIIPADDRESS]" is changed to the IP address of your Raspberry Pi.
You must switch to the local Container endpoint while loading the interface. To access the container management interface, please go here.
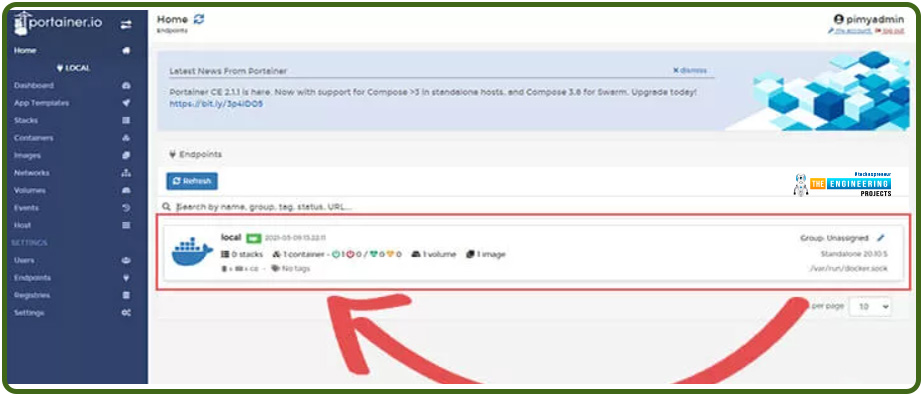
It is necessary to construct a volume for the Bitwarden containers before they can be created. Look for a link labeled "Volumes" in the menu slides out from the side.
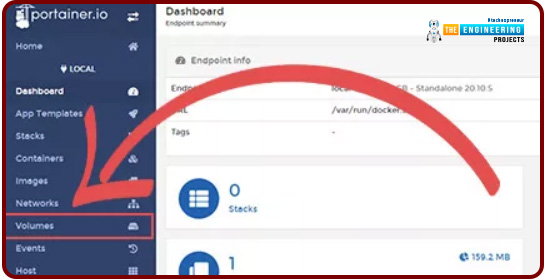
There should be a collection of volumes you've made available here. An "Add volume" link must be placed here first. To access the volume settings, press the button.
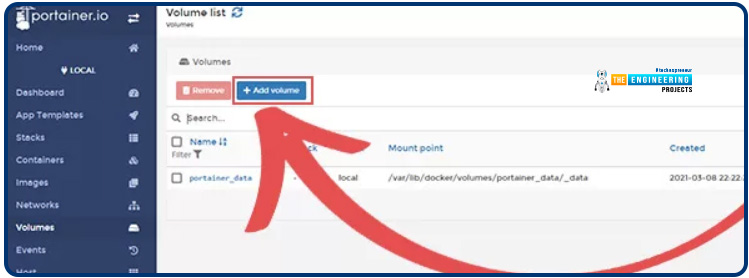
A title should be selected for this new volume. In this tutorial, we will continue using Bitwarden exclusively. Simply give the book you're creating in RPi Bitwarden a title, and then hit the "Create the volume" option.
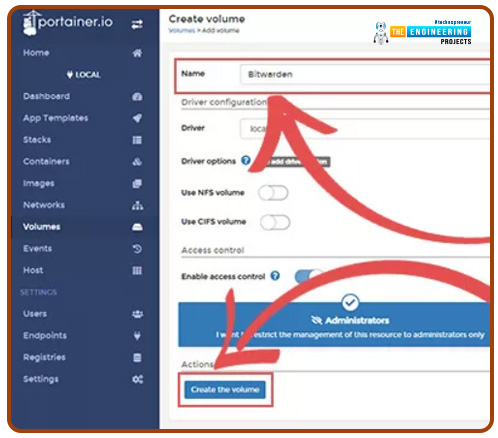
Following successfully creating the volume, we must now navigate to the "Containers" section of the interface. To toggle to this view, select "Containers" from the sidebar.
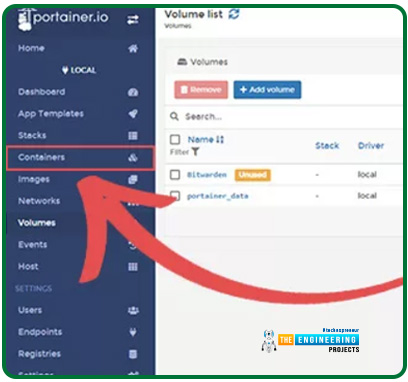
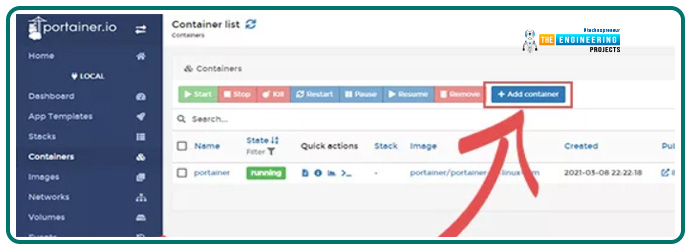
The containers that can be used with your RPi are listed below. The "Add container" button is up here somewhere.
Developing the Pi 4 Bitwarden RS Container
We have completed the preliminary setup and are ready to install the Bitwarden on our RPi.
As a first step, identify the container's label. Our own container's name is Bitwarden. The next step is to tell Docker which image to retrieve. This is the RPi's Bitwarden container in our instance. Don't forget to type "vaultwarden/server:latest" into the "Image" field.
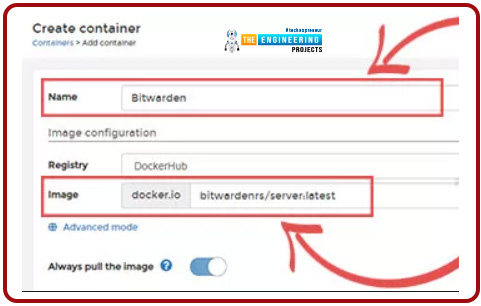
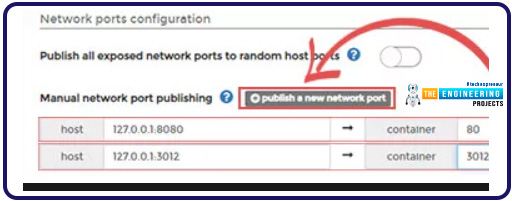
The container's network configuration comes next. Find the heading labeled "Network ports setup."
Select the "publish a new network port" button below this heading twice. The boxes to set the Bitwarden ports to expose should now be visible.
Firstly, ensure the host is set to "127.0.0.1:8080" in the first box. Make sure that port 80 is entered into the container settings as well. From this port, you can access Bitwarden's web-based administration console.
To proceed to Step 2, please change the host to "127.0.0.1:3012". The correct port number for "container" is 3012. (3.). This port is used by Bitwarden for communicating over web sockets. As a side note, both host ports have been tied to the local computer. Because we can use them without any extra hardware, these are made public via a reverse proxy hosted by NGINX.
Keep going down until you reach the advanced containers settings heading. If you want to adjust the volume, click the "Volumes" tab. To add the RPi's volume to the container, we must next select the "map extra volume" option. Ensure that "/data" is entered into the "container" field.
At this point, we'll want to apply the custom volume setting we made before. Bitwarden-local is a good name for this.
Our next step is to keep Bitwarden running on the Raspberry Pi. Changing the startup policy will accomplish this. Simply select the "Restart policy" tab here. There should be an "Always" option for restarting. That way, even if the container goes offline for any reason, Docker will attempt to keep it running.
We may now deploy the Bitwarden containers after we have done setting it. The "Deploy the container" button may be found under this site's "actions" heading.

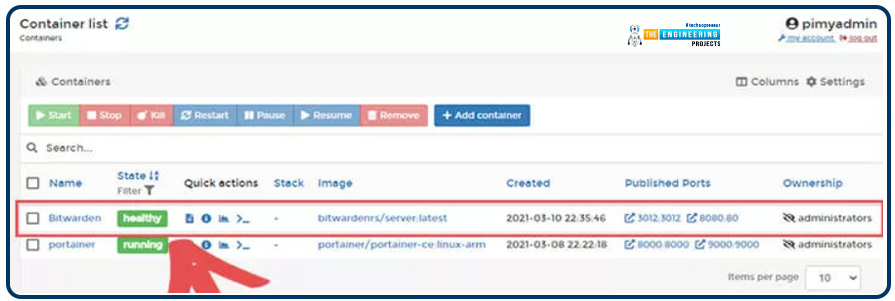
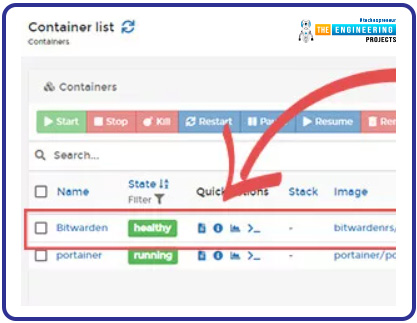
In the containers list, you'll find Bitwarden once Portainer has downloaded the file to your Pi 4. Below is a snapshot of our containers list after Bitwarden was successfully installed.
Docker command line interface installation of Bitwarden
You can also use the command line interface if you avoid installing and using Portainer with Bitwarden on the RPi. Following these instructions, you can successfully download and install Bitwarden on your device.
We will use Docker to retrieve the most recent version of Bitwarden RS. The newest server version will be downloaded and made available after these procedures.

docker pull vaultwarden/server:latest
Docker will automatically begin downloading Bitwarden RS to the Pi 4. The next step will be to launch the image. To accomplish this, please type in the command below and hit enter.
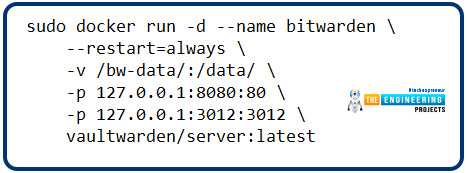
sudo docker run -d --name bitwarden \
--restart=always \
-v /bw-data/:/data/ \
-p 127.0.0.1:8080:80 \
-p 127.0.0.1:3012:3012 \
vaultwarden/server:latest
With this command, our Bitwarden RS servers will begin running from the downloaded file. The ports to which we require Docker to connect the Bitwarden image are then specified. Here, we're listening for connections on port "8080" to our web server. As a next step, we open up "port 3012," which is the port Bitwarden's URL sockets use for communication. The RPi's localhost IP address will be the only one able to access these ports (127.0.0.1). In the following part, we'll set up a proxy server to enable HTTPS for Bitwarden, allowing it to be accessed from outside the local network.
Installing Bitwarden with an NGINX Proxy
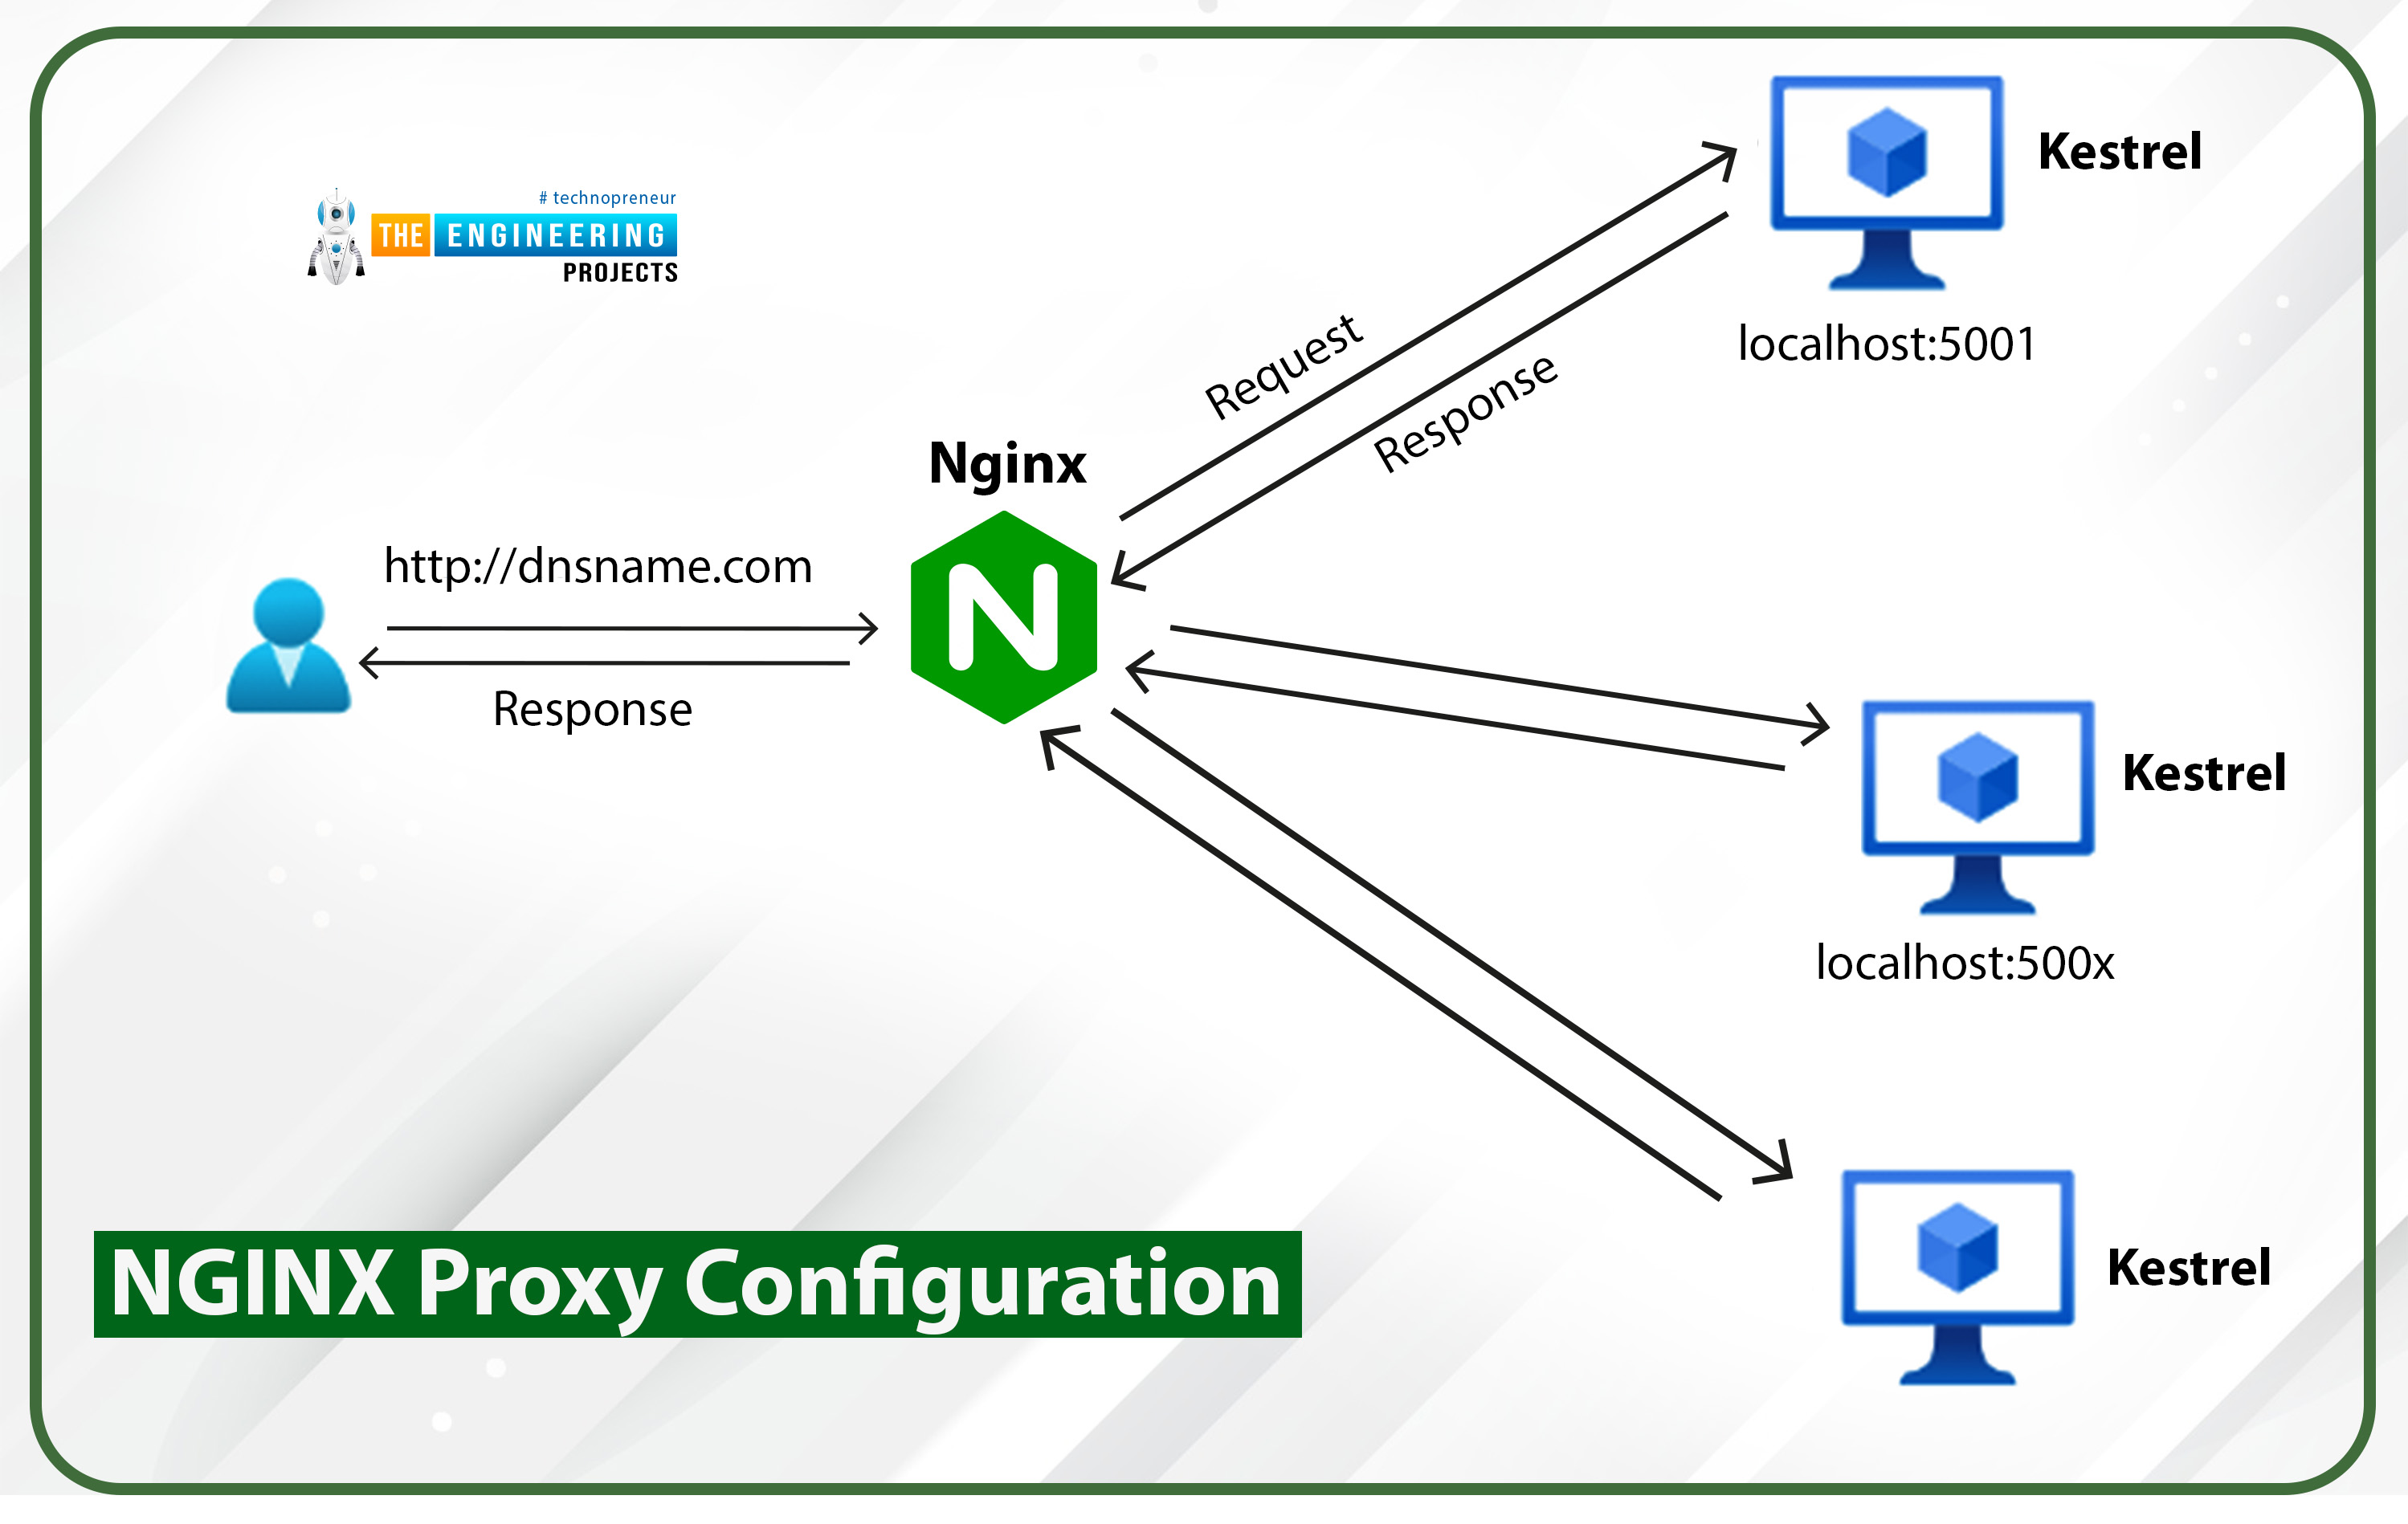
We have Bitwarden functioning, but it is not usable unless we configure HTTPS. The Bitwarden WebClient uses secure HTTPS connections for certain JavaScript operations. Setting up an NGINX proxy is required to enable HTTPS functionality. NGINX will handle processing requests to our Bitwarden server hosted on an RPi.
Pi NGINX Preparation
Setting up NGINX is a prerequisite to deploying Bitwarden. To establish a secure HTTPS connection, it is necessary to install the web server program and create an SSL certificate.
NGINX installation is a prerequisite for continuing with this section. So then, let's go ahead and do it.
Raspberry Pi NGINX installation.
There are a few reasons why Nginx is a good choice than Apache for Pi 4. NGINX is preferable to other web servers for the Raspberry Pi because it makes more efficient use of the Pi's limited resources, such as its memory and processing power. While NGINX has more space to maneuver than Apache, you still shouldn't count on it to handle heavy loads or major PHP tasks.
Since Apache2 may already be installed on your machine, we will use the command below to remove it. Since we want to use NGINX as our web server, we have decided to disable it from autostarting and accessing port 80. If you know that Apache2 hasn't been set up on your Pi 4, you can ignore this step.

sudo apt remove apache2
Now that we have the most recent versions of all the packages and have gotten rid of Apache 2, we can continue with the procedure. Finally, use your RPi to execute the command below and set up NGINX.

sudo apt install Nginx
Now that NGINX has been installed, we may launch it. To activate your RPi's web server, enter the command that follows into the terminal.

Sudo systemctl start Nginx.
Now that the NGINX server is running, we may obtain a local IP address. This is done so that we can use a different web browser to check the functionality of our web server. Use the hostname statement to learn your RPi's local Internet Protocol address.

hostname -I
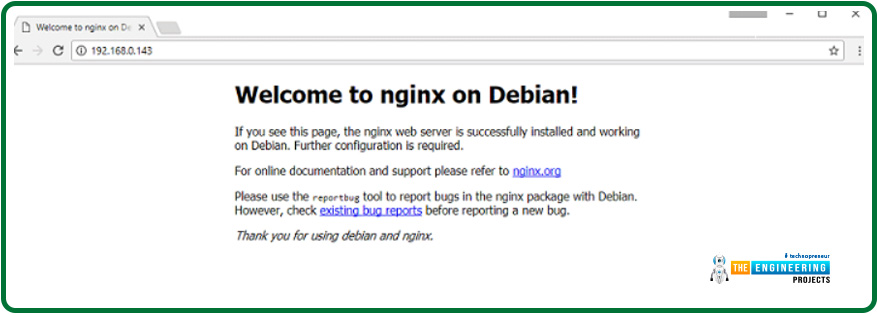
Now that we know the local Internet address for our Pi 4, we can visit that location in any internet browser. Once you have the local Internet Protocol Address by using hostname -I, simply navigate there. The address http://192.168.0.143 works for me.

http://YOUR PI's IP ADDRESS
If you type in the URL above, your browser should take you to the desired location. In the rare case that this displays an Apache page, you should not worry; NGINX does not always replace the Apache index.html file.
After NGINX is set up, we'll make an SSL cert for it. You can make a license on your RPi in two distinct ways.
You can use "Let's Encrypt to generate a trusted SSL certificate" if you have a domain name registered with them. A signed certificate cannot be issued with just an Internet address as the DNS name. If you follow this way, remember to write down the path to where your certificate is kept.
Secure Sockets Layer Certificates for Raspberry Pi with Let's Encrypt
Using this Certbot client and your existing web server or a temporary server, you can acquire an SSL cert from Let's Encrypt. To purchase an SSL Cert for your RPi, you must have a DNS name directed to your Internet address. Ensure your DNS settings are configured to avoid going through Cloudflare's proxy if you use them as your DNS provider. As the proxy disguises your actual internet protocol address, the Let's Encrypt program will be unable to validate your RPi's IP address and provide an SSL cert.

Now, using one of the commands below, we may install the LetsEncrypt application onto our Pi 4. "Cabot" is the program's name in question. Set up the certbot package for Apache if you're using that web server, or use the standalone certbot program.

sudo apt install python3-certbot-apache
sudo apt install certbot
Now that Certbot is set up, we can go to Let's Encrypt and request an SSL cert for our Pi 4. The situation can be approached from two different angles. You can ignore this step if you do not use Apache. If you're using Apache, you may quickly and easily install a certificate into Apache's settings by executing the following command. To begin, you must ensure that ports 80 and 443 are routed. Cloudflare, which disguises your Internet address, must be temporarily bypassed if it is your DNS service provider.
sudo certbot --apache
We can take two approaches to obtain a license cert from Let's Encrypt if Apache is not used. With certbot, we have the option of running a separate python server to seize the host machine. You can also use another web server, such as NGINX, and we will still be able to retrieve the certificate from it. Once you get the license, though, you will need to set it up manually.
If you want to use the web server without having to install anything more, all you have to do is ensure port 80 is open and forwarded. You must modify example.com to your domain name.
sudo certbot certonly --standalone -d example.com -d www.example.com
More expertise is needed to use webroot than the installed web server. Check that the directory /var/www/example exists and can be accessed from the internet by changing its pointing to the correct location.
sudo certbot certonly --webroot -w /var/www/example -d example.com -d www.example.com
Following these instructions, you will be asked to supply information, including your e-mail address. The information you provide will help Let's Encrypt maintain track of the licenses it issues and get in touch with you if any problems arise. After you enter the necessary data, it will immediately retrieve the permit from Let's Encrypt. If you are having problems, check that ports 80 & 443 are not banned and that your DNS name is correctly pointed to your IP address. Finally, if Cloudflare is your DNS service provider, double-check that the DNS settings currently exclude the proxy servers. This is where certbot client licenses will be saved after being downloaded.
The secret key file for the license (privkey.pem) and the entire certificate chain (fullchain.pem) can be found in these directories. Keep in mind that these documents are what authenticates your Https connection and keep it safe; therefore, you shouldn't share them with anyone.
Building a solid Diffie-Hellman group is our final preparation step. This is to assist in strengthening SSL connections on your devices.
sudo openssl dhparam -out /etc/ssl/certs/dhparam.pem 2048
NGINX Proxy Configuration
To have NGINX act as a proxy for Bitwarden, a virtual host must first be created. Thankfully, setting NGINX as a proxy requires no effort.
First, we need to get rid of NGINX's factory settings file. If you intend to use Bitwarden with a domain name, there is no need to do so.
sudo rm /etc/nginx/sites-enabled/default
A newer NGINX config file must be made. Launch the nano editor and type the instruction below to get started editing this new configuration file.
sudo nano /etc/nginx/sites-enabled/bitwarden.conf
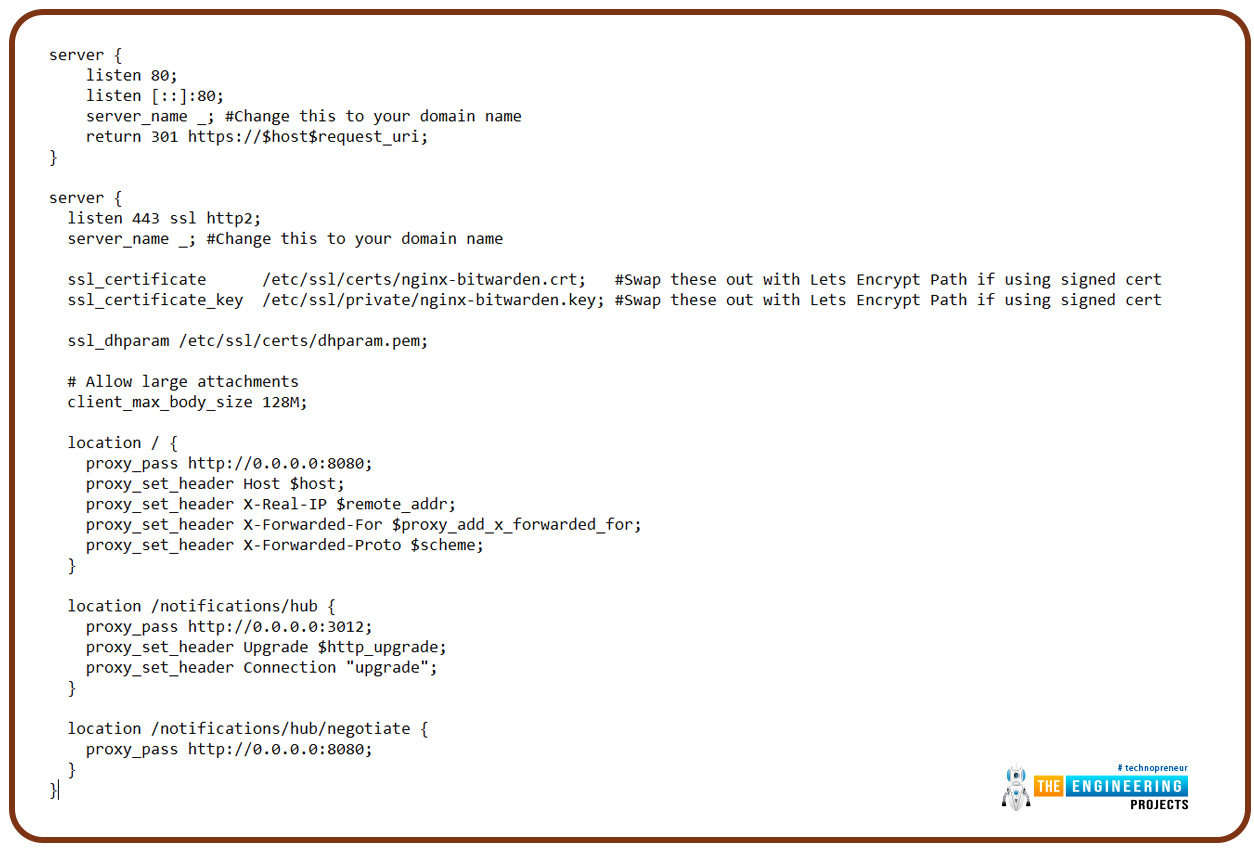
Copy and paste the below lines of text into this document. The first rule we're creating will force all HTTP (port 80) traffic to use HTTPS instead (port 443).
server {
listen 80;
listen [::]:80;
server_name _; #Change this to your domain name
return 301 https://$host$request_uri;
}
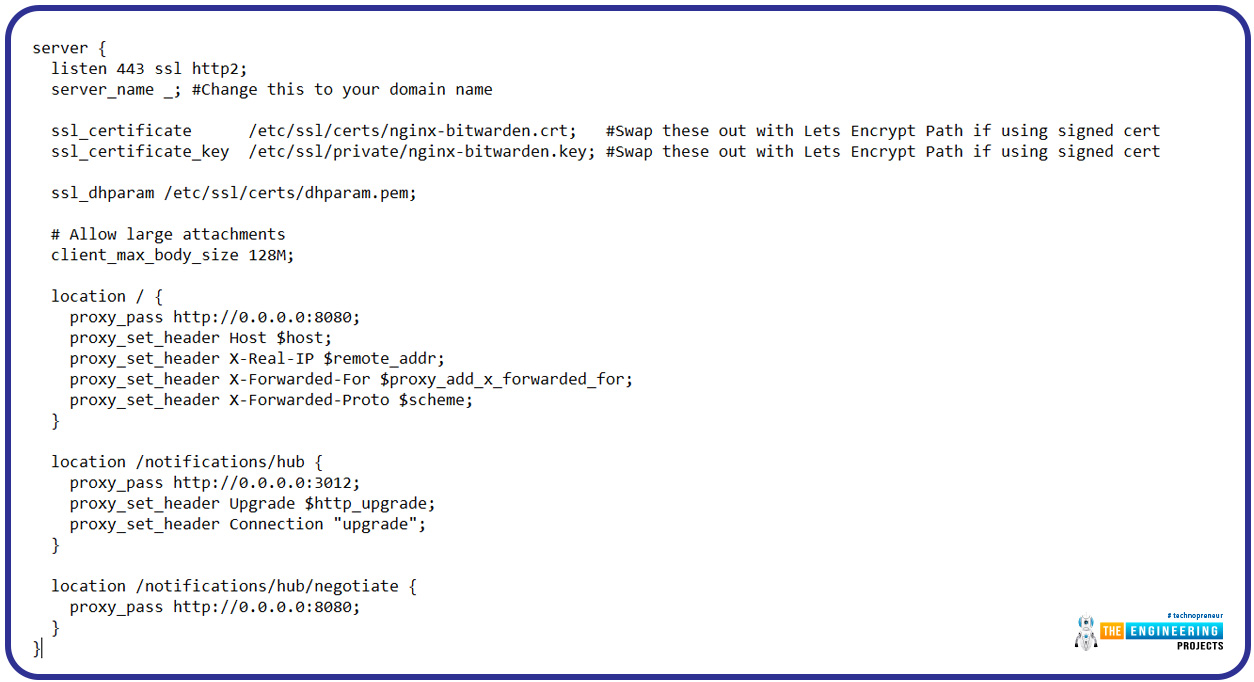
The web server block will manage the proxy and Hypertext transfer protocol connection we'll add next. If you created the certificate with Let's Encrypt, you'd also need to change the locations of the "SSL certificate" & "SSL certificate key" environment variables.
server {
listen 443 ssl http2;
server_name _; #Change this to your domain name
ssl_certificate /etc/ssl/certs/nginx-bitwarden.crt; #Swap these out with Lets Encrypt Path if using signed cert
ssl_certificate_key /etc/ssl/private/nginx-bitwarden.key; #Swap these out with Lets Encrypt Path if using signed cert
ssl_dhparam /etc/ssl/certs/dhparam.pem;
# Allow large attachments
client_max_body_size 128M;
location / {
proxy_pass http://0.0.0.0:8080;
proxy_set_header Host $host;
proxy_set_header X-Real-IP $remote_addr;
proxy_set_header X-Forwarded-For $proxy_add_x_forwarded_for;
proxy_set_header X-Forwarded-Proto $scheme;
}
location /notifications/hub {
proxy_pass http://0.0.0.0:3012;
proxy_set_header Upgrade $http_upgrade;
proxy_set_header Connection "upgrade";
}
location /notifications/hub/negotiate {
proxy_pass http://0.0.0.0:8080;
}
}
According to your needs, tweaks to your RPi Bitwarden server are sometimes necessary. If you have a custom domain name, you should substitute it for the server name.
At completion, your document should resemble the one displayed below.
You may now save this document. The NGINX service just has to be restarted at this point. Our modifications will not take effect until we continue the operation. Type in the following instructions if you want to reboot NGINX on your RPi.
sudo systemctl restart Nginx
The Bitwarden Web Client Access Procedure
The Bitwarden web application on our RPi is now accessible and usable, thanks to the installation of a proxy server.
Visit this link in your preferred web browser to access the Bitwarden interface. Always change "YOURPIIPADDRESS" to reflect your RPi's actual Internet address. A domain name, if you have one, must be used instead.
You will get a warning if you try using a certificate you signed yourself.
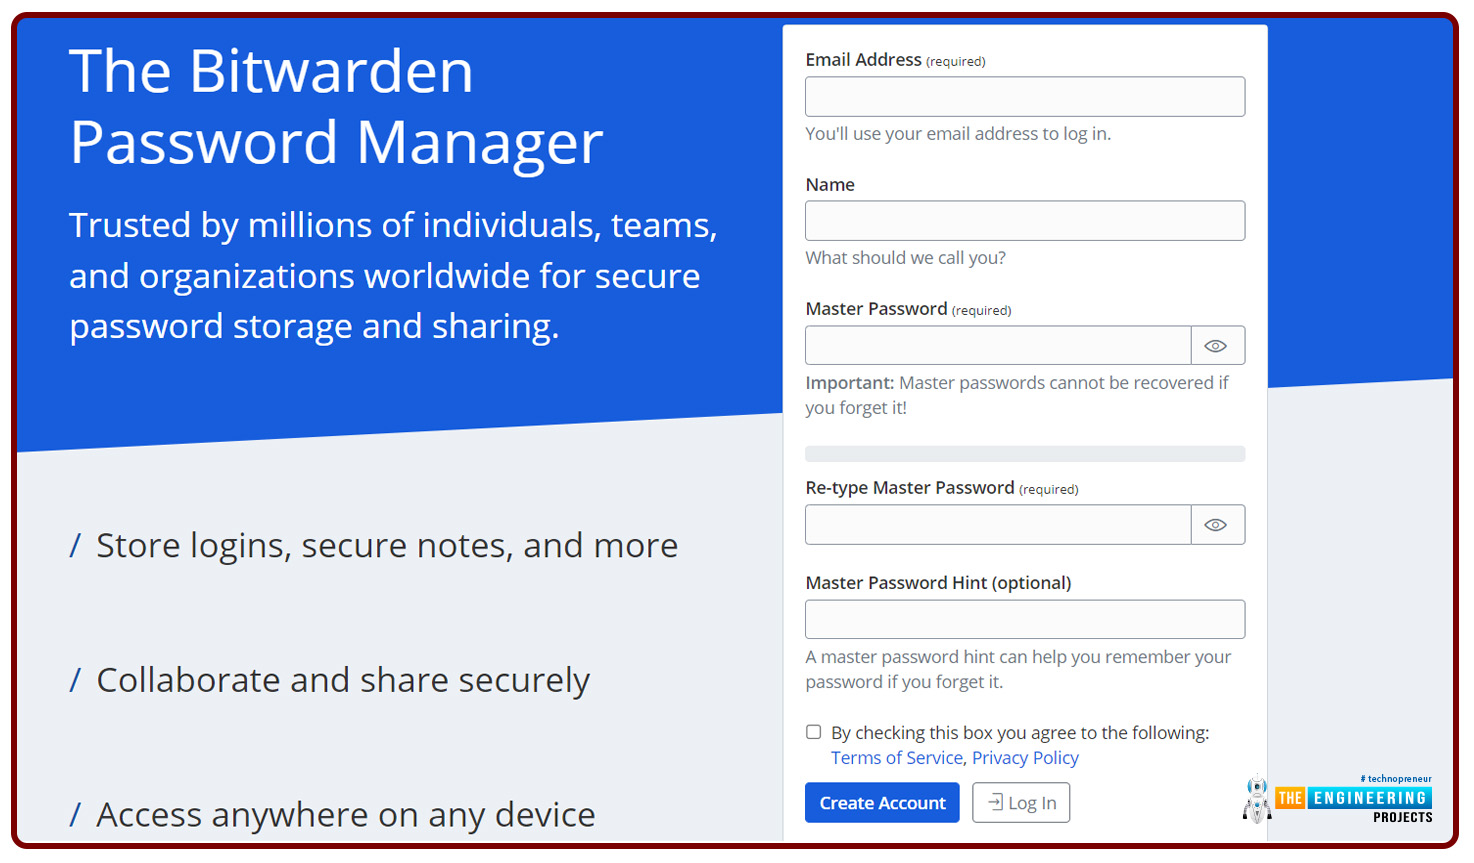
Creating a Bitwarden account is a prerequisite to using the service. There must be a "Create Account" link on the login screen. If you can locate this link, please click it.
Starting immediately, you can enter data for your brand-new account. To get prompted, type in your Bitwarden account's e-mail address. You'll need to use this e-mail address to sign in. Next, provide Bitwarden with a label to utilize throughout its user interfaces. Next, you'll want to protect this account with a strong password. This needs to be a robust and difficult-to-guess password. After reading and accepting Bitwarden's terms of service and privacy policy, you can finish creating your account. When you're through customizing your account, click the "Submit" button.
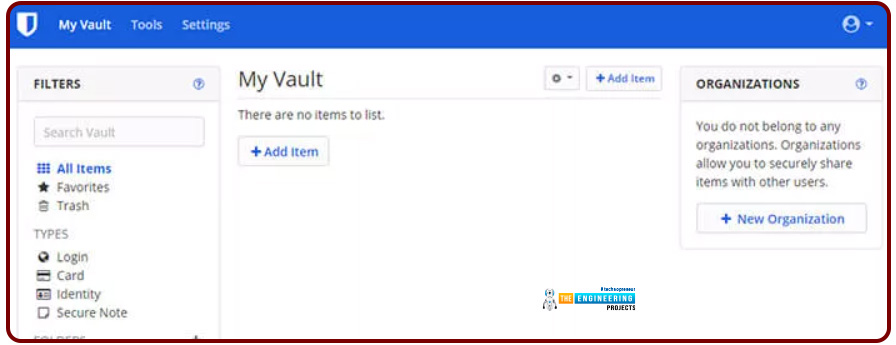
Having signed up, you can now access your Bitwarden vault. Enter the e-mail address you used to create the account first. Now, please log in using the password you just created. The "Log In" button is active, allowing you to enter the site.
Once you've installed Raspberry Pi Bitwarden, you may begin using it as a secure repository for your data.
Allowing access to the Bitwarden admin Panel
Your account has been created, and the administrator token can be created now. You'll need the admin token to go into the Bitwarden control panel. We'll have to adjust the settings on our Docker containers to accommodate this. You will have access to a list of all users who have registered, as well as the option to delete them from the administrative dashboard. Even if you've turned off the feature, you can still create invites for new users. Bitwarden's settings can also be adjusted through this user interface. You may wish to decide if you want others to be capable of signing up.
Create a new Admin Token
The first order of business is to produce a new Bitwarden administrator token. Given this token's importance, we will use OpenSSL to construct a long string of robust randomly generated digits. You may create this secure code using the following program on your Pi 4.
openssl rand -base64 48
Keep this token secure as it provides unrestricted access to the Bitwarden RS server if it falls into the wrong hands.
Connecting to the admin Panel
This current admin token will need inputted into the Bitwarden Docker container running on our RPi. The Portainer online interface or a customized command line can be used to accomplish this.
Configuring the Admin Token in Portainer
The Portainer UI must be launched, and then the container list revisited to change the administrator token. Find the Bitwarden container in the list of containers. Click on the link once you've located it to read more about it.
There must be a "Duplicate/Edit" button at the top of the page you're about to visit. The container's properties can be modified by clicking this button.
To access the "Advanced container options," please continue scrolling down. Click the "ENV" button to switch to the Environment tab under this header. For us to add the administrator token, please select the "add environment variable" button. After you click the button, you should see two new text fields appear at the page's footer. Just enter "ADMIN TOKEN" into the "name" field. A valid admin token must be entered in the "value" field. You can now click "Deploy the container" after creating the administrator token.
Please read the following message before attempting to update the Bitwarden container on your Raspberry Pi using Portainer. The container with the same name will be replaced, as shown by this message. For this, select the "Replace" option.
Configuring the Admin Token via the Terminal
Using a command prompt to update a container is a little more involved than doing it via the GUI, as you will need to delete the old container by hand. The Bitwarden container on our Pi 4 will need to be taken offline for us to delete it. Using this command, you can terminate a container that is already executing.
sudo docker stop bitwarden
Next, the old container must be discarded. If a container with an identical name and port number already exists, Docker will not allow us to create a duplicate. Execute the following command to get rid of the current Bitwarden container.
sudo docker rm bitwarden
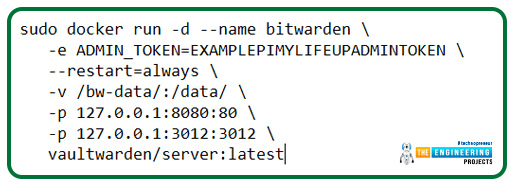
The final step is to restart the docker process. Instead of using the default token, we'll use the administrator token we just created.
sudo docker run -d --name bitwarden \
-e ADMIN_TOKEN=EXAMPLEPIMYLIFEUPADMINTOKEN \
--restart=always \
-v /bw-data/:/data/ \
-p 127.0.0.1:8080:80 \
-p 127.0.0.1:3012:3012 \
vaultwarden/server:latest
To use these new commands, you must first produce a token and replace all occurrences of "EXAMPLETHEENGINEERINGPROJECTS" with that key.
The Bitwarden Control Panel Login
Access the Bitwarden administration website once you've successfully implemented your freshly generated administrator token on Pi's Bitwarden setup. You should type this address into your internet browser's address bar. Remember to change "YOURPIIPADDRESS" to the address of your Pi 4.
https://YOURPIIPADDRESS/admin
The Bitwarden control panel can be accessed at this location.
The created administrator token is required to be entered here. You can now log in by selecting the "Enter" button after you have provided the token.
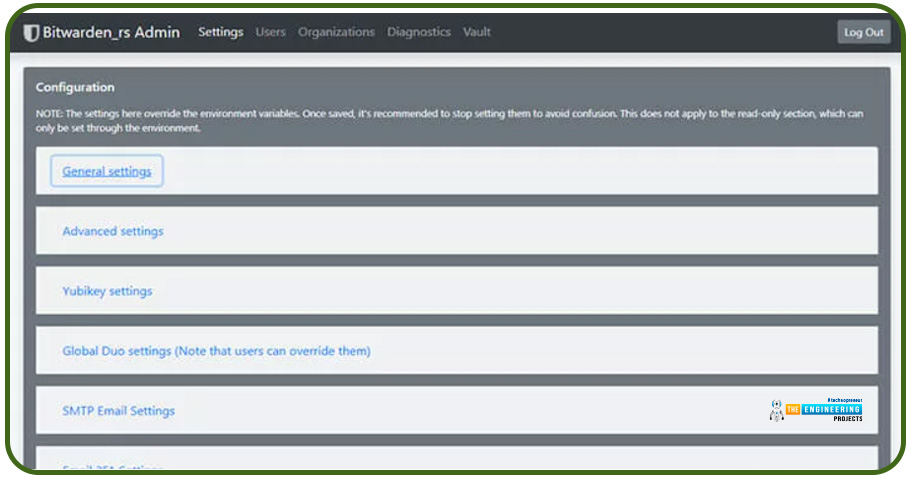
To manage your Bitwarden account, you can now visit the control panel. These sections allow you to control who has access to Bitwarden and how it operates.
Prevent the creation of new users
After logging in for the first time and gaining access to the control panel, you may remove the option for new users to register. As a result, only anyone you grant permission can add new users to the Bitwarden safe.
Bitwarden's new account creation can be disabled in the admin interface of your Raspberry Pi. Once you have logged into the control panel as an administrator, you can continue.
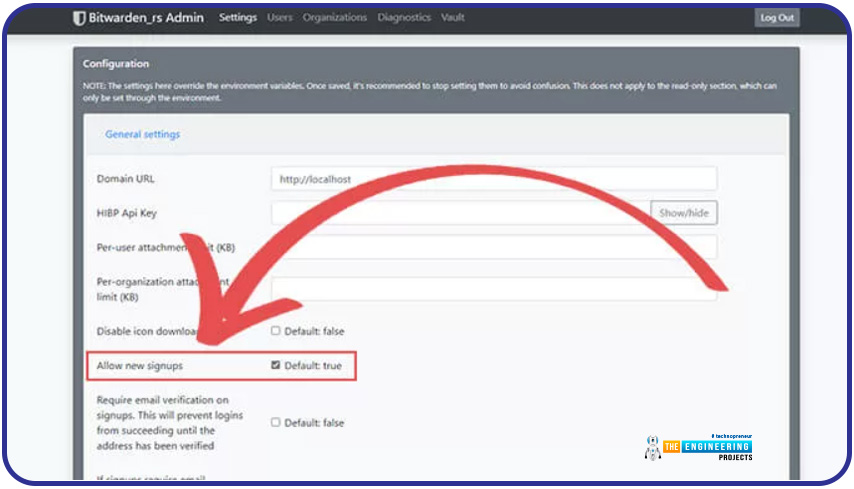
New user registrations can be disabled using a setting in the system's global preferences. Click the corresponding button to access the locations buried in the "General settings" panel.
You should see an option labeled "Allow new signups" within the "General settings" menu. To turn off this feature, uncheck the box close to it.
A confirmation of the new settings will appear at the end of the page. There should be a blue "Save" button near the bottom of the page. To keep the current changes, please click here.
Conclusion
As of this point, your Raspberry Pi ought to be running Bitwarden. Clients for Bitwarden, a free and open-source password manager, are available for virtually any platform. Using a modified version of the standard client that uses fewer system resources, you may set up your Bitwarden web service on your Raspberry Pi. The following article will teach you how to use Pi 4 to play Xbox games in the cloud.


