

Hello readers, we hope you all are doing great. Welcome to the 4th lecture of Section 5(ESP32 Sensor) in the ESP32 Programming Series. So far, we have discussed the ESP32 built-in sensors in this section. Today, we are going to interface an external embedded sensor(i.e. PIR Sensor) with the ESP32 Microcontroller board. At the start, we will discuss the basics of a PIR Sensor(HC-SR501) i.e. its pinout and working. After that, we will design a simple project to detect the motion with a PIR sensor and ESP32. Finally, we will display the motion detection results on the ESP32 WebServer.
We will use ESP32 interrupts to detect the motion. Interrupts are used when a microcontroller needs to continuously monitor an event while executing other tasks at the same time. We have already posted a tutorial on ESP32 Interrupts, which includes both software and hardware interrupts. In this tutorial, we are implementing the hardware interrupt(Hardware interrupts are the external interrupts that are caused by an external event). In our project, the hardware interrupt will be generated by the PIR sensor.

PIR motion sensor is mostly used in home automation & security projects, used to enable the system to respond automatically over human presence. Appliances connected to ESP32 will respond automatically(as per the instructions provided) whenever an interrupt is triggered by the PIR motion sensor. Let's first have a look at the working of PIR Sensor:
| Where To Buy? | ||||
|---|---|---|---|---|
| No. | Components | Distributor | Link To Buy | |
| 1 | ESP32 | Amazon | Buy Now | |
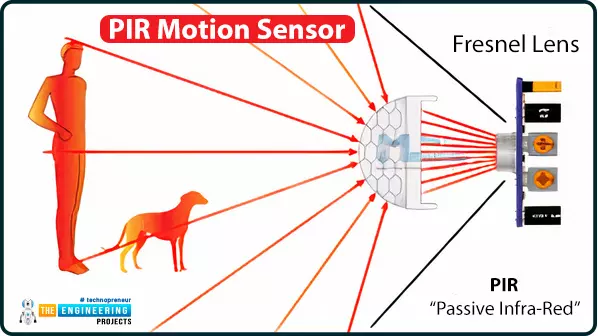
What is a PIR Motion Sensor?
In today's project, we will use the HC-SR501 PIR Sensor to detect the motion. PIR stands for Passive Infrared sensors. It uses a pair of pyroelectric sensors to detect heat energy in the surrounding environment. Both the sensors sit beside each other, and when a motion is detected or the signal differential between the two sensors changes the PIR motion sensor will return a LOW result (logic zero volts). It means that you must wait for the pin to go low in the code. When the pin goes low, the desired function can be called.
PIR Sensor Calibration
PIR Sensor has two variable resistors on its back side, used to adjust the Sensitivity and Detection Range, explained below:
- Low sensitivity ignores the small motions i.e. a moving leaf or a small mouse. The sensitivity can be adjusted based on the installation location and project requirements.
- The second resistor is used to specify how long the detection output should be active. It can be set to turn on for as little as a few seconds or as long as a few minutes.
PIR Sensor Applications
Thermal sensing applications, such as security and motion detection, make use of PIR sensors. They're frequently used in security alarms, motion detection alarms, and automatic lighting applications.
Now let's interface the PIR Sensor with ESP32:
Interfacing PIR Sensor with ESP32
As I mentioned earlier, in today's project, we will design a motion detection project with ESP32 and PIR Sensor. In the first example, we will turn "ON" the LED on motion detection, while in the second project, we will display the results in the ESP32 WebServer.
Here's the list of the components for today's project:
Components Required
- ESP32 Development Board
- PIR motion sensor (HC-SR501)
- LED
- 1k Ohm resistor
- Jumper Wires
- Breadboard
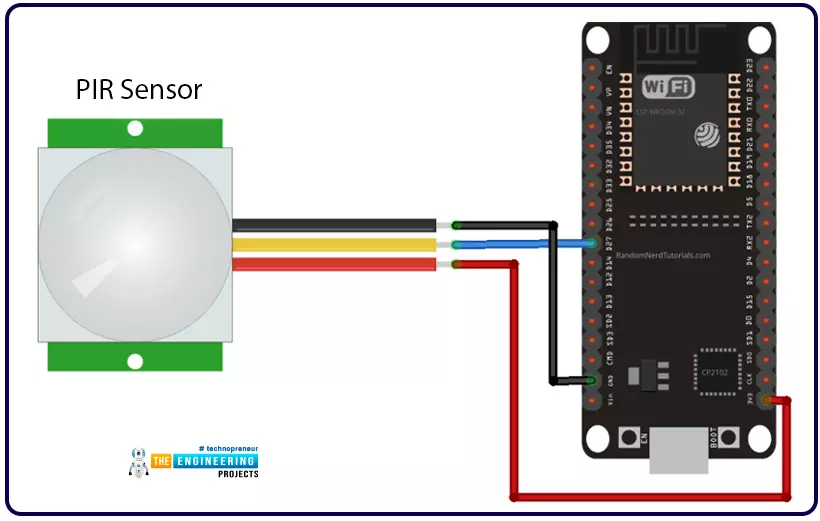
Circuit Diagram
Here's the circuit diagram for motion detection with ESP32 and PIR Sensor:
Now let's design the programming code for motion detection:
ESP32 Motion Detection Code
We are using Arduino IDE to compile and upload code into the ESP32 module. You need to first Install ESP32 in Arduino IDE to get started. Here's the code for motion detection:
//----Set GPIOs for LED and PIR Motion Sensor
const int led = 23;
const int PIRSensor = 4;

// -----Timer: Auxiliary variables
#define timeSeconds 10
unsigned long now = millis();
unsigned long lastTrigger = 0;
boolean startTimer = false;

//---Checks if motion was detected, sets LED HIGH and starts a timer
void IRAM_ATTR detectsMovement()
{
    Serial.println( " MOTION DETECTED " );
    Serial.println("Turning ON the LED");
    digitalWrite(led, HIGH);
    startTimer = true;
    lastTrigger = millis();
}

void setup()
{
    Serial.begin( 115200 ); // Serial port for debugging purposes
    pinMode( PIRSensor, INPUT_PULLUP ); // PIR Motion Sensor mode INPUT_PULLUP
    pinMode( led, OUTPUT );
    digitalWrite( led, LOW );
    attachInterrupt( digitalPinToInterrupt( PIRSensor ), detectsMovement, FALLING ); // Set PIRSensor pin as interrupt, assign interrupt function and set RISING mode
}

void loop()
{
    now = millis();
    if( startTimer && (now - lastTrigger > ( timeSeconds*500)))
    {
        Serial.println(" Turning OFF the LED " );
        digitalWrite( led, LOW );
        startTimer = false;
    }
}
Variables Declaration
- The first step is to set up the GPIO pins for the LED and motion sensor(PIR).
- LED is connected to GPIO23 and PIR sensor to GPIO4, as shown in the below code:
//----Set GPIOs for LED and PIR Motion Sensor
const int led = 23;
const int PIRSensor = 4;- Next, we need variables to set the timer to count the time, after the interrupt is detected.
- The variable "now" defines the current time
- The variable "lastTrigger" defines the time when the interrupt is detected.
- The variable "startTimer" is used to start the time when an interrupt is detected.
//-----Timer: Auxiliary variables
#define timeSeconds 10
unsigned long now = millis();
unsigned long lastTrigger = 0;
boolean startTimer = false;
ESP32 Interrupt Function "IRAM_ATTR"
- The Function with the attribute "IRAM_ATTR" is executed inside the internal RAM.
- We are assigning this attribute to our interrupt function because RAM (random access memory) operates faster than flash memory.
- After the execution of the interrupt code or ISR, the normal code will be executed inside the flash memory.
- It is recommended that the interrupt service routine should have the minimum possible execution time because it halts or blocks the normal program execution.
//---Checks if motion was detected, sets LED HIGH and starts a timer
void IRAM_ATTR detectsMovement()
{
    Serial.println( " MOTION DETECTED " );
    Serial.println("Turning ON the LED");
    digitalWrite(led, HIGH);
    startTimer = true;
    lastTrigger = millis();
}
Setup() Function
- Inside the setup() function we are initializing the serial communication with a baud rate of 115200.
- Set the mode of pin GPIO23 (LED) as output.
- Set the initial state of the LED as LOW.
- Assigned the digital pin(connected to the PIR Sensor) to hardware interrupt using the attachInterrupt function.
- The detectMovement function is passed as an argument inside this function.
void setup()
{
    Serial.begin( 115200 ); // Serial port for debugging purposes
    pinMode( PIRSensor, INPUT_PULLUP ); // PIR Motion Sensor mode INPUT_PULLUP
    pinMode( led, OUTPUT );
    digitalWrite( led, LOW );
    attachInterrupt( digitalPinToInterrupt( PIRSensor ), detectsMovement, FALLING ); // Set PIRSensor pin as interrupt, assign interrupt function and set RISING mode
}
Loop() Function
We have activated the interrupt in the Setup Function, so when the PIR Sensor detects the motion, it will automatically execute the interrupt function, which will turn the LED ON and start the timer.
- In the loop function, we are comparing the current time with the last triggered time.
- LED will turn off after a delay of 5sec (once an interrupt is detected).
- The variable “now” will be updated with the current time in each iteration.
void loop()
{
now = millis();
if( startTimer && (now - lastTrigger > ( timeSeconds*500)))
{
Serial.println(" Turning OFF the LED " );
digitalWrite( led, LOW );
startTimer = false;
}
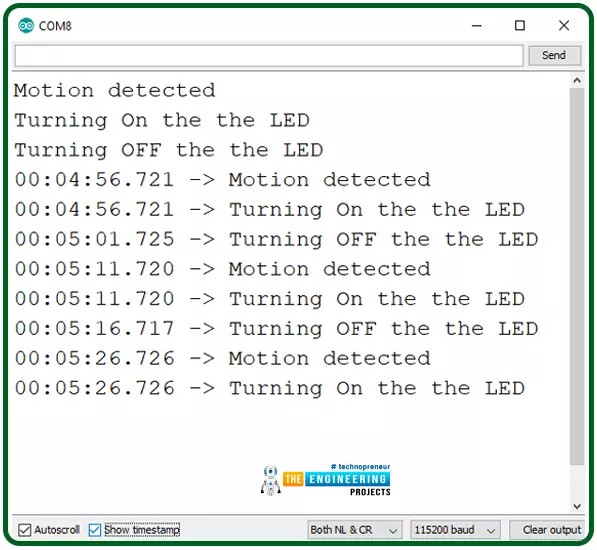
}Motion Detection Results/Testing
- Select the right development board from Tools >> Boards >> DOIT ESP32 DevKit V1 in Arduino IDE.
- Compile and upload the code into ESP32 using Arduino IDE.
- Open the serial monitor with a 115200 baud rate as defined in the Arduino code.
- Press the EN button on the ESP32 development board.
This concludes the tutorial. I hope you find this tutorial helpful. Thanks for reading. See you soon with a new tutorial on ESP32. Take care !!!
