


ESP32 Over The Air (OTA) Web Updater


Hello readers, I hope you are all doing great. In this tutorial, we are going to discuss the OTA web updater on the ESP32.
We already covered the fundamentals of OTA programming in ESP32, in our previous tutorial where we used the Arduino IDE to upload OTA code into the ESP32 module using the network port.
In the OTA web updater, you need to create a web server page for OTA programming.
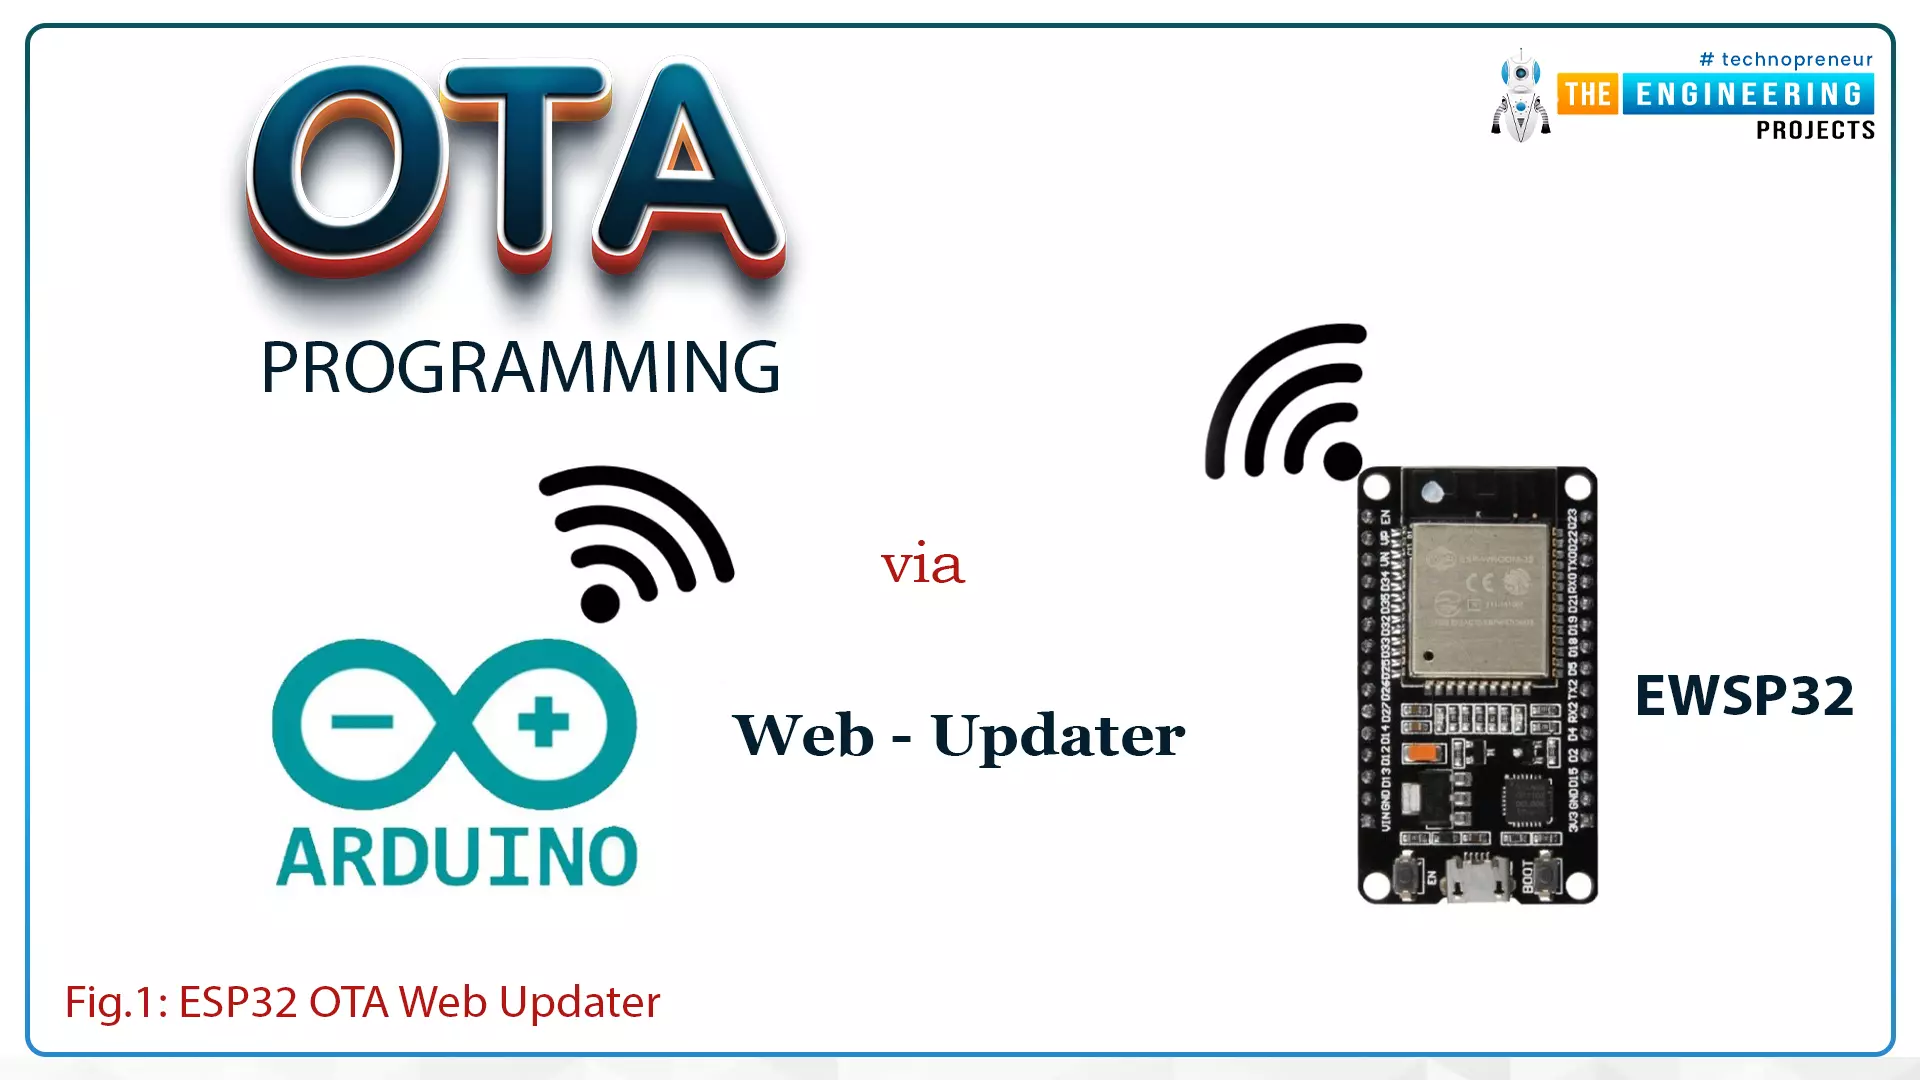
Fig.1 ESP32 OTA web updater
Over the Air Web Updater
- "Over-the-air" refers to the ability to wirelessly download an application, configuration, or firmware to internet-enabled devices, also known as IoT. (OTA). It functions similarly to our computers, laptops, tablets, and phones.
- Instead of using a serial port and a wired medium to upload a code, the OTA web updater allows the user to update the code or firmware wirelessly via a web server.
- When sensor nodes are frequently placed in remote or difficult-to-reach locations, OTA programming can be used.
Steps to implement an OTA web updater using ESP32
- Using the serial communication port, upload the code containing the instructions to enable the OTA web updater (so that in the future you can update the code using a browser instead of a wired medium).
- The code uploaded via the serial port will launch a web server, allowing you to upload new code over the air.
- The new code, which has been uploaded using a web server, should contain instructions to keep the OTA web updater enabled on the ESP32 board so that you can use the OTA programming feature in future applications as well.
- Create a .bin using Arduino IDE compiler and upload the file on the server.
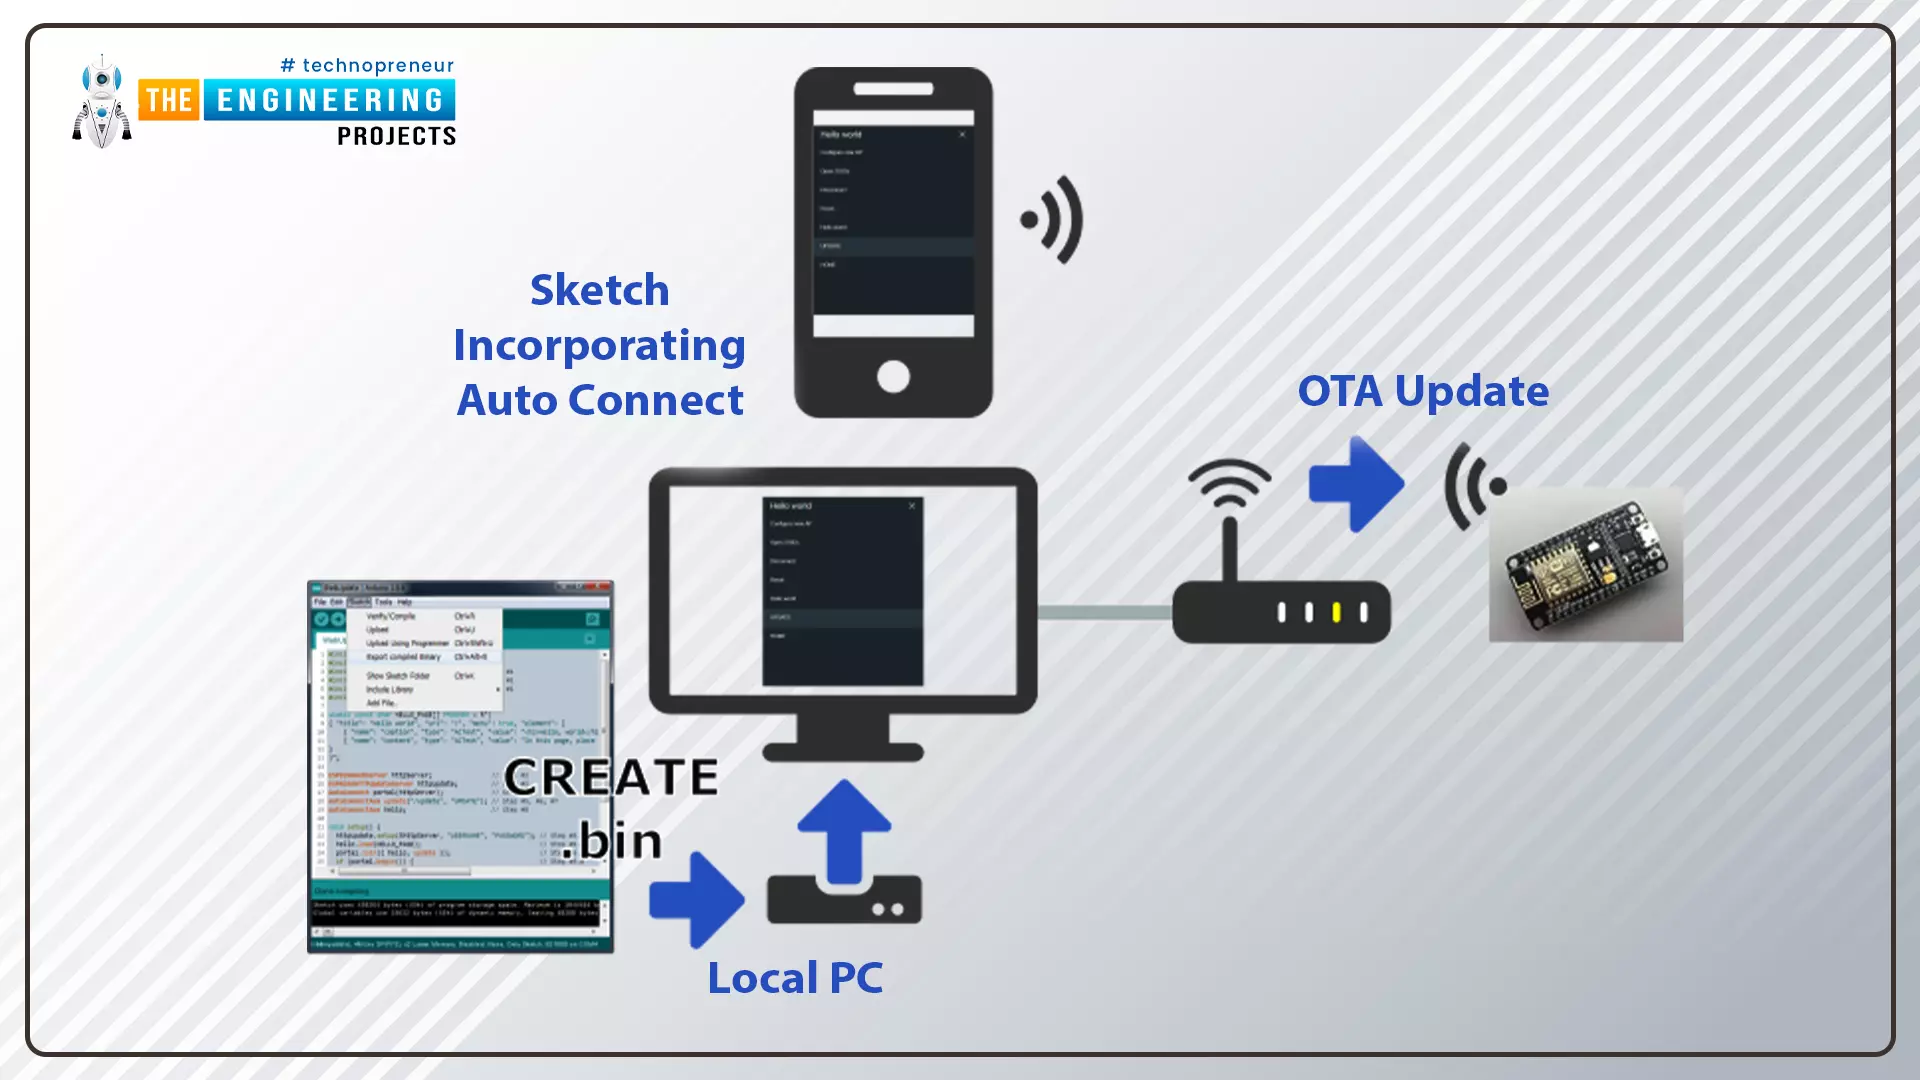
Fig. 2
Code for OTA web updater implementation in ESP32
In this tutorial, we will discuss only the OTA web updater method using Arduino IDE and ESP32 dev-Kit V1 module.
If you want to know more about the basics of ESP32 and how to get started with Arduino IDE, then read Introduction to ESP32 Programming Series.
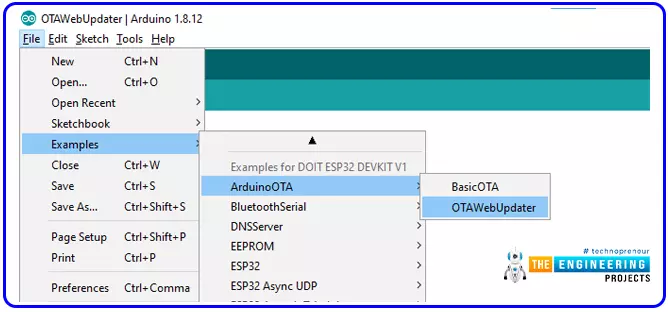
- You can find the code through File> Examples> ArduinoOTA> BasicOTA.
- An image has been attached below for reference:
- This code should be uploaded serially through a serial communication port only then you can access the OTA web updater feature.
Code
#include <WiFi.h> #include <WiFiClient.h> #include <WebServer.h> #include <ESPmDNS.h> #include <Update.h> const char* host = "esp32"; const char* ssid = "SSID"; const char* password = "password"; WebServer server(80); /* * Login page */ const char* loginIndex = "<form name='loginForm'>" "<table width='20%' bgcolor='A09F9F' align='center'>" "<tr>" "<td colspan=2>" "<center><font size=4><b>ESP32 Login Page</b></font></center>" "<br>" "</td>" "<br>" "<br>" "</tr>" "<td>Username:</td>" "<td><input type='text' size=25 name='userid'><br></td>" "</tr>" "<br>" "<br>" "<tr>" "<td>Password:</td>" "<td><input type='Password' size=25 name='pwd'><br></td>" "<br>" "<br>" "</tr>" "<tr>" "<td><input type='submit' onclick='check(this.form)' value='Login'></td>" "</tr>" "</table>" "</form>" "<script>" "function check(form)" "{" "if(form.userid.value=='admin' && form.pwd.value=='admin')" "{" "window.open('/serverIndex')" "}" "else" "{" " alert('Error Password or Username')/*displays error message*/" "}" "}" "</script>"; /* * Server Index Page */ const char* serverIndex = "<script src='https://ajax.googleapis.com/ajax/libs/jquery/3.2.1/jquery.min.js'></script>" "<form method='POST' action='#' enctype='multipart/form-data' id='upload_form'>" "<input type='file' name='update'>" "<input type='submit' value='Update'>" "</form>" "<div id='prg'>progress: 0%</div>" "<script>" "$('form').submit(function(e){" "e.preventDefault();" "var form = $('#upload_form')[0];" "var data = new FormData(form);" " $.ajax({" "url: '/update'," "type: 'POST'," "data: data," "contentType: false," "processData:false," "xhr: function() {" "var xhr = new window.XMLHttpRequest();" "xhr.upload.addEventListener('progress', function(evt) {" "if (evt.lengthComputable) {" "var per = evt.loaded / evt.total;" "$('#prg').html('progress: ' + Math.round(per*100) + '%');" "}" "}, false);" "return xhr;" "}," "success:function(d, s) {" "console.log('success!')" "}," "error: function (a, b, c) {" "}" "});" "});" "</script>"; /* * setup function */ void setup(void) { Serial.begin(115200); // Connect to WiFi network WiFi.begin(ssid, password); Serial.println(""); // Wait for connection while (WiFi.status() != WL_CONNECTED) { delay(500); Serial.print("."); } Serial.println(""); Serial.print("Connected to "); Serial.println(ssid); Serial.print("IP address: "); Serial.println(WiFi.localIP()); /*use mdns for host name resolution*/ if (!MDNS.begin(host)) { //http://esp32.local Serial.println("Error setting up MDNS responder!"); while (1) { delay(1000); } } Serial.println("mDNS responder started"); server.on("/", HTTP_GET, []() { server.sendHeader("Connection", "close"); server.send(200, "text/html", loginIndex); }); server.on("/serverIndex", HTTP_GET, []() { server.sendHeader("Connection", "close"); server.send(200, "text/html", serverIndex); }); /*handling uploading firmware file */ server.on("/update", HTTP_POST, []() { server.sendHeader("Connection", "close"); server.send(200, "text/plain", (Update.hasError()) ? "FAIL" : "OK"); ESP.restart(); }, []() { HTTPUpload& upload = server.upload(); if (upload.status == UPLOAD_FILE_START) { Serial.printf("Update: %s\n", upload.filename.c_str()); if (!Update.begin(UPDATE_SIZE_UNKNOWN)) { //start with max available size Update.printError(Serial); } } else if (upload.status == UPLOAD_FILE_WRITE) { /* flashing firmware to ESP*/ if (Update.write(upload.buf, upload.currentSize) != upload.currentSize) { Update.printError(Serial); } } else if (upload.status == UPLOAD_FILE_END) { if (Update.end(true)) { //true to set the size to the current progress Serial.printf("Update Success: %u\nRebooting...\n", upload.totalSize); } else { Update.printError(Serial); } } }); server.begin(); } void loop(void) { server.handleClient(); delay(1); }
Code Description
The first task is to add the header files, required to perform over the air (OTA) web updates using the ESP32 module.- WiFi.h : This header file allows the ESP32 board to connect to the internet. It can serve either as a server or a client.
- ESPmDNS.h : This library is used to implement multicast DNS query support for the ESP32 chip. A multicast UDP service is used to provide local network service.
- WiFiClient.h : It is used to create a client that can connect to a specific port and IP address.
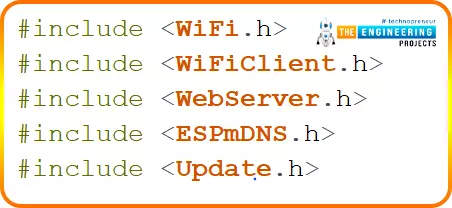
Fig. 4
- Enter the SSID and password.

- You can style the HTML page anytime as per your requirements or use the default style given in the example code.
Setup()
- Initialize the serial monitor at a 115200 baud rate.
- WiFi.begin() function is used to initialize the Wi-Fi module with Wi-Fi credentials used as arguments.
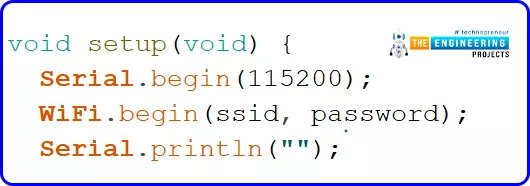
Fig. 6
- Wait until the ESP32 is connected to the Wi-Fi network.
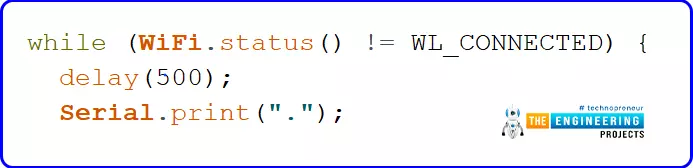
Fig. 7
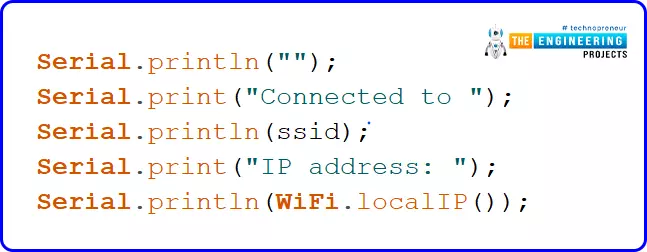
- If the device is connected to a local Wi-Fi network then print the details on the serial monitor.
- WiFi.localIP() function is used to fetch the IP address.
- Print the IP address on the serial monitor using Serial.println() function.
- Use multicast Domain Name System (mDNS) for hostname resolution.
- Hostname has been defined as a global variable at the beginning of code.
- Start the mDNS responder for esp32 or host using MDNS.begin() function.

Fig. 9
- Return the index page which is stored in serverIndex.
- Send the status OK (200 represents ‘OK’) to inform the client.
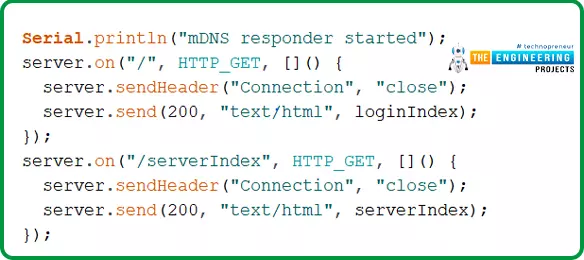
Fig. 10
- Handling the uploading of firmware files.

- Start uploading the new firmware into the ESP32 board.
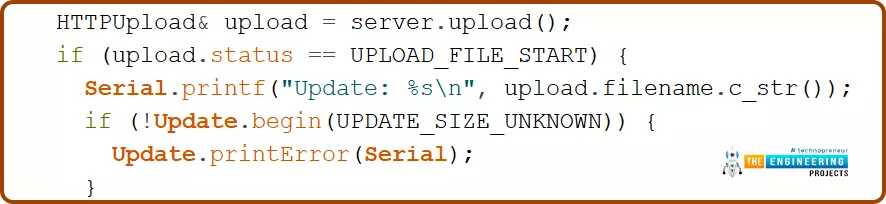
Fig. 12
- Server.begin() function will start the server to listen for incoming connections.

Fig. 13
Loop()
- Server.handleCLient() function is used to handle the client devices.
- It will monitor the client devices and provide the requested HTML page.
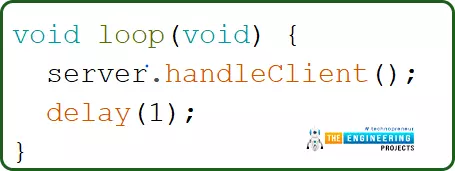
Fig. 14
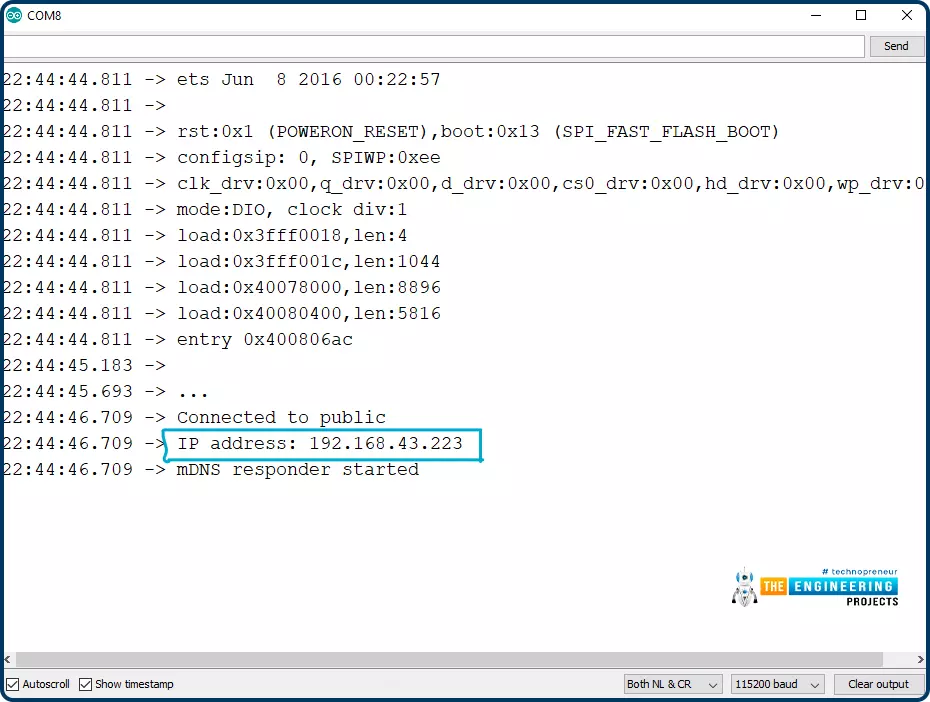
- After successfully uploading the code into ESP32 board using serial communication port, open the serial monitor with 115200 baud rate.
- Press EN or enable button from the ESP32 board.
- You can see the IP address printed on the serial monitor, once the ESP32’s Wi-Fi module is connected to wi-fi network.
- We have attached a screenshot below for your reference:
Testing
- Now the ESP32 module is ready for over the air (OTA) programming.
- For testing the OTA web updater, remove the ESP32 module from your computer and power the ESP32 board using another power source.
- Open the browser and enter the IP address from the Serial Monitor as shown in the above image.
- A web page with an IP address of 168.43.223 is shown below:
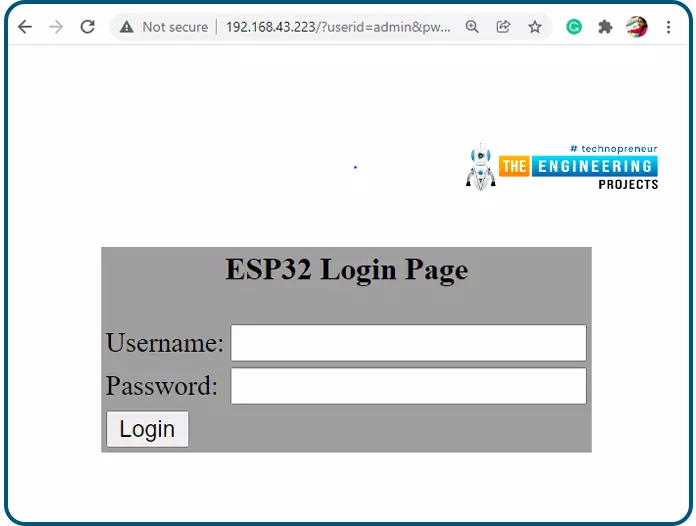
Fig. 16
- Enter the username and password on the login page. As per the example code:
- You can change the username and password details if you wish to.
- Click on Login.
- A new browser page with URL 192.168.43.223/serverIndex will be displayed on the screen, as shown below:
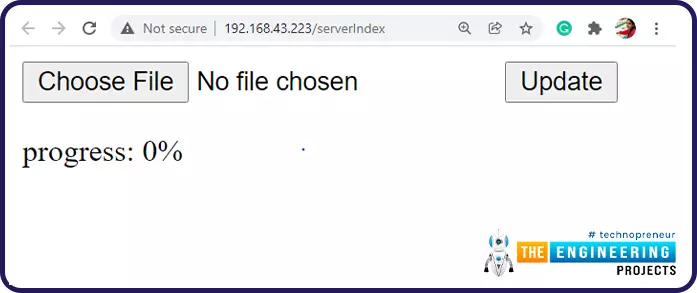
Fig. 17
- You can style the browser page as per your requirements.
Test code
- Write a new code in Arduino IDE.
- The code should contain two sections:
- The instructions to keep OTA web updater feature enabled
- Instructions to blink the LED (you can replace the LED code with another code as per your requirements).
#include <WiFi.h> #include <WiFiClient.h> #include <WebServer.h> #include <ESPmDNS.h> #include <Update.h> const char* host = "esp32"; const char* ssid = "SSID"; const char* password = "password"; //variabls to blink without delay: const int led = 2; unsigned long previousMillis = 0; // will store last time LED was updated const long interval = 1000; // interval at which to blink (milliseconds) int ledState = LOW; // ledState used to set the LED WebServer server(80); /* * Login page */ const char* loginIndex = "<form name='loginForm'>" "<table width='20%' bgcolor='A09F9F' align='center'>" "<tr>" "<td colspan=2>" "<center><font size=4><b>ESP32 Login Page</b></font></center>" "<br>" "</td>" "<br>" "<br>" "</tr>" "<td>Username:</td>" "<td><input type='text' size=25 name='userid'><br></td>" "</tr>" "<br>" "<br>" "<tr>" "<td>Password:</td>" "<td><input type='Password' size=25 name='pwd'><br></td>" "<br>" "<br>" "</tr>" "<tr>" "<td><input type='submit' onclick='check(this.form)' value='Login'></td>" "</tr>" "</table>" "</form>" "<script>" "function check(form)" "{" "if(form.userid.value=='admin' && form.pwd.value=='admin')" "{" "window.open('/serverIndex')" "}" "else" "{" " alert('Error Password or Username')/*displays error message*/" "}" "}" "</script>"; /* * Server Index Page */ const char* serverIndex = "<script src='https://ajax.googleapis.com/ajax/libs/jquery/3.2.1/jquery.min.js'></script>" "<form method='POST' action='#' enctype='multipart/form-data' id='upload_form'>" "<input type='file' name='update'>" "<input type='submit' value='Update'>" "</form>" "<div id='prg'>progress: 0%</div>" "<script>" "$('form').submit(function(e){" "e.preventDefault();" "var form = $('#upload_form')[0];" "var data = new FormData(form);" " $.ajax({" "url: '/update'," "type: 'POST'," "data: data," "contentType: false," "processData:false," "xhr: function() {" "var xhr = new window.XMLHttpRequest();" "xhr.upload.addEventListener('progress', function(evt) {" "if (evt.lengthComputable) {" "var per = evt.loaded / evt.total;" "$('#prg').html('progress: ' + Math.round(per*100) + '%');" "}" "}, false);" "return xhr;" "}," "success:function(d, s) {" "console.log('success!')" "}," "error: function (a, b, c) {" "}" "});" "});" "</script>"; /* * setup function */ void setup(void) { pinMode(led, OUTPUT); Serial.begin(115200); // Connect to WiFi network WiFi.begin(ssid, password); Serial.println(""); // Wait for connection while (WiFi.status() != WL_CONNECTED) { delay(500); Serial.print("."); } Serial.println(""); Serial.print("Connected to "); Serial.println(ssid); Serial.print("IP address: "); Serial.println(WiFi.localIP()); /*use mdns for host name resolution*/ if (!MDNS.begin(host)) { //http://esp32.local Serial.println("Error setting up MDNS responder!"); while (1) { delay(1000); } } Serial.println("mDNS responder started"); /*return index page which is stored in serverIndex */ server.on("/", HTTP_GET, []() { server.sendHeader("Connection", "close"); server.send(200, "text/html", loginIndex); }); server.on("/serverIndex", HTTP_GET, []() { server.sendHeader("Connection", "close"); server.send(200, "text/html", serverIndex); }); /*handling uploading firmware file */ server.on("/update", HTTP_POST, []() { server.sendHeader("Connection", "close"); server.send(200, "text/plain", (Update.hasError()) ? "FAIL" : "OK"); ESP.restart(); }, []() { HTTPUpload& upload = server.upload(); if (upload.status == UPLOAD_FILE_START) { Serial.printf("Update: %s\n", upload.filename.c_str()); if (!Update.begin(UPDATE_SIZE_UNKNOWN)) { //start with max available size Update.printError(Serial); } } else if (upload.status == UPLOAD_FILE_WRITE) { /* flashing firmware to ESP*/ if (Update.write(upload.buf, upload.currentSize) != upload.currentSize) { Update.printError(Serial); } } else if (upload.status == UPLOAD_FILE_END) { if (Update.end(true)) { //true to set the size to the current progress Serial.printf("Update Success: %u\nRebooting...\n", upload.totalSize); } else { Update.printError(Serial); } } }); server.begin(); } void loop(void) { server.handleClient(); delay(1); //loop to blink without delay unsigned long currentMillis = millis(); if (currentMillis - previousMillis >= interval) { // save the last time you blinked the LED previousMillis = currentMillis; // if the LED is off turn it on and vice-versa: ledState = not(ledState); // set the LED with the ledState of the variable: digitalWrite(led, ledState); } }
Test Code Description
- We are using the same old code with an additional LED blinking part.
- In this code, we are using inbuilt LED for testing.
- Define the GPIO pin to which LED is connected.
- GPIO 2 is connected to the inbuilt LED.
- To add delay, we are using timers instead of delay() function.
- The variable interval is defining the time delay.
- Set LED’s state to low.

Arduino Loop() Function
- Blink the LED after every 1000ms or 1sec delay as defined in variable ‘interval’.

Fig. 19
How to generate a bin file
- Compile the code in Arduino IDE.
- Go to Sketch > Export compiled Binary or press Crl+Alt+S to generate .bin file.
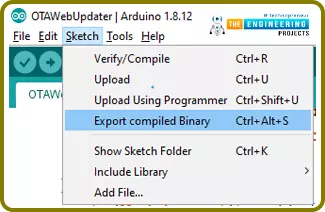
Fig. 20
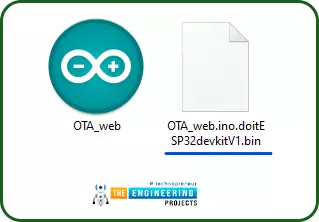
Fig. 21 bin file
- Upload the .bin file on the browser with 192.168.43.223/serverIndex URL and click on update option.
- At 100% progress the inbuilt LED from the ESP32 board will start blinking.
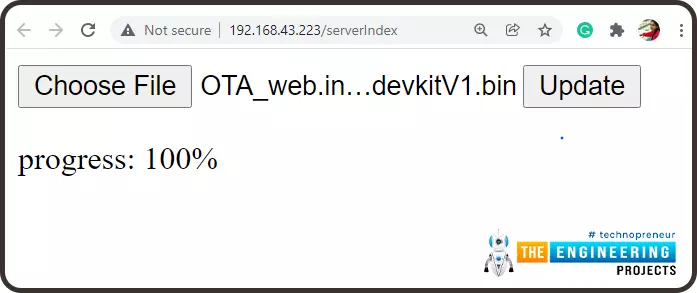
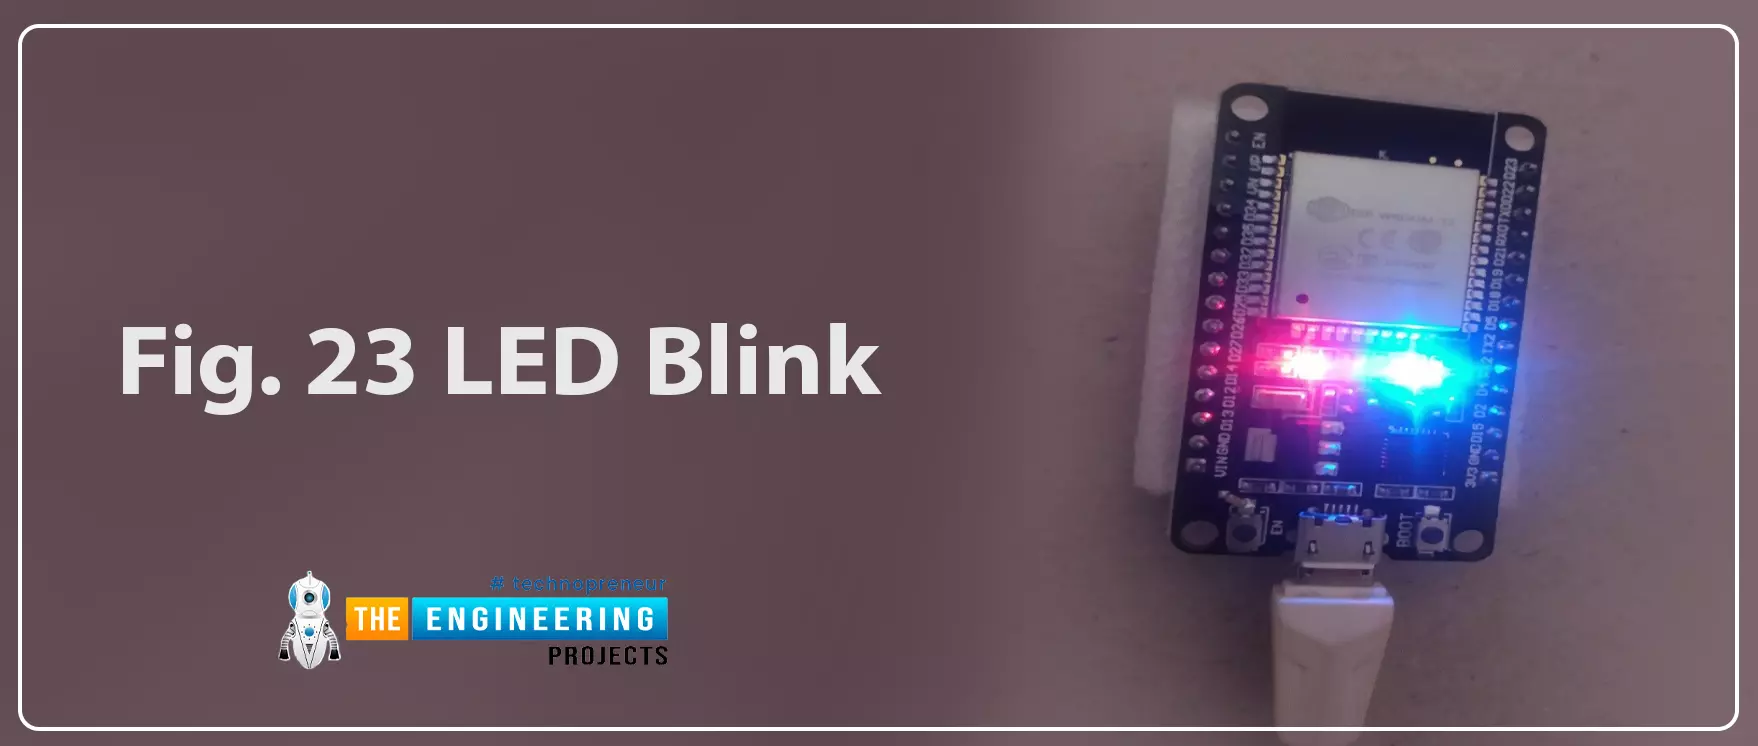
Fig. 23 LED blink
- Similarly, you can upload a new code using over the air web updater.
This concludes the tutorial. I hope, you found this helpful and I hope to see you soon for the new ESP32 tutorial.


