Hello readers, I hope you all are doing well. Welcome to the Section 2 (ESP32 Features) of the ESP32 Programming Series. ESP32 is equipped with numerous built-in features and in each chapter of this Section 2, we will explore one of these ESP32 features in detail.
In the previous Section(Section 1: ESP32 IDEs), we installed different software IDEs to program ESP32 boards. Among these IDEs, we are going to use Arduino IDE for programming ESP32. So, I hope all of your tools are configured properly and you are ready to explore the built-in features of ESP32.
Today's the 1st Chapter of Section 2, and here we will discuss How to communicate with ESP32 Bluetooth Classic from a smartphone using Arduino IDE.
Here's the video tutorial for ESP32 Bluetooth Classic:
| Where To Buy? | ||||
|---|---|---|---|---|
| No. | Components | Distributor | Link To Buy | |
| 1 | ESP32 | Amazon | Buy Now | |
ESP32 Wireless Features
ESP32 is equipped with 3 wireless communication protocols:
- Bluetooth Classic
- Bluetooth Low Energy(BLE)
- Wi-Fi
Before going forward, let's first have a look at the basic features of BT Classic:
What is Bluetooth Classic?
Bluetooth is a short-range communication(wireless) technology, used in electronic devices(i.e. mobile phones, computers, LED, headphones, speakers etc.) for wireless communication over a short distance, approximately 15m. Bluetooth operates at a 2.4GHz ISM band. Bluetooth uses low-energy radio waves for data communication between Bluetooth-enabled devices.
Now, let's design the code to communicate over ESP32 Classic BT:
ESP32 Bluetooth Classic
We are using Arduino IDE for code compiling and uploading to the ESP32 module. I hope you have already installed ESP32 Boards in Arduino IDE. So, let's design a simple project to understand the working of ESP32 Bluetooth Classic:
Project Description
First of all, we will install a "Serial BluetoothTerminal" App from the Google Play Store to communicate with the ESP32 Classic BT.
In this project, we will first enable the ESP32 Classic Bluetooth, so that we can connect it to our smartphone. After a successful connection, we will send data from our smartphone(Serial Bluetooth Terminal App) to the ESP32 Serial Terminal and vice versa.
So, let's first understand the ESP32 BT Code and then will install the Serial Bluetooth App from the Google Play Store:
Code for ESP32 Classic BT
- Open Arduino IDE and navigate to "File > Examples > BluetoothSerial > SerialtoSerialBT".
- This code utilizes BluetoothSerial Library, it's pre-installed with Arduino IDE but if you can't find it in the Examples, you can manually Download Bluetooth Serial Library and add it from Library Manager in Arduino IDE.
- Upload this code to your ESP32 Microcontroller Board.
Here's the complete code:
#include "BluetoothSerial.h"
#if !defined(CONFIG_BT_ENABLED) || !defined(CONFIG_BLUEDROID_ENABLED)
#error Bluetooth is not enabled! Please run `make menuconfig` to enable it
#endif

BluetoothSerial SerialBT;

void setup() {
    Serial.begin(115200);
    SerialBT.begin("TEP_ESP32_BT"); //Bluetooth device name
    Serial.println("The device started, now you can pair it with bluetooth!");
}

void loop() {
    if (Serial.available()) {
        SerialBT.write(Serial.read());
    }
    if (SerialBT.available()) {
        Serial.write(SerialBT.read());
    }

    delay(20);
}
Let's understand the code working:
How the Code Works
- First of all, we added the Classic Bluetooth Library named "BluetoothSerial", it has all the routines/functions required to enable Bluetooth and to communicate with other devices.
#include "BluetoothSerial.h"
- Next, we placed a check to ensure that Classic Bluetooth is configured properly and is discoverable to other devices:
#if !defined(CONFIG_BT_ENABLED) || !defined(CONFIG_BLUEDROID_ENABLED)
#error Bluetooth is not enabled! Please run `make menuconfig` to enable it
#endif
- Next, we created a Bluetooth object "SerialBT" of class BluetoothSerial to initialize the Bluetooth stack and communicate serially with ESP32 Classic Bluetooth:
BluetoothSerial SerialBT;
Setup() Function
Initial Configurations of the project are added in the Setup() function. In our code:
- First, we initialized the Serial Port at a baud rate of 115200.
- Next, we initialized the SerialBT object and assigned a unique name "TEP_ES32_BT" to our Bluetooth device, this name will appear in the Bluetooth Search List.
- Finally, printed a welcome message on the Serial Monitor.
void setup() {
    Serial.begin(115200);
    SerialBT.begin("TEP_ESP32_BT"); //Bluetooth device name
    Serial.println("The device started, now you can pair it with bluetooth!");
}
Loop() Function
The Loop() Function is an infinite loop and is equivalent to while(1) in normal C Language. In our code, we have placed two if checks:
- The first "IF Check" is monitoring the ESP32 Serial Terminal.
If we send any data from the Serial Terminal, this data will be transmitted to the SerialBT.
- The second "IF Check" is monitoring the SerialBT.
If we receive any data via ESP32 Classic Bluetooth, we will print it on the Serial Terminal.
void loop() {
    if (Serial.available()) {
        SerialBT.write(Serial.read());
    }
    if (SerialBT.available()) {
        Serial.write(SerialBT.read());
    }

    delay(20);
}
So, I hope you have understood the working of this ESP32 Classic Bluetooth code. Now, let's install the Serial Bluetooth Terminal App from the Google Play Store:
Serial Bluetooth Terminal App
- Make sure your mobile's Bluetooth is enabled.
- Open the Google Play Store on your Smartphone and make a search for "Serial Bluetooth Terminal" and install it.
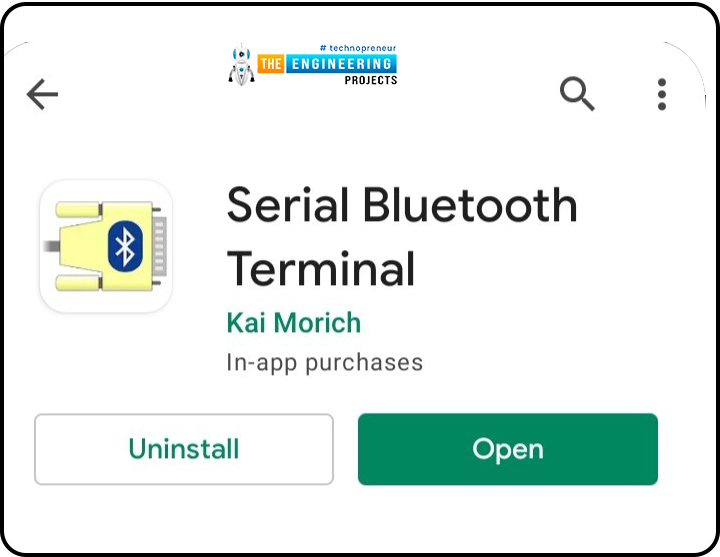
If we are connecting with the ESP32 BT for the first time, we need to pair it first.
- Open the Serial Bluetooth Terminal app and click on the "Devices" tab.
It will scan the list of all the available Bluetooth devices:
[Image]
- Now, Pair with the ESP32 Classic BT device named "TEP_ESP32_BT".
- Click on Pair.
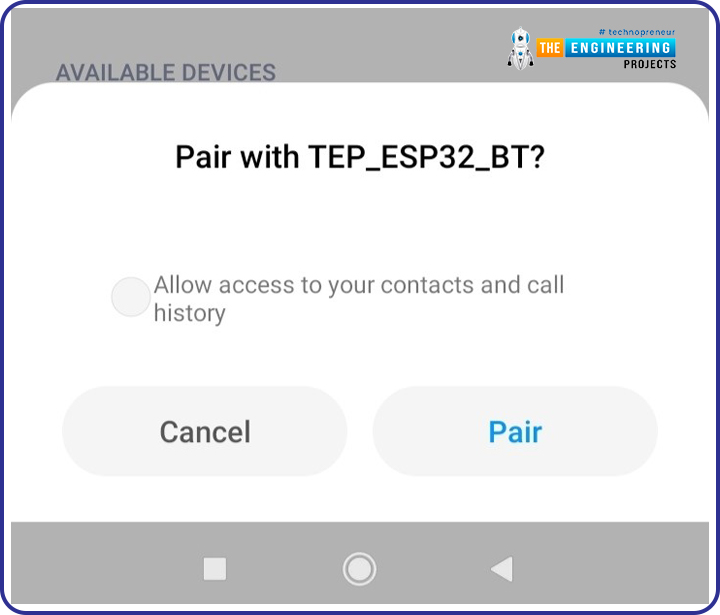
We have successfully paired the ESP32 BT with the smartphone's Bluetooth.
ESP32 BT to Smartphone - Data Testing
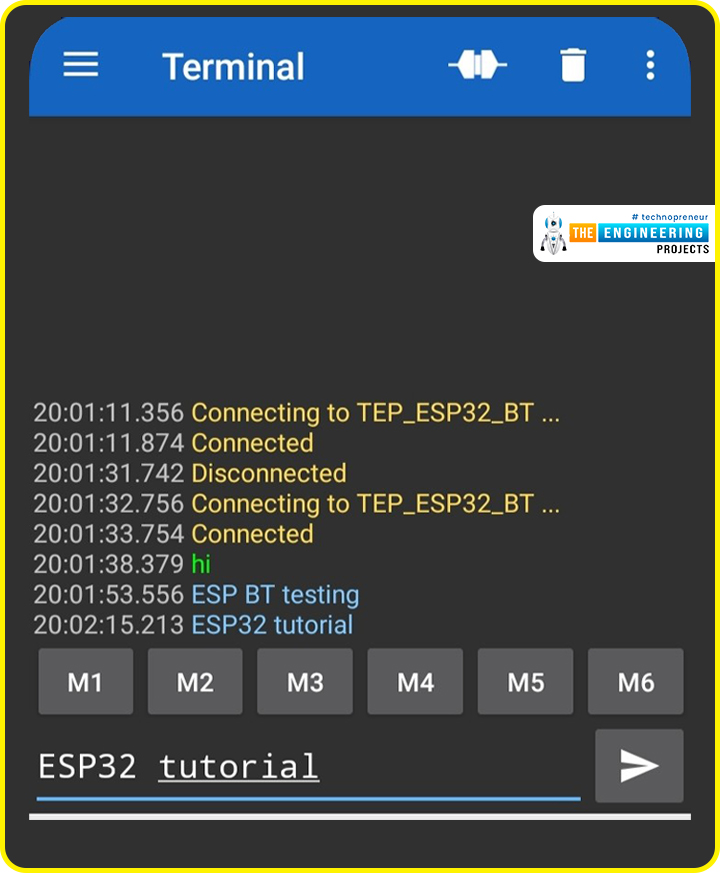
- Open the Bluetooth Terminal App and click on the Connect Button at the top:
[Image]
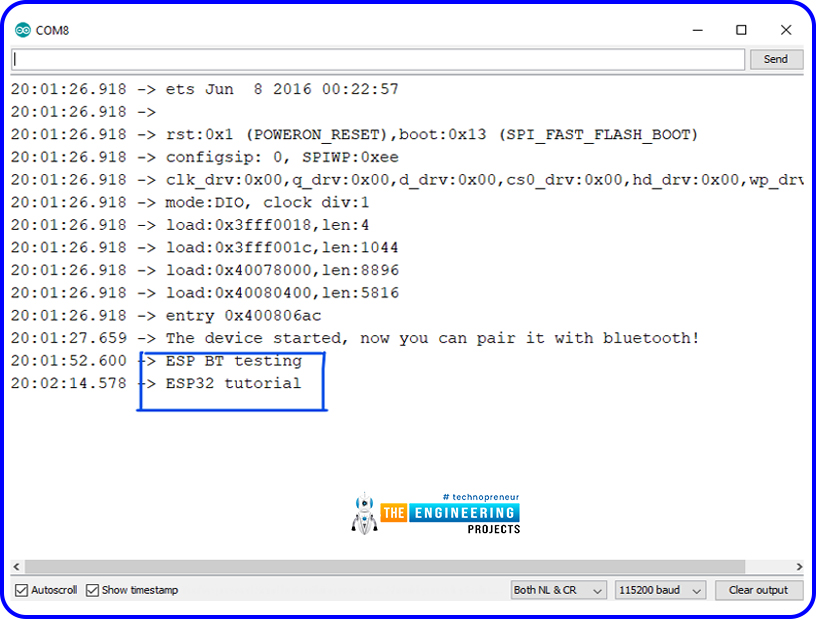
- Open the Serial Monitor in the Arduino IDE and set the baud rate to 115200:
[Image]
- As shown in the below figure, when we send data from the Serial Monitor, it communicates over Classic Bluetooth and appears in the BT Terminal App.
- Similarly, when we send data from the BT Terminal App, it appears on the Serial Monitor of Arduino IDE.

So, that's how we can communicate between ESP32 and smartphones over Classic Bluetooth. In today's lecture, we communicated simple text data to understand the working principle. In the upcoming lectures, we will send complex data(i.e. commands & sensor values) via Classic Bluetooth.
Now, let's have a look at some theoretical knowledge about Classic Bluetooth:
BLE vs Bluetooth Classic
Fig: BLE vs Classic Bluetooth
- Bandwidth: Bluetooth can send a large amount of data, while BLE sends small chunks of data.
- Compatibility: Classic Bluetooth and BLE are not compatible with each other. A Bluetooth-supported device can’t communicate with BLE supported device.
But, a device having BT V4 (Bluetooth version 4) can discover both BLE and Classic Bluetooth devices.
- Power consumption: The classic Bluetooth consumes more power than BLE.
- Pairing: In Bluetooth classic pairing is necessary before sharing data between Bluetooth devices for security purposes. On the other hand, BLE technology doesn't ask for pairing before data transmission.
- Number of active devices: In traditional Bluetooth, a maximum of 7 slave devices can be connected with the master Bluetooth at a time. Though classic Bluetooth can connect with multiple nodes/slave devices at a time but it can exchange data with only a single node at a time.
Bluetooth Evolution
- The initial Bluetooth version (V1.0) was riddled with bugs and limitations.
- Bluetooth 2.0 was created as a result of various modifications and improvements to the basic version 1.0.
- Bluetooth 2.0's most notable feature was the enhanced data rate (EDR).
- Fast modulation technology and a data rate of up to 3Mbps are used in Enhanced Data Rate mode.
- Despite improvements in the basic version, Bluetooth 2.0 lacks a security feature.
- Bluetooth 2.1 added a security feature called "Pairing" as well as a faster data rate.
- Another updated version, Bluetooth 3.0, included a Wi-Fi feature, but it was rarely used, and when it was, the features were similar to the Bluetooth 2.1 version.
- Bluetooth 4.0 was the first version to include the Bluetooth low energy feature (BLE).
- The most recent Bluetooth version is v5.2, which supports both Classic Bluetooth and BLE and consists of the following features:
- EATT (enhanced attribute protocol)
- LE (Low Energy) power control feature (LEPCF)
- LE Audio
Bluetooth Network topology
- Classic Bluetooth forms a piconet. A piconet has a single master and multiple(max 7) slaves. Each piconet has its own hopping sequence.
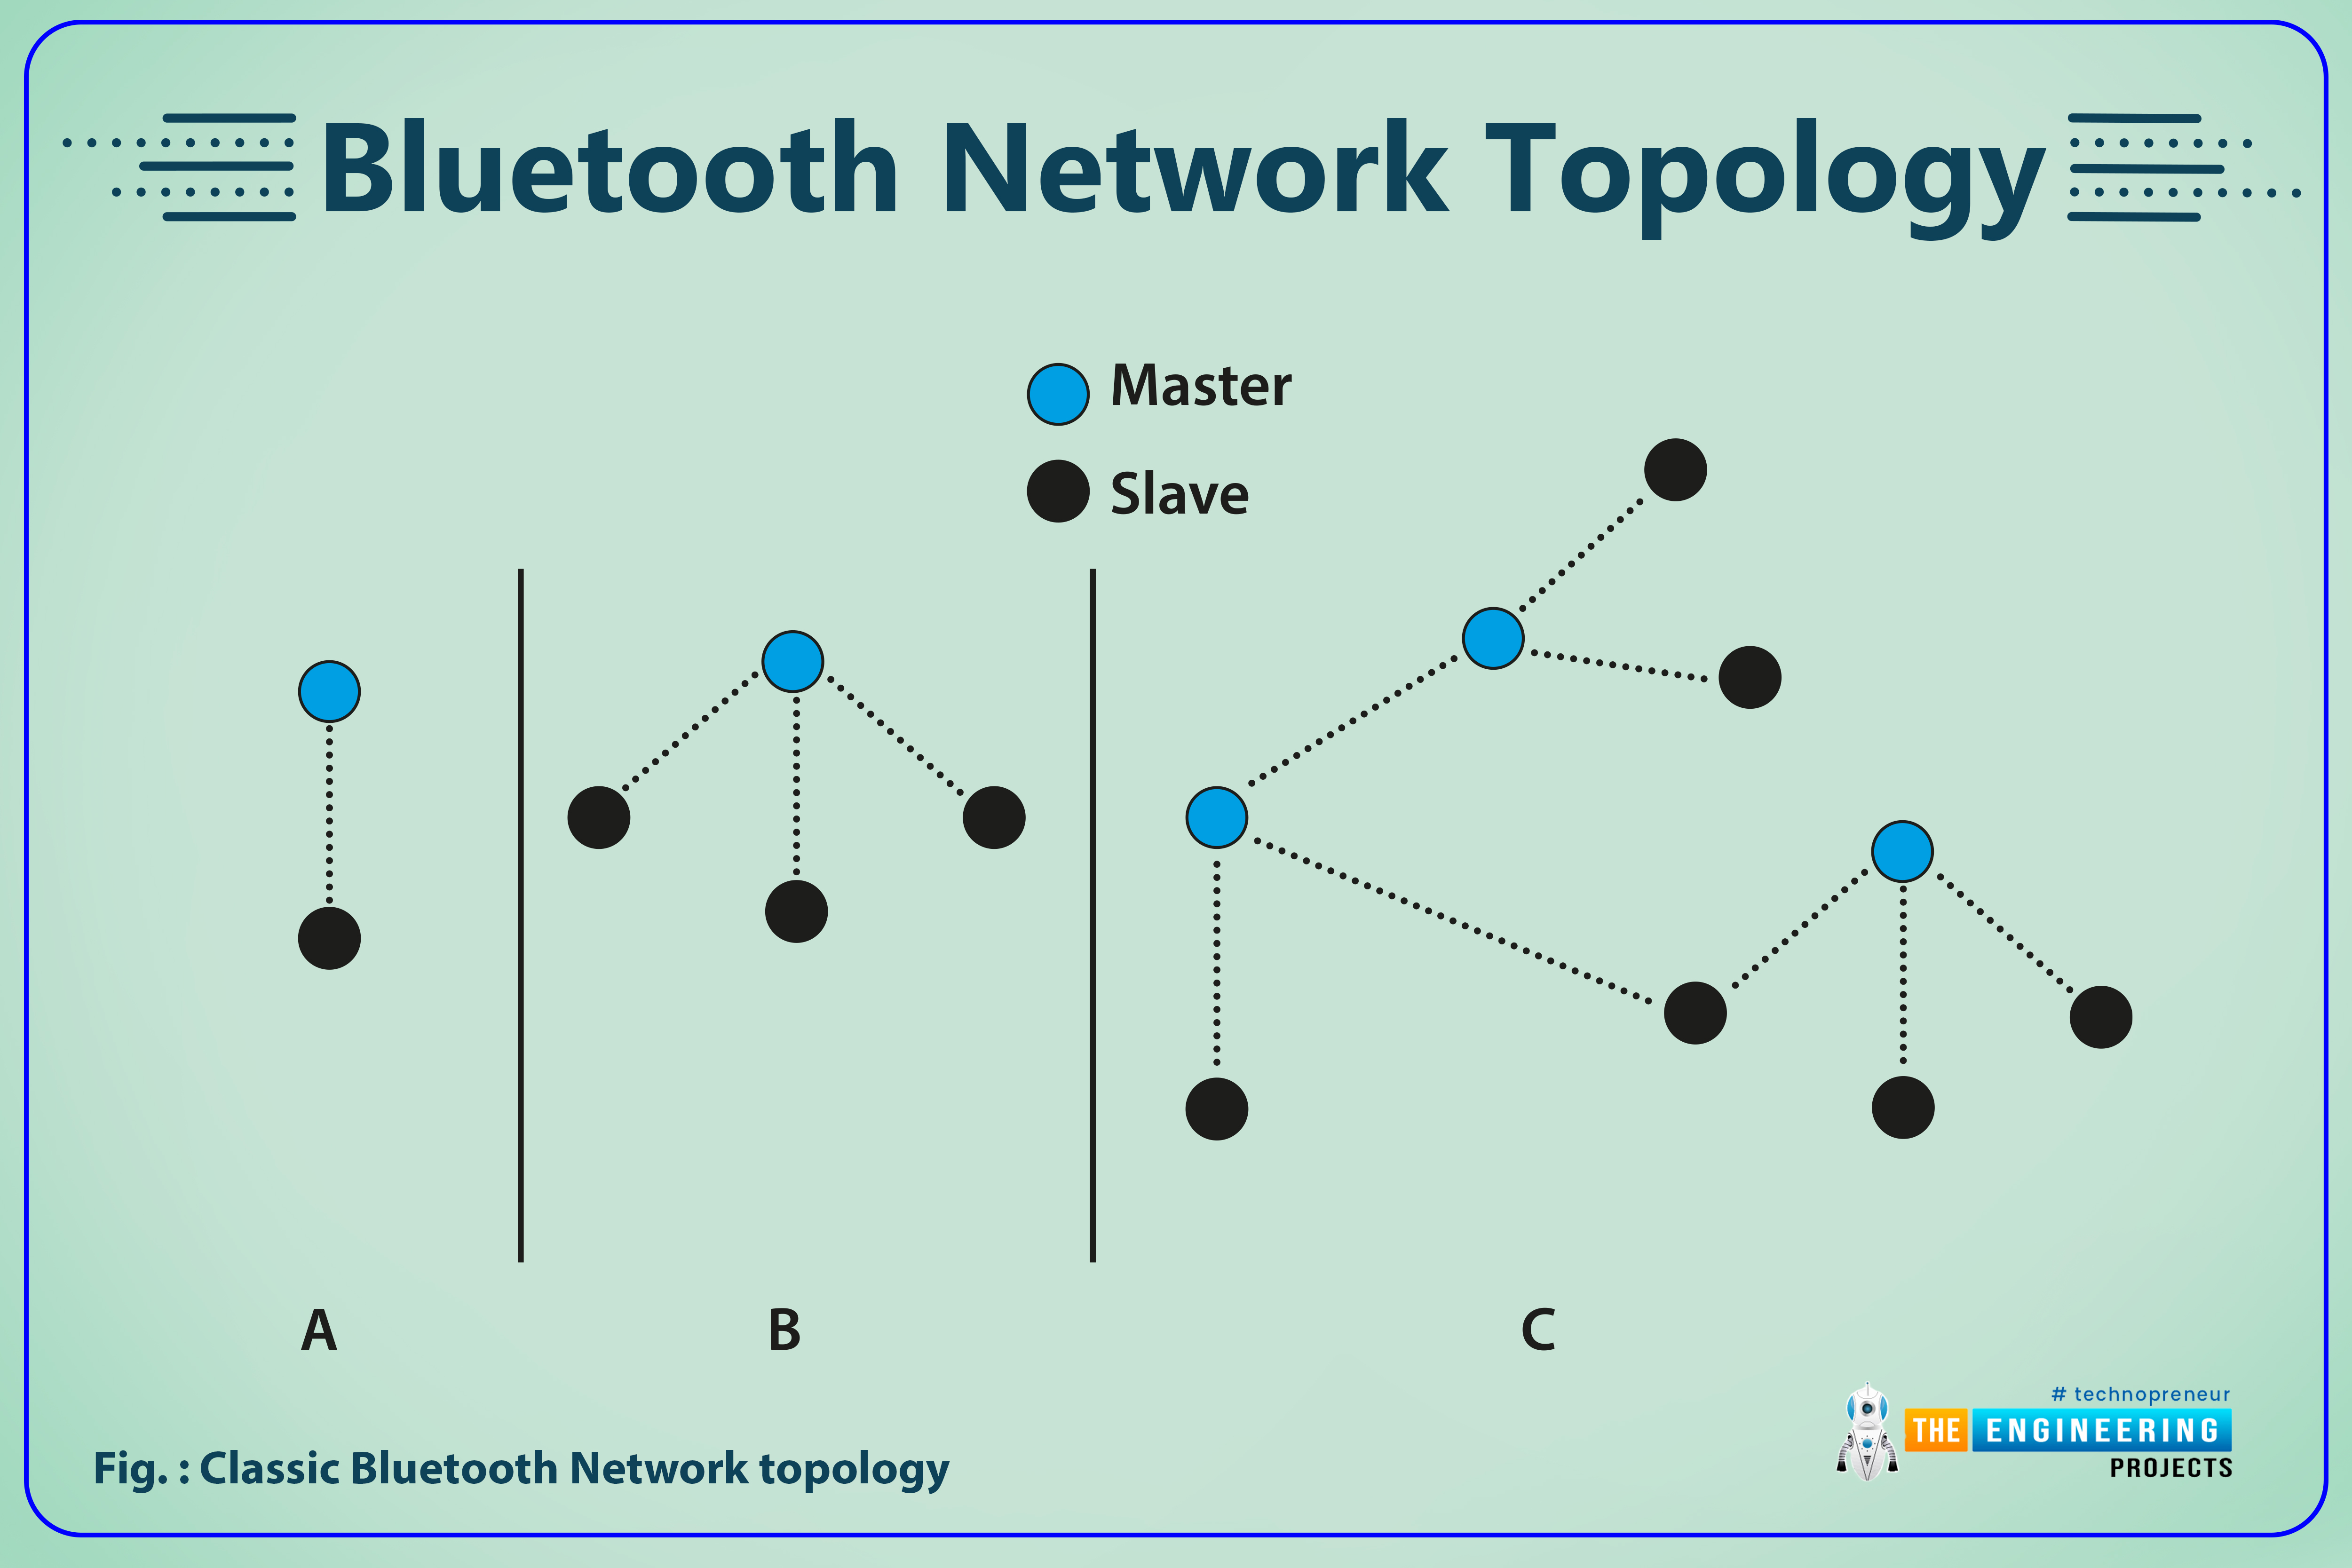
Fig: Classic Bluetooth Network topology
Classic Bluetooth can operate on both point-to-point and point-to-multi-point network topology. In traditional Bluetooth, a maximum of 7 slave devices can be connected with the master Bluetooth at a time. Though, classic Bluetooth can connect with multiple nodes/slave devices at a time, but it can exchange data with only a single node at a time.
Bluetooth Clock
In classic Bluetooth, the piconets are not synchronized.
The clock is one of the most important aspects of Bluetooth. In a Bluetooth connection, the master device has a clock that is used to split the time on each physical channel. Clocks on all slaves in a connection are synchronized to the master clock.
Bluetooth clock synchronization is essential because the radios must agree on when to transmit. Because Bluetooth uses precise timeslots for transmissions with devices alternating, if the clocks are not synchronized, there may be issues with devices transmitting at the incorrect time.
Classic Bluetooth transmitting power
It is defined in multiple classes:
- Class 1: +20dBm maximum.
- Class 2: Up to +4dBm.
- Class 3: Up to +0dBm.
Classic Bluetooth Data transmission modes
Generally, there are two data transmission modes:
- Basic Rate (BR): BR is the first Bluetooth protocol which is implemented in Bluetooth v1.0. It uses one of the FSK (frequency shift keying) modulation techniques known as Gaussian frequency-shift keying (GFSK) and communicates data at the 2.4 GHz ISM band.
- Enhanced Data Rate (EDR): It's a Bluetooth specification that allows for a higher data rate or speed. It is not available in all Bluetooth versions, and its availability is dependent on the Bluetooth version and profile. EDR uses pi/4-DQPSK (differential quadrature phase-shift keying) and 8DPSK (differential phase-shift keying) modulation techniques with data rates of 2Mbps and 3Mbps respectively.
Bluetooth packet format
- When two devices communicate data over Classic Bluetooth, they use SPP (Serial Port Profile)
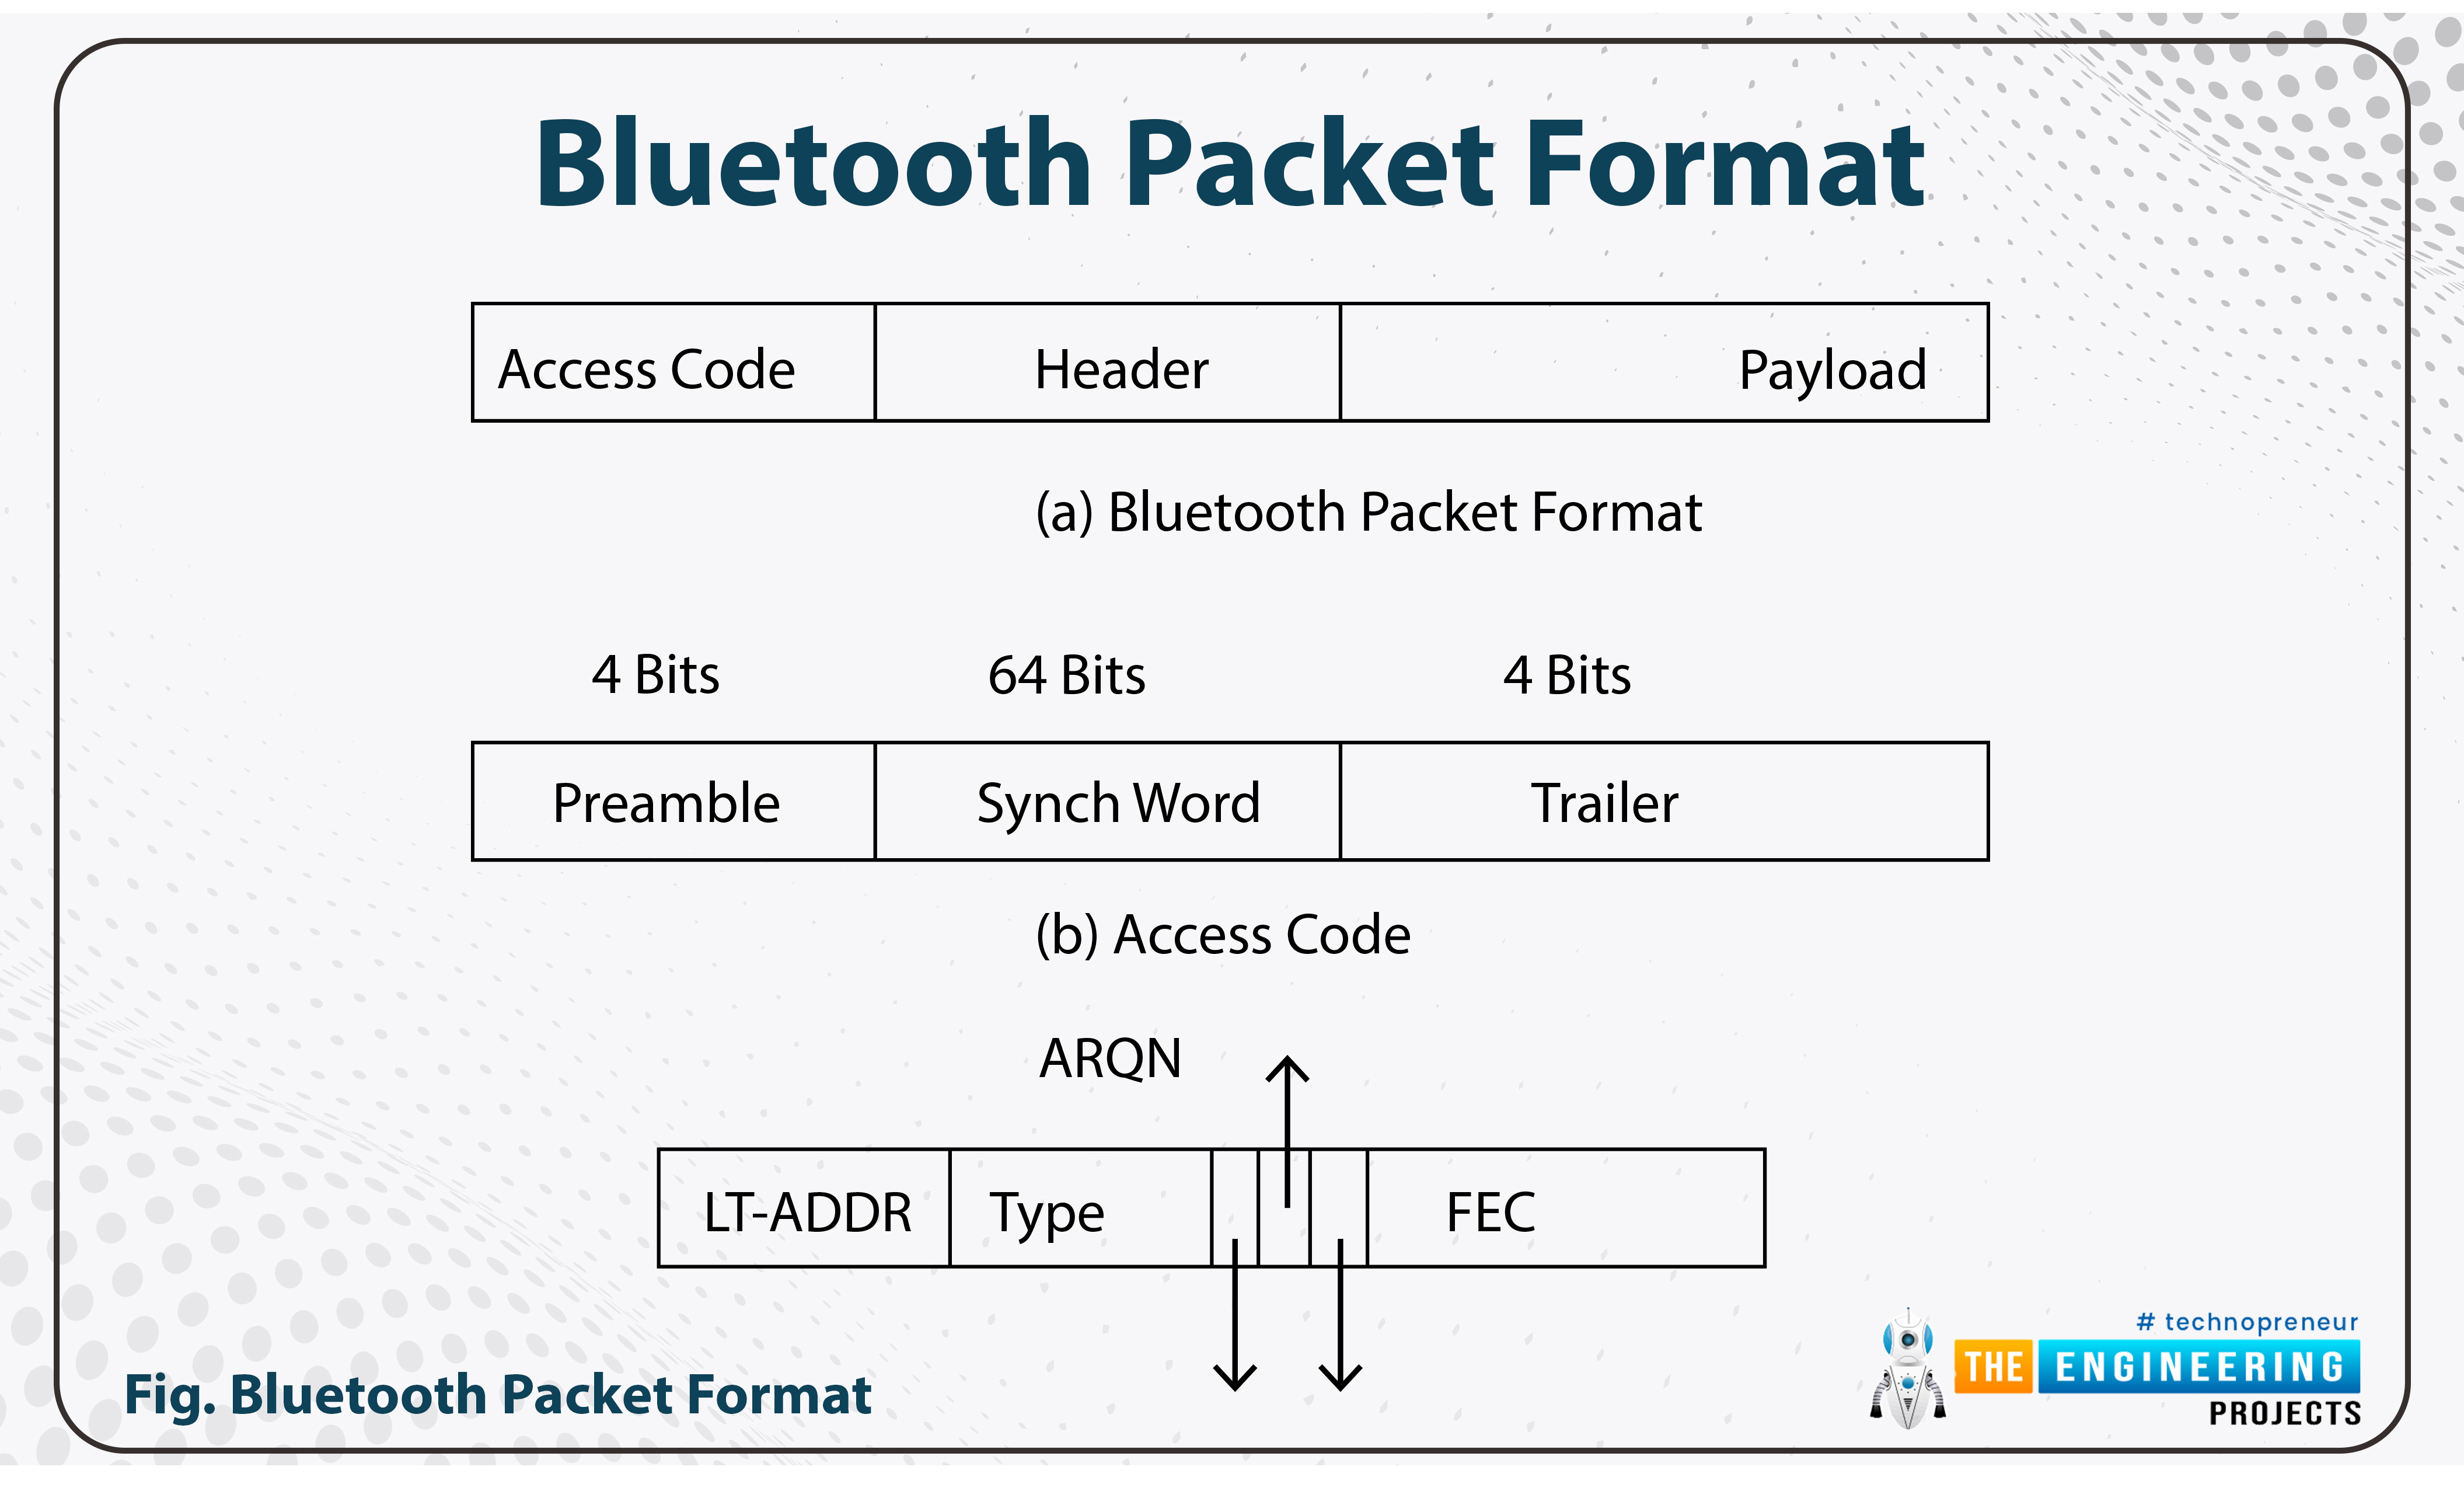
Fig. Bluetooth packet format
Enhanced data rate packet sends the Access code and header using the basic rate and this process uses GFSK (Gaussian Frequency Shift Keying). The guard gives the time to change the modulation to EDR modulation and then the synch word (64 bits), payload, and Trailer (4 bits) bits are sent using EDR (enhanced data rate) modulation.
So, that was all for today. In the next lecture, we will communicate between ESP32 and smartphones via BLE(Bluetooth Low Energy). Till then take care. Have a good day!!!


