- Introduction to LM386 Audio Amplifier.
- Components of LM386 Audio amplifier.
- LM3386 Audio Amplifier Working.
- Simulation of the LM386 Audio Amplifier Circuit in Proteus.
Introduction to LM386 Audio Amplifier
Audio signals play important role in many devices. These signals are used to regulate the life of the community in many ways. These signals, when required, are amplified by some means to use them more effectively and efficiently. Many devices can do this task. Yet, at the present time, we are going to discuss LM386 Audio Amplifier. Let's have its definition:
- "The LM386 audio frequency Amplifiers are the types of low power audio amplifiers used commonly in small amplifier systems and can be run on even a 9V battery."
The input signals once pass through the LM386, are amplified and the user senses a loud sound as compare to the input signal. This type of amplification is really important in the circuits where a signal is required to show the completion of the task, requirement of the involvement of the user or an error in the circuits.
Components of the circuit of LM386 Audio Amplifier
In this article, we're using the very simple circuit of LM386 Audio Amplifier to show the easy but understanding hypothesis of the topic. This circuit consists of capacitors, audio signals, LM386 IC, power source and speaker, out of which, we have to discuss the LM386 IC, Audio signals and speaker.
LM386 IC
The LM386 is a versatile chip that can easily be used in many kinds of circuits. The IC runs no low voltage, therefore it is a very common yet power operational amplifier that is used even in DIY guitar pre-amplifiers. If we look at the basic definition of LM386 then we find:"The LM386 is an 8-pin Dual inline integrated circuit that can work on very low voltage and when connected with some simple components can be used as an operational amplifier in a large number of amplifying circuits."The power intake and efficiency depends totally upon the models of the LM386. Basically, there are three models of aLM386 IC as mentioned below:
| Number of Pin | Name of pin |
| 1 | Gain |
| 2 | Negative input |
| 3 | Positive Input |
| 4 | Ground |
| 5 | Gain |
| 6 | Bypass |
| 7 | Input power |
| 8 | Output of IC |
Speaker
The speakers are the devices that takes the audio signals and convert them into voice. This conversion is done by the special mechanism of speaker. In this experiment, the output will me hear with the help of this speaker.Variable Resistor
As the name describes, the variable resistor is the special device that is capable of changing the value of resistance according to the requirement of the user. The + and - terminal of variable resistor are used to increase and decrease the resistance respectively. In this way, the input audio signals can be controlled.Working of LM386 Audio Amplifier
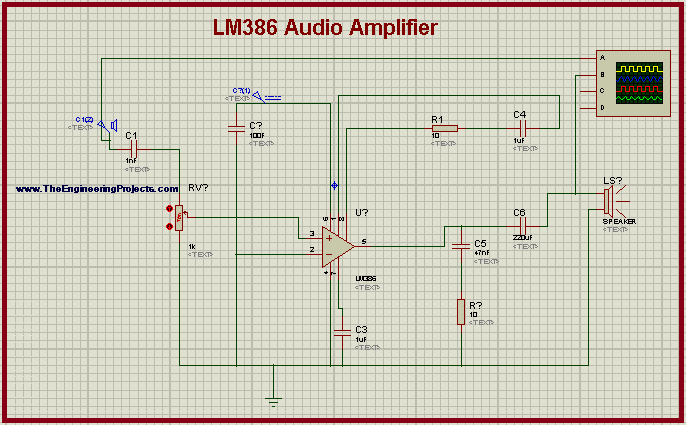
- The working of the LM386 Audio Amplifier starts with the audio signal generation of audio generator.
- These signals passes through the capacitor that regulates these signals and then pass them to the LM386.
- The IC inputs these signals, the pin 6 of the LM386 is connected with the DC Source hence it powers it up. The IC now amplify the audio signals.
- From pin 5 of the IC, the amplified audio signals are generated. Meanwhile, the resistor and capacitor regulates the signal so that the user may sense these signals in the right sequence of waves.
- Finally, the speaker takes these signals as input and convert it in the form of sound so that the user can hear it easily.
Procedure to simulate the LM386 in Proteus ISIS
By availing all the information given above, let's simulate the circuit in Proteus ISIS. Just apply the instructions given below:Material Required
- LM386 IC
- Resistor
- Capacitor
- POT HG
- Speaker
- Ground Terminal
- Audio device
- Start your Proteus ISIS.
- create a new Project.
- Click on P button.
- Choose 1st five components mentioned in the list given above.
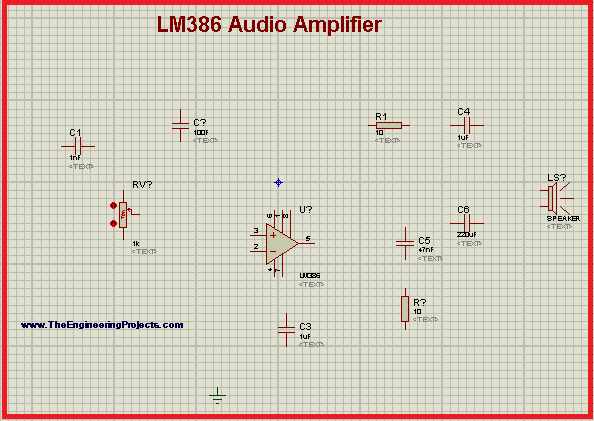
- Arrange all the components on the working area by following the image given next:

- Go to Terminal Mode from the left side of your screen and choose ground. Now, set it just below the circuit.
- Go to Generator mode>choose audio and set it just on left side of arrangement.
- Double click the audio probe>brows>upload this file.
- [audio wav="https://www.theengineeringprojects.com/wp-content/uploads/2021/06/file_example_WAV_1MG.wav"][/audio]
- Change the values of the components as described in the following table :
| Component | Value |
| C1 | 1nF |
| C2 | 100F |
| C3 | 1uF |
| C4 | 47nF |
| C5 | 47 nF |
| C6 | 220uF |
| R1 | 10 ohm |
| R2 | 10 ohm |
| DC Power Supply | 9V |
- Once all the values are changes, just go to virtual Instrument mode and select the oscilloscope above the components.
- At this time, join the components with the help of connecting wires.

- Hit the Play button with your mouse and simulate the circuit.
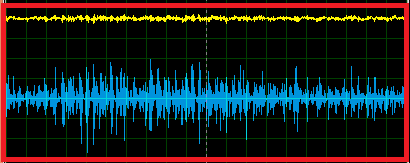
- Change the values of the voltages of terminals and current through the nobs to get the visible wavelengths.


