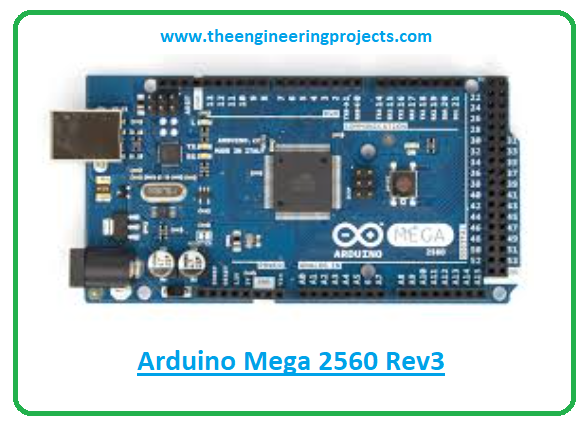
Hi Friends! Hope you’re well today. In this post today, I’ll walk you through the detailed Introduction to Arduino Mega 2560 Rev3.
The Arduino Mega 2560 Rev3 is a microcontroller board that is based on the ATmega2560 microcontroller.
The Arduino boards are widely used in the automation industry and embedded projects. Other boards like Arduino Uno, Arduino Nano, Arduino Every, Arduino Beetle all seem a good pick for the projects that require little memory to store the program. However, when the nature of projects becomes complex, requiring more memory and a rich set of I/O interfaces, the Arduino Mega 2560 Rev3 comes into play. In order to power up these Arduino boards, we need to use a Power supply for electronics or we can also use the USB port on the board.
I suggest you buckle up and read this entire post till the end, as I’ll detail the complete Introduction to Arduino Mega 2560 Rev3, covering pinout, pin description, features, programming, and applications.
Let’s get started.
| Where To Buy? | ||||
|---|---|---|---|---|
| No. | Components | Distributor | Link To Buy | |
| 1 | Arduino Mega 2560 | Amazon | Buy Now | |
Introduction to Arduino Mega 2560 Rev3
- The Arduino Mega 2560 Rev3 is a microcontroller board that is based on the ATmega2560 microcontroller.
- There are a total of 54 digital I/O pins available on the board, out of which 15 pins are used as PWM pins. There are 15 analog pins incorporated on the board.
- The board comes with 4 serial ports, one SPI, and one I2C communication protocol.
- The operating voltage of the device is 5V while the input voltage ranges from 6V to 20V while the recommended input voltage ranges from 7V to 12V.
- The oscillator clock speed is 16MHz which ensures the synchronization of the internal functions.
- The Arduino Program (sketch) is stored in the Flash memory which is 256KB and SRAM is 8KB while the EEPROM is 4KB.

- The SRAM is responsible for producing and manipulating the variables when it runs and EEPROM is a non-volatile memory that remains stored in the board even if power is removed.
- It is important to note that Arduino Duemilanove/UNO is compatible with Arduino Mega 2560 which projects the shields developed for Duemilanove stands fit for this mega board.
- You can say Arduino Mega 2560 is identical to Arduino Uno with more memory and rich I/O interfaces so it is mainly used for more complex and advanced projects.
- This device is also incorporated with a new USB chip (similar to Arduino UNO) - ATmega16U2 (previously ATmega8U2 or FTDI chips were used).
- This board incorporates two voltage regulators i.e. 5V and 3.3V which gives the ability to regulate the voltage as per requirements in contrast to Arduino Uno which comes with only one voltage regulator.
- More features include a power jack, a USB connection, an ICSP header, and a reset button. It comes with everything required to support the microcontroller.
Arduino Mega 2560 Rev3 Pinout
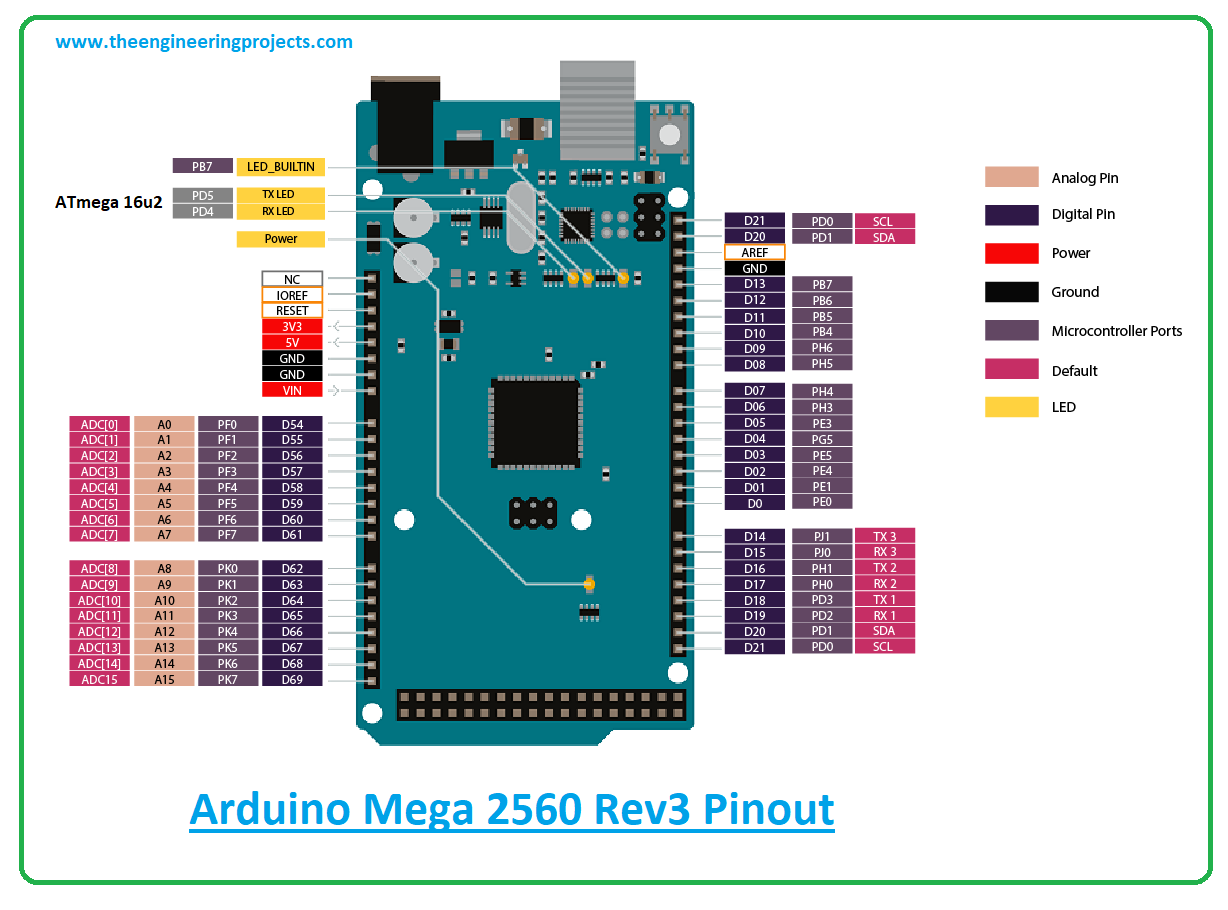
In the following picture, you’ll see the pinout diagram of Arduino Mega 2560 Rev3.

The board incorporates 4 LEDs where one is a built-in LED connected to pin 13 of the board. One is a power LED that turns on when the board is turned on. While two LEDs are reserved for Rx and Tx which respond when the serial communication happens on this board.
Arduino Mega 2560 Rev3 Pin Description
Hope you’ve got a brief idea about this Arduino Mega board. In this section, we’ll highlight the pin description of each pin incorporated on the board.
Let’s get started.
UART Pins
There are 4 serial ports incorporated on the board. Each UART serial port comes with two pins Rx and Tx. The Rx is the receiving pin that ensures the receiving of serial data while Tx is the transmission pin that guarantees the transmission of serial data.
SPI Pins
The board contains one SPI communication protocol. While is a serial peripheral interface communication protocol. It is used to develop communication between the controller and other peripheral devices like sensors and shift registers. It contains two Pins… MISO (master input slave output) and MOSI (master output slave input) for the SPI communication.I2C Pins
The board carries one I2C communication protocol. It carries two pins SDL and SCL. The SDL is the serial data pin that carries the data while SCL is the serial clock line that ensures the synchronization of data transfer over I2C bus.
Digital Pins
This comes with the most number of digital I/O pins incorporated on any Arduino board. The reason it is called Arduino Mega. It is also capable to store more memory of the Arduino program in the Flash memory. You can use these 54 pins as an input or output based on the requirement. These pins receive two values HIGH and LOW. When they receive 5V the pins are at HIGH state while when they receive 0V the pins remain in a LOW state.
Analog Pins
The board contains 15 analog pins. These pins can get any values in contrast to digital pins that receive only two values HIGH and LOW.
PWM Pins
Out of 54 digital I/O pins, 15 pins can be used as PWM pins. These pins generate analog results with digital means.
Arduino Mega 2560 Rev3 Features
The main features of Arduino Mega 2560 Rev3 are described below.
- Microcontroller = ATmega2560
- Input Voltage (limit) = 6-20V
- Input Voltage (recommended) = 7-12V
- SPI = 1
- I2C = 1
- UART = 4
- Digital I/O Pins = 54
- Analog Pins = 16
- PWM Pins = 15
- DC Current for 3.3V Pin = 50 mA
- DC Current per I/O Pin = 20 mA
- Clock Speed = 16MHz
- Flash Memory = 256 KB
- EEPROM = 4 KB
- SRAM = 8 KB
- LED_BUILTIN = 13
- Size = 53x101mm
- Weight = 37g
Programming
The Arduino.cc has introduced the official software Arduino IDE to program all Arduino boards.
The Arduino Mega 2560 Rev3 comes with a USB comes that is used to program the board. Simply connect the board with the computer using a USB cable and start playing with it.
Moreover, the board comes with an internal Bootloader which is used to burn the program inside the controller. Setting you free from buying the external burner to burn the program.
Difference between Arduino Mega 2560 R2 and R3
- Two more pins are included in each row of the pin. In the "digital section" two-pin header sockets are available: 10 and 8 pins, despite 2 x 8. While in the "analog section" two pins 8 and 6 are included instead of 2 x 6.
- ATmega16U, chip for USB communication, replaced the ATmega8U chip in the R3 board. And it comes with16 kB of flash memory as compared to 8.
- Now digital section incorporates two separate pins for I2C communication i.e. SDL and SCL.
- It is important to note that, these pins are not considered additional signals. In the case of Arduino UNO R2, two pins SDA and SCL are incorporated at A5 and A4. In R3 they reserve the same spot, merging new pins with old ones.
Arduino Mega 2560 Rev3 Applications
This mega board is an ideal pick for the projects requiring more memory space to store the program and require a rich set of I/O interfaces. The following are the main applications of Arduino Mega 2560 Rev3.
- Controlling and handling more than one motors
- Developing 3D printer
- Sensing and detecting temperature
- Interfacing of number of sensors
- Parallel programming and Multitasking
- Home automation and security systems
- Embedded Systems
- Water level detection projects
That’s all for today. Hope you find this article helpful. If you’re unsure or have any questions, you can approach me in the section below, I’d love to help you the best way I can. Feel free to share your valuable suggestions and feedback around the content we share. This helps us create quality content customized to your exact needs and requirements. Thank you for reading the post.


