Hello everyone! I hope you all will be absolutely fine and having fun. Today, I will give you a detailed discussion on myRIO Ultrasonic Sensor Interfacing. In this tutorial, you will learn about NI myRIO ultrasonic sensor interfacing. We will go into the details of the ultrasonic sensor and then will move forward towards its interfacing with myRIO. I have already shared many articles on ultrasonic sensors and will share their link in this article as well.
The ultrasonic sensor is also known as SONAR (Sound Navigation and Ranging). As it is clear from its name, it transmits sound waves and these waves are received back to it after getting reflected from any object. It measures the total time elapsed during the entire transmission as well as during the reception of the reflected waves. The sum of both the times is usually known as RTT (Round Trip Time). This RTT is equal to the distance between any external object and the sensor itself. Optical sensors have a transmitter for the transmission of optical waves and a receiver at the receiving end. But in comparison to an optical sensor, the SONAR sensor has a single structure for both transmission and receiving purposes.
SONAR sensor has four pins to perform different actions. It is the most common device and is specially used for obstacle avoidance purposes in robotics. It can also be used to estimate the distance of different objects. It is an inexpensive device and is easily available in the market these days. There is another sensor similar to the ultrasonic sensor available in the market named as PNG sensor. But it has three pins, that is the only difference between PNG and ultrasonic sensor. Both can be used for distance measurement and obstacle avoidance purposes. Further detail about the ultrasonic sensor and myRIO ultrasonic sensor interfacing will be provided later in this tutorial.
myRIO Ultrasonic Sensor Interfacing
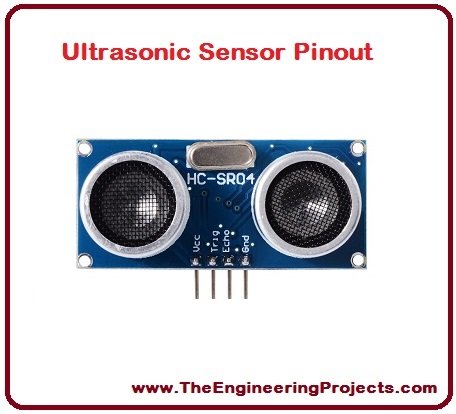
An ultrasonic sensor is an electronic device/sensor/module used to estimate the distance of different objects. It works on a very simple principle. It transmits ultrasonic waves and these waves get reflected from the objects in surroundings. It receives the reflected waves and measures the time elapsed during the whole process which is equal to the distance between the specific object and the SONAR sensor. It has a wide range of applications including robot sensing, liquid level control, full detection, stacking height control, people detection for counting, presence detection, vehicle detection, thread/wire break detection etc. The ultrasonic sensor is shown in the figure given below.
- Ultrasonic Sensor Library for Proteus
- Ultrasonic Sensor Simulation in Proteus
- Interfacing of Ultrasonic Sensor with Arduino
- Interfacing of Multiple Ultrasonic Sensor With Arduino
Ultrasonic Sensor Pins
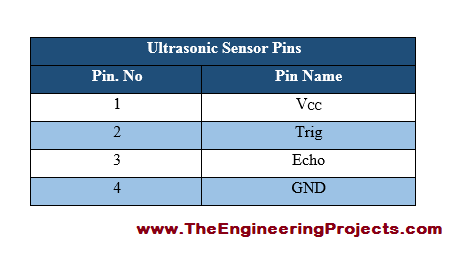
- It has four pins having different individual tasks to perform.
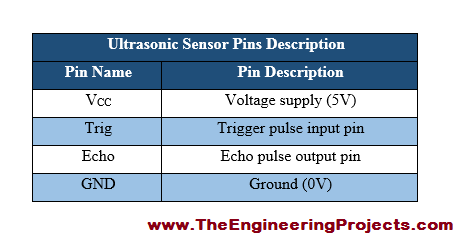
- Ultrasonic sensor pins are listed in the table shown in the figure below.
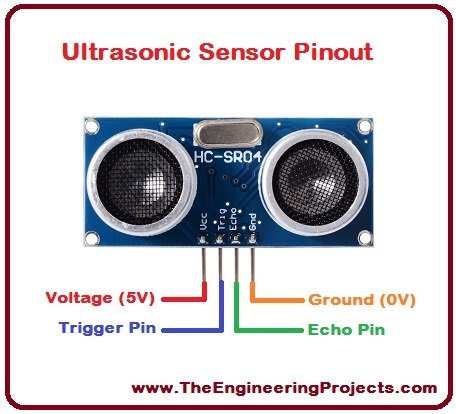
- The ultrasonic sensor along with its pin names is given in the figure shown below.
Ultrasonic Sensor Pins Description
- As we know each of them has been assigned a different task, so we should about each pin.
- Ultrasonic sensor pins description is provided in the table given in the figure shown below.s
3. Ultrasonic Sensor Dimensions
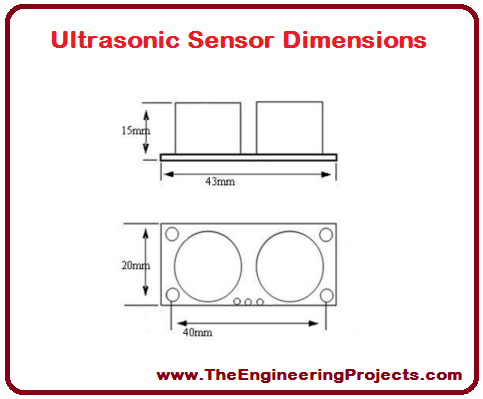
- The ultrasonic sensor is divided into different segments.
- Dimensions of each segment are shown in the figure given below.
4. Ultrasonic Sensor Working Principle
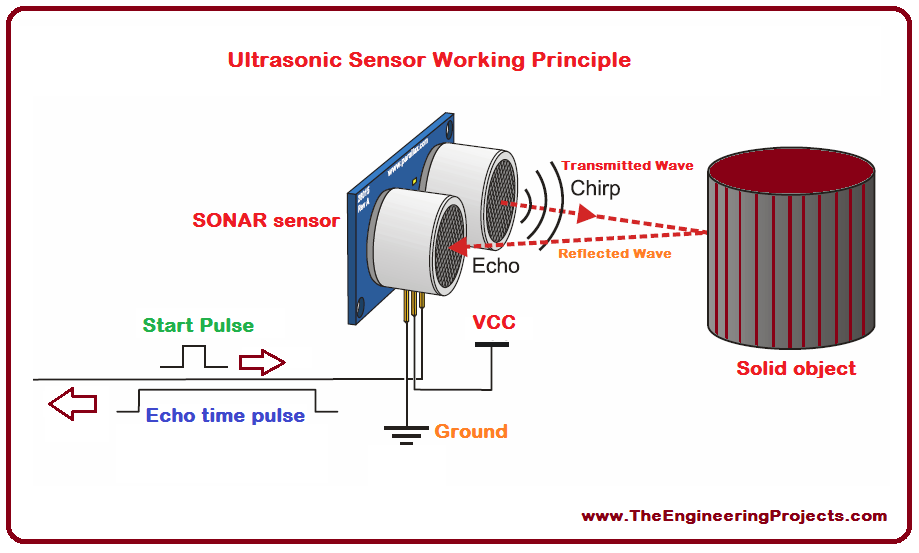
- It works on a very simple principle based on sound waves.
- It transmits sound waves in the surroundings.
- These sounds waves collide with the external objects.
- After colliding with the external objects they reflect back to ultrasonic sensor.
- It measures the total time elapsed during the transmission and receiving the reflected wave.
- The total time is known as a Round Trip Time (RTT) and is equal to the distance between the object and the sensor.
- That was the entire working principle of SONAR sensor.
- I have provided the visual description of its working principle as given in the figure shown below.

5. Ultrasonic Sensor Features
- The features of any electronic device that can make a device more popular among its competitors.
- Ultrasonic sensor features are listed in the table shown in the figure given below.

6. Ultrasonic Sensor Ratings
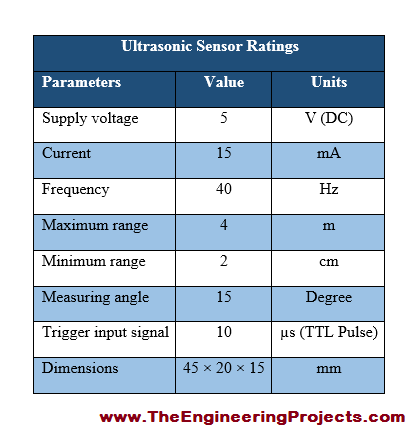
- Ratings show the voltage, power and current requirements of any electronic device.
- Ultrasonic sensor ratings are listed in the table shown in the figure below.
7. Ultrasonic Sensor Applications
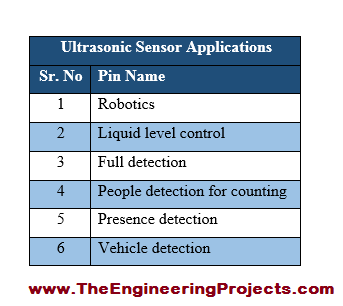
- Electronic devices such as small sensors are usually known on the basis of their applications.
- Ultrasonic sensor has a wide range of applications in real life.
- Some of them are listed in the table given in the figure shown below.
8. myRIO Ultrasonic Sensor Interfacing Wiring Diagram
- I have made a completely labelled wiring diagram for myRIO ultrasonic sensor interfacing.
- A complete wiring diagram is given in the figure shown below.
9. LabVIEW Final Front Panel Design
- As a result I have provided a complete front panel window for myRIO ultrasonic sensor interfacing.
- The LabVIEW front panel window is given in the figure shown below.
- Our team has designed this LabVIEW simulation with a lot of several testing stages.
- After a lot of testing we got the accurate results, so we have imposed a very low cost on it.
- But, the imposed cost is as low, that even a student can easily buy it.


Please can i have access to the block diagram for the ultrasonic sensor/myRio Project?
Many thanks Reply