Introduction to Arduino Leonardo
- Arduino Leonardo is a microcontroller board developed by Arduino.cc. It is based on the ATmega32U4 and comes with 23 digital input/output pins that are enough to connect with external devices and turn your innovation into reality.
- The Microcontroller on the board incorporates a built-in USB communication, setting you free from the use of a secondary processor. The USB communication helps Leonardo disguise the mouse or keyboard when it is connected to a computer.
- The module supports the crystal oscillator with the frequency up to 16 MHz that is enough to generate clock pulses with decent pace required for the synchronization of all the internal operations.
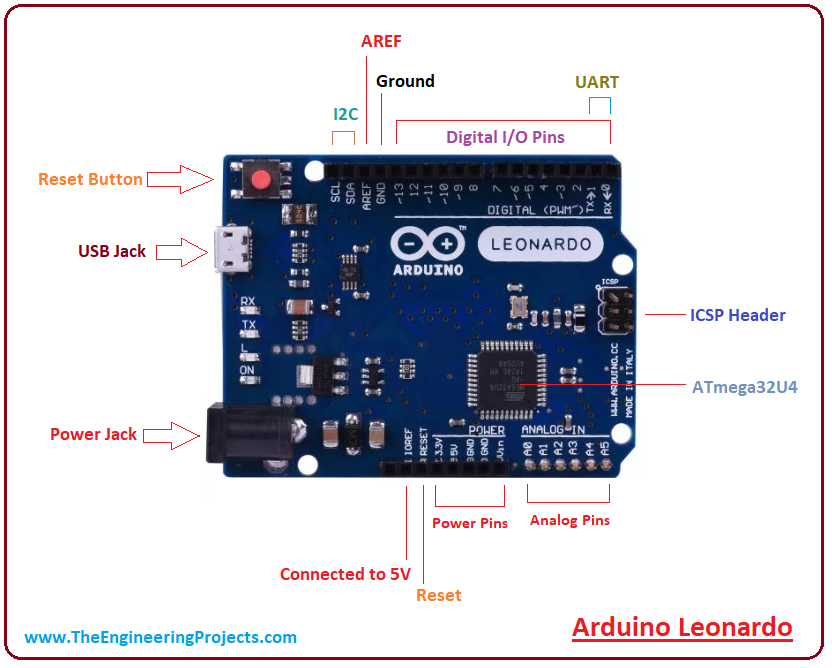
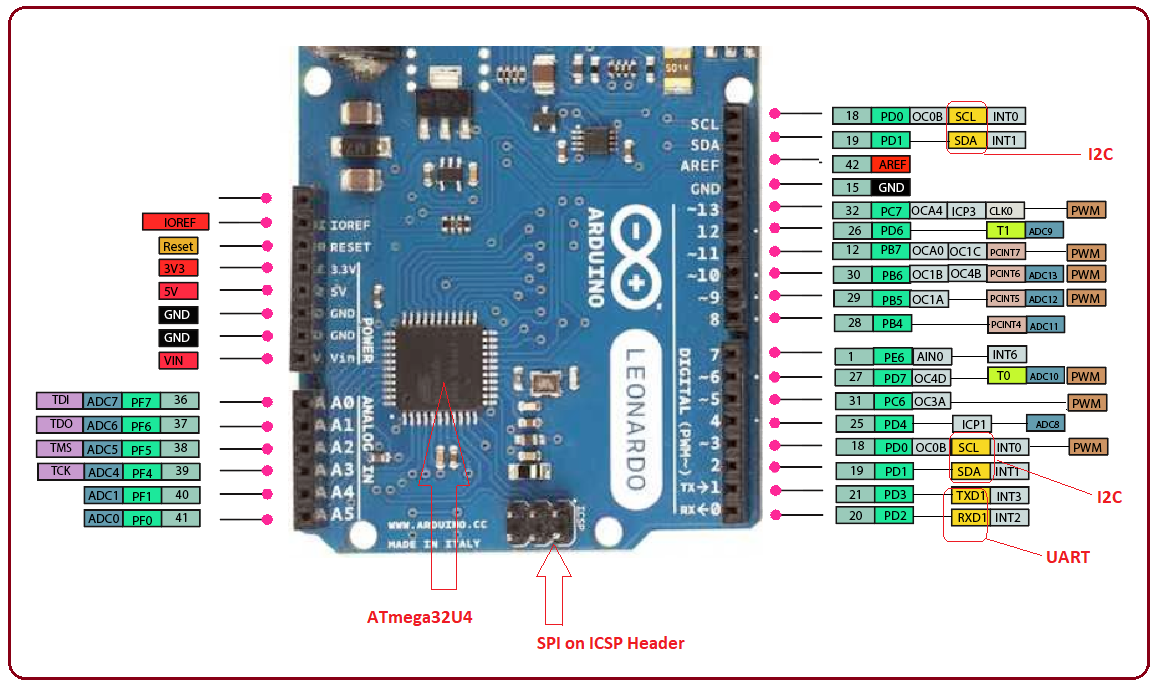
- This board supports common communication protocol like UART, SPI, and I2C. The UART is a serial communication protocol mainly used for transferring and receiving serial data using two pins called TX and RX.
- Serial Peripheral Interface (SPI) is a third communication protocol added on the board that is commonly used to send data between microcontrollers and small peripherals such as sensors, shift registers, and SD cards using separate clock and data lines, layered with a select line to pick the device for communication.
1. Arduino Leonardo Features
If you aim to work on your desired project, you must know the common features this device holds in order to avoid any hassle in future, getting you a clear idea if the ratings of the device are quite in line and stand fit for your project. Following table shows the main features of the Arduino Leonardo.| Microcontroller | ATmega32U4 |
| CPU | 8-Bit |
| Digital I/O Pins | 23 |
| PWM Output | 7 |
| Analog Input | 12 |
| Flash Memory (Program Memory) | 32 KB (Out of which 4 KB is used by bootloader) |
| SRAM | 2.5 KB |
| EEPROM | 1 KB |
| Input Voltage | 7-12 V |
| Operating Voltage | 5 V |
| Oscillator | up to 16 MHz |
| Software Used | Arduino Software (IDE) |
| Reset Button | Yes |
| ICSP Header | Yes |
| USB Port | 1 |
| UART (Serial Communication) | Yes |
2. Arduino Leonardo Pinout
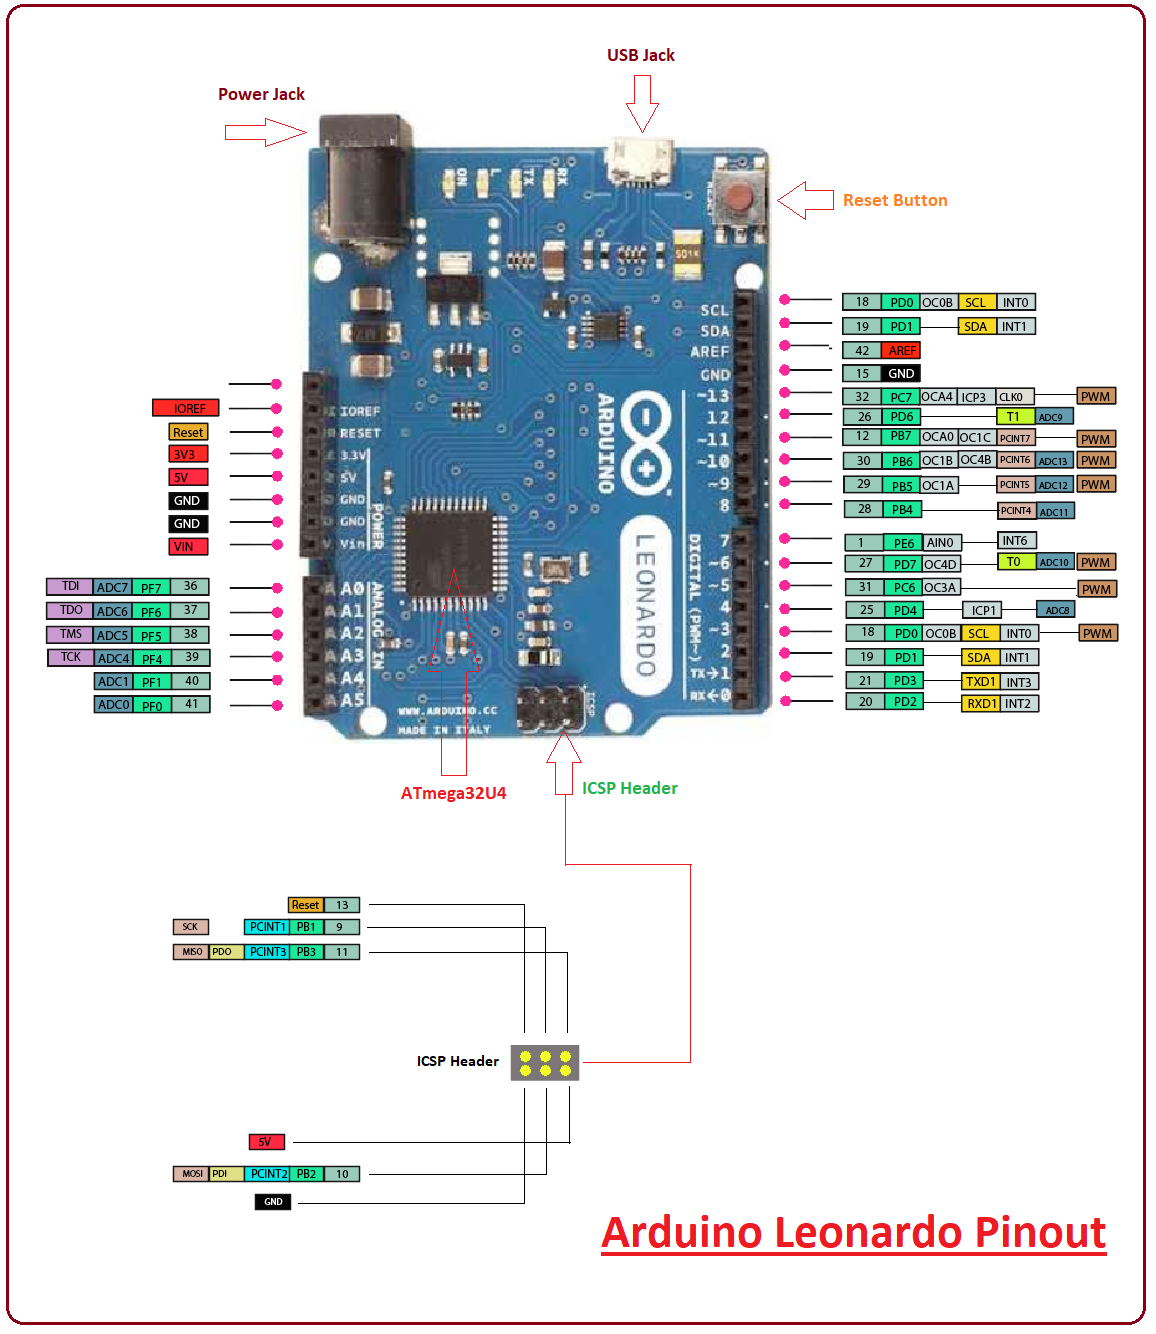
Following figure shows the pinout of Arduino Leonardo.
- USB jack, Power Jack and Reset button are quite in line with each other and are surfaced on one side of the board. Nonetheless, all components and pins on the board are designed in a regular pattern, giving a compact and symmetrical interface.
3. Arduino Leonardo Pin Description
You have got a clear idea about some of the basic functions of this Arduino Module. In this section, we will break down pinout of the board with different images and describe them in terms of pin description of the board. Let's get started.Analog Pins
There are 12 analog pins added on the board. As per the nature of these pins, they can utilize any number of values, unlike digital signals that are designed to deal with only two values: HIGH and LOW. The following figure shows the placement of these analog pins on the board.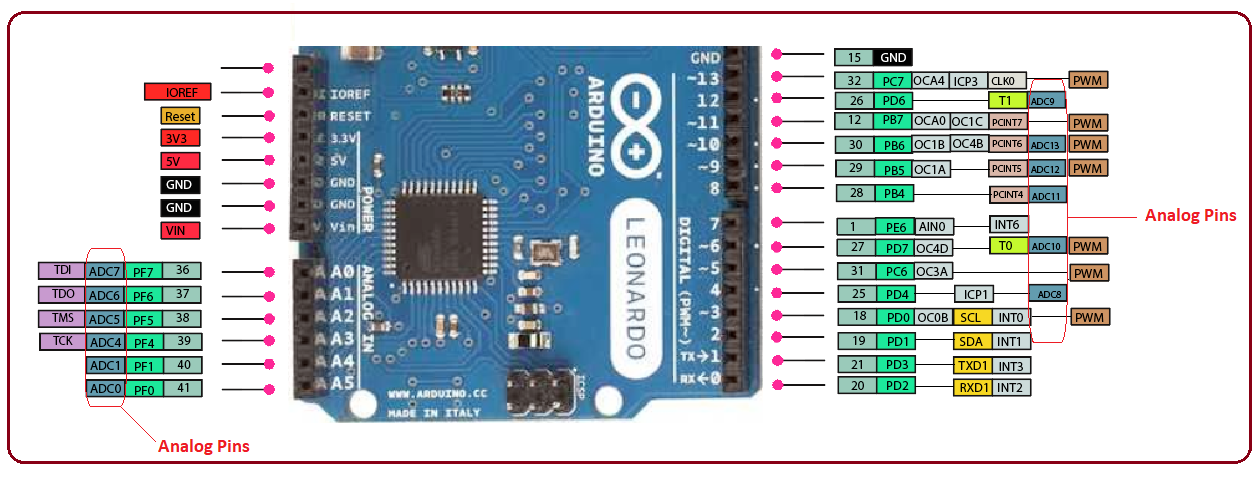
PWM Output
There are seven PWM pins available on the board. If you place the board with power jack pointing upward, these pins appear on the right side of the board. PWM is a process for getting analog results with digital means. You can see these pins in the figure below.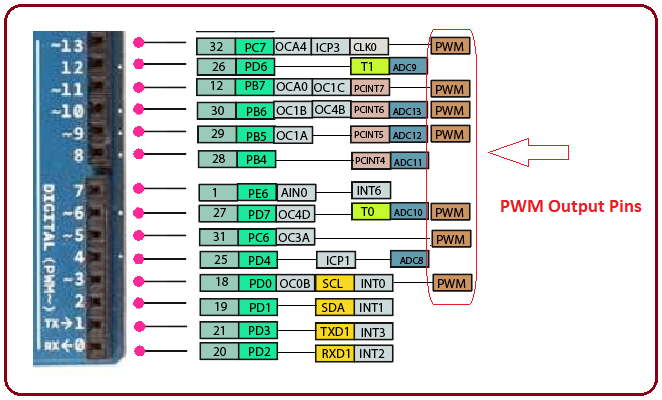
Communication Protocols
Three communication protocols including SPI, UART and I2C are incorporated on the board. You can see them on the figure below. It is important to note that SPI communication is not available on the digital I/O pins like other boards instead, it houses in the ICSP header as shown in the figure below.
Power Source
Difference power sources are available for a variety of purpose. Mainly, the board operates at 5V while 3.3V is the operating voltage of each pin. The Vin is the input voltage that ranges between +7 to +12 V. This voltage comes from the external power source. There are two ground pins on the board. The AREF is an Analogue reference voltage, mainly used for analog pins. The IOREF is useful for powering and developing a compatibility between this board and Arduino Shields. As the shield is connected with this pin, it (shield) wears the I/O voltage provided by the Board. The Shield using IOREF pin will be compatible with both 3V3 and 5V. You can see the power source in the figure below.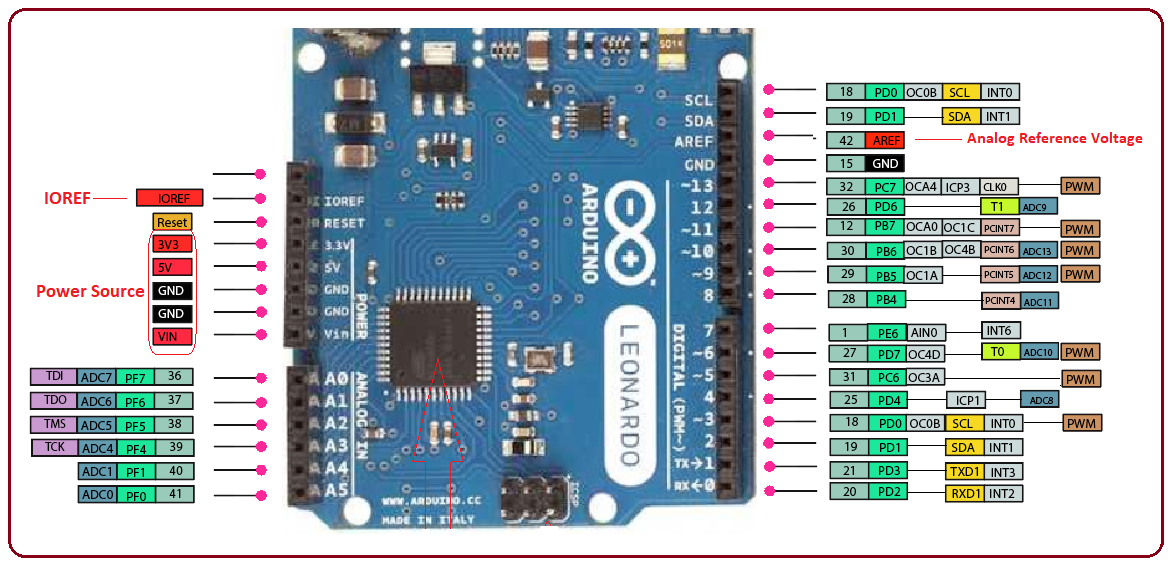
ICSP Header
ICPS stands for In-Circuit Serial Programming – A feature used for programming Arduino with another Arduino. ICSP header is added that helps in connecting the board with a computer for uploading a sketch in case USB port is not available.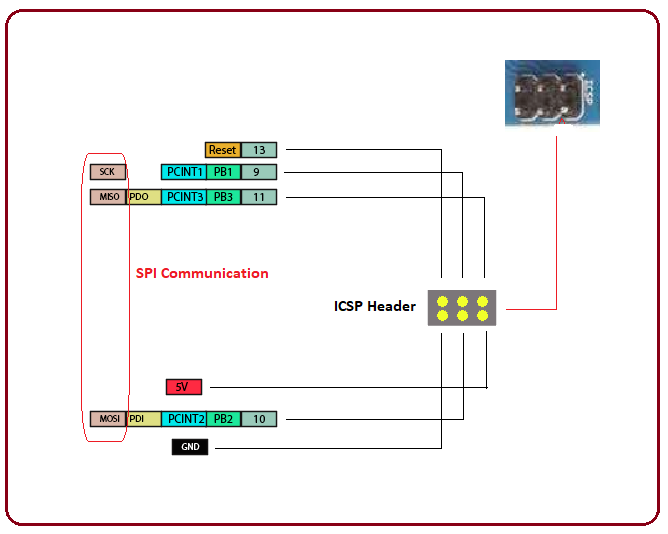
4. Programming
- Arduino.cc has introduced its own official software, called Arduino IDE, for programming the Arduino module. This software supports common operating systems like Windows, Linux or MAC. Before you download this software, make sure the required software version is compatible with your system i.e. if you aim to download App version, you must have Windows 10 installed in your system as app version is not compatible with Windows 7 or 8.1.
- No external burner is required to burn the code inside the module as it comes with a built-in bootloader. Having said that, if you intend to insert a new controller on the module, you need to install the bootloader again using IDE software.
- Arduino IDE comes with a compilation option that allows you to see the code compilation on the bottom of the screen as you upload the code. It generates hex file of the code which then is transferred into the board.
5. Difference between Arduino Leonardo and Arduino Uno
There is a slight difference between these two boards in terms of controller used, number of digital pins, PWM pins, and the pins reserved for SPI communication.- Arduino Uno incorporates ATmega328 while Arduino Leonardo comes with ATmega32U4.
- There are 7 PWM output pins available on the Leonardo and 6 are added on the Uno board.
6. Arduino Leonardo Projects and Applications
You can not write off the importance of Arduino Modules if you are working on a project that comes with a remote connection with automation. Arduino Leonardo comes with a wide range of applications and incorporates a number of peripherals, setting you free from the hassle of spending too much for buying external components. Following are some major applications Arduino can be used for:- Industrial Automation
- Health and Security Systems
- Creating wireless keyboard
- Automatic Pill Dispenser
- Embedded Systems
- Student Projects
- USB Trackpad
- Water Level Meter


