How to use analogWrite in Arduino?
- The analogWrite Arduino command is used to update the status of analog pins and also used to address the PWM pins on the board.
- The PWM pins are 8-bit pins, terming that you can set the duty cycle somewhere between 0 -255.
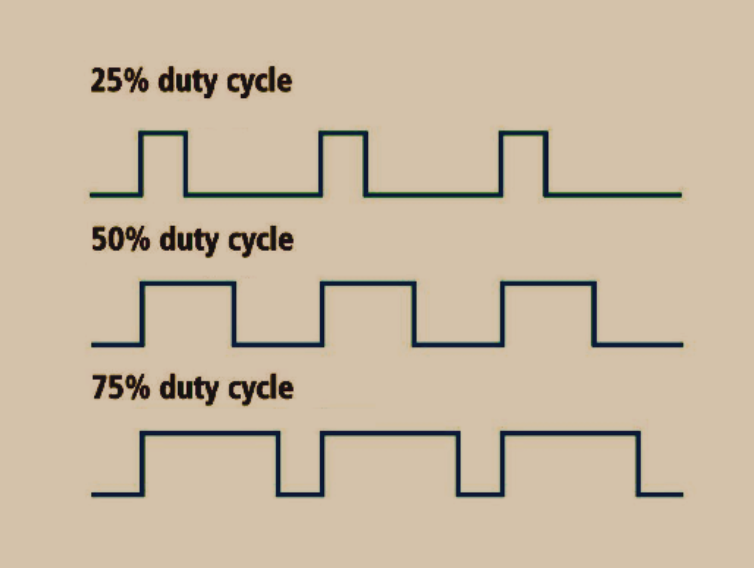
- The duty cycle is described as the amount time the signal switches between ON and OFF condition. It is mainly written in percentage.
- If the signal remains turned ON half of the total duty cycle and OFF in another half, then the duty cycle will be 50%.

- The analogWrite comes handy when you plan to control the motor speed or the intensity of any LED.
- The value you write on the PWM pins will control the speed.
- For example, if you intend to run the motor at full speed, you will set the value 255 i.e. the maximum value it can handle that will ultimately run the motor at full speed.

- Similarly, setting value as "0" will be sending no signal and motor won't start.
- And if the motor requires to be run at half speed, then you will set the value 127 or 128 - half of the maximum value that will cause the motor to be running at half speed.
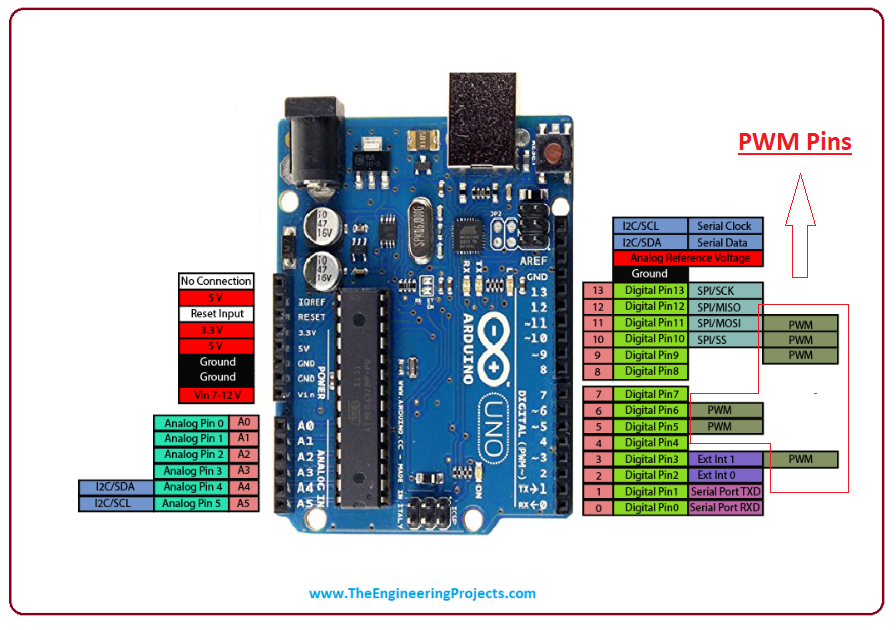
- Arduino Uno comes with PWM pins available on digital pin number 3,5,6 and 9,10,11. You can put any number, out of these pins.
- Now let's have a look at How to use analogWrite Arduino command:
Syntax
analogWrite(int pin, int value);
where:- "pin" is the pin number you are targeting.
- "value" is the duty cycle that can be set anywhere between 0 to 255 where former indicates the OFF condition and later indicates the system is running at full speed.
Example
analogWrite(10, 175);
Note: The analogWrite command doesn't return or store any value, unlike analogRead that returns value anywhere between 0 to 1023 depending on the voltage it gets in return from the connected sensor or device. The Arduino IDE is an official software used to program the Arduino Boards. It is an open source software, giving you the flexibility to program the Arduino Board as per your technical needs and requirements. It is free of cost and help is readily available on the Arduino site in case you feel any difficulty in shaping the desired code on the board. That’s all for now. I'll be writing more articles on how to code Arduino. If you are feeling skeptical about anything, making it difficult for you to grab the basic idea, you can approach me in the comment section below. I’d love to help you the best way I can. In the coming tutorial, we will have a look at How to use Arduino PWM Pins. Thanks for reading the article.


