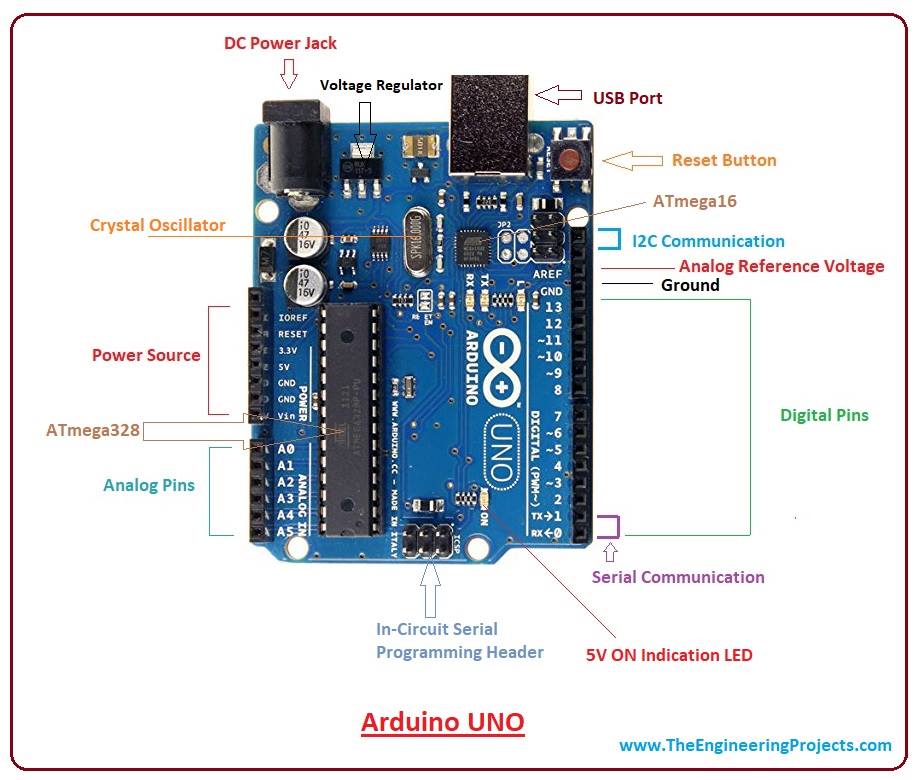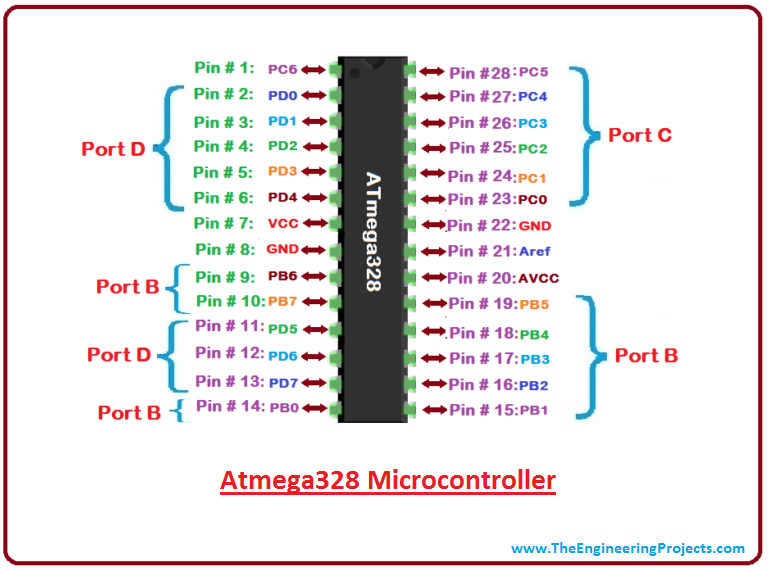
Arduino UNO is a very valuable addition in electronics that consists of a USB interface, 14 digital I/O pins(of which 6 Pins are used for PWM), 6 analog pins and an Atmega328 microcontroller. It also supports 3 communication protocols named Serial, I2C and SPI protocol. You should also have a look at this video presentation on Arduino UNO:
- Few main features of Arduino UNO are shown in the below figure:
| Arduino UNO Features and Technical Specs | ||||
|---|---|---|---|---|
| No. | Parameter Name | Parameter Value | ||
| 1 | Microcontroller | Atmega328 | ||
| 2 | Crystal Oscillator | 16MHz | ||
| 3 | Operating Voltage | 5V | ||
| 4 | Input Voltage | 5-12V | ||
| 5 | Digital I/O Pins | 14 (D0 to D13) | ||
| 6 | Analog I/O Pins | 6 (A0 to A5) | ||
| 7 | PWM Pins | 6 (Pin # 3, 5, 6, 9, 10 and 11) | ||
| 8 | Power Pins | 5V, 3.3V, Vin, GND | ||
| 9 | Communication | UART(1), SPI(1), I2C(1) | ||
| 10 | Flash Memory | 32 KB (0.5KB is used by bootloader) | ||
| 11 | SRAM | 2 KB | ||
| 12 | EEPROM | 1 KB | ||
| 13 | ICSP Header | Yes | ||
| 14 | Power sources | DC Power Jack & USB Port | ||
I'll try to cover each and everything related to Arduino Uno, so you get a clear idea of what it does, its main features, working and everything you need to know. Let's get started.

| Where To Buy? | ||||
|---|---|---|---|---|
| No. | Components | Distributor | Link To Buy | |
| 1 | Arduino Uno | Amazon | Buy Now | |
Introduction to Arduino Uno
- Arduino Uno is a microcontroller board, developed by Arduino.cc, based on the Atmega328 microcontroller and is marked as the first Arduino board developed(UNO means "one" in Italian).
- The software used for writing, compiling & uploading code to Arduino boards is called Arduino IDE (Integrated Development Environment), which is free to download from Arduino Official Site.
- It has an operating voltage of 5V while the input voltage may vary from 7V to 12V.
- Arduino UNO has a maximum current rating of 40mA, so the load shouldn't exceed this current rating or you may harm the board.
- It comes with a crystal oscillator of 16MHz, which is its operating frequency.
- Arduino Uno Pinout consists of 14 digital pins starting from D0 to D13.
- It also has 6 analog pins starting from A0 to A5.
- It also has 1 Reset Pin, which is used to reset the board programmatically. In order to reset the board, we need to make this pin LOW.
- It also has 6 Power Pins, which provide different voltage levels.
- Out of 14 digital pins, 6 pins are used for generating PWM pulses of 8-Bit resolution. PWM pins in Arduino UNO are D3, D5, D6, D9, D10 and D11.
- Arduino UNO comes with 3 types of memories associated with it, named:
- Flash Memory: 32KB
- SRAM: 2KB
- EEPROM: 1KB
- Arduino UNO supports 3 types of communication protocols, used for interfacing with third-party peripherals, named:
- Serial Protocol
- I2C Protocol
- SPI Protocol
- You can download the Arduino UNO datasheet by clicking the below button:

- Apart from USB, a battery or AC to DC adopter can also be used to power the board.
Features of Arduino Uno Board
- Arduino Uno comes with a USB interface i.e. USB port is added on the board to develop serial communication with the computer.
- Atmega328 microcontroller is placed on the board that comes with a number of features like timers, counters, interrupts, PWM, CPU, I/O pins and based on a 16MHz clock that helps in producing more frequency and number of instructions per cycle.

- It is an open-source platform where anyone can modify and optimize the board based on the number of instructions and tasks they want to achieve.
- This board comes with a built-in regulation feature that keeps the voltage under control when the device is connected to the external device.
- A reset pin is present in the board that resets the whole board and takes the running program in the initial stage. This pin is useful when the board hangs up in the middle of the running program; pushing this pin will clear everything up in the program and starts the program right from the beginning.
- There are 14 I/O digital and 6 analog pins incorporated in the board that allows the external connection with any circuit with the board. These pins provide flexibility and ease of use to the external devices that can be connected through these pins. There is no hard and fast interface required to connect the devices to the board. Simply plug the external device into the pins of the board that are laid out on the board in the form of the header.
- The 6 analog pins are marked as A0 to A5 and come with a resolution of 10bits. These pins measure from 0 to 5V, however, they can be configured to the high range using analogReference() function and AREF pin.
- Only 5 V is required to turn the board on, which can be achieved directly using a USB port or external adopter, however, it can support an external power source up to 12 V which can be regulated and limit to 5 V or 3.3 V based on the requirement of the project.
Arduino Uno Pinout
Arduino Uno is based on an AVR microcontroller called Atmega328. This controller comes with 2KB SRAM, 32KB of flash memory, 1KB of EEPROM. Arduino Board comes with 14 digital pins and 6 analog pins. ON-chip ADC is used to sample these pins. A 16 MHz frequency crystal oscillator is equipped on the board. The following figure shows the pinout of the Arduino Uno Board.
Arduino UNO Pin Description
There are several I/O digital and analog pins placed on the board which operates at 5V. These pins come with standard operating ratings ranging between 20mA to 40mA. Internal pull-up resistors are used in the board that limits the current exceeding the given operating conditions. However, too much increase in current makes these resisters useless and damages the device.- LED. Arduino Uno comes with a built-in LED which is connected through pin 13. Providing HIGH value to the pin will turn it ON and LOW will turn it OFF.
- Vin. It is the input voltage provided to the Arduino Board. It is different than 5 V supplied through a USB port. This pin is used to supply voltage. If a voltage is provided through a power jack, it can be accessed through this pin.
- 5V. This board comes with the ability to provide voltage regulation. 5V pin is used to provide output regulated voltage. The board is powered up using three ways i.e. USB, Vin pin of the board or DC power jack.
- USB supports voltage around 5V while Vin and Power Jack support a voltage ranges between 7V to 20V. It is recommended to operate the board on 5V. It is important to note that, if a voltage is supplied through 5V or 3.3V pins, they result in bypassing the voltage regulator that can damage the board if the voltage surpasses its limit.
- GND. These are ground pins. More than one ground pins are provided on the board which can be used as per requirement.
- Reset. This pin is incorporated on the board which resets the program running on the board. Instead of physical reset on the board, IDE comes with a feature of resetting the board through programming.
- IOREF. This pin is very useful for providing voltage reference to the board. A shield is used to read the voltage across this pin which then selects the proper power source.
- PWM. PWM is provided by 3,5,6,9,10, 11pins. These pins are configured to provided 8-bit output PWM.
- SPI. It is known as Serial Peripheral Interface. Four pins 10(SS), 11(MOSI), 12(MISO), 13(SCK) provide SPI communication with the help of the SPI library.
- AREF. It is called Analog Reference. This pin is used for providing a reference voltage to the analog inputs.
- TWI. It is called Two-wire Interface. TWI communication is accessed through Wire Library. A4 and A5 pins are used for this purpose.
- Serial Communication. Serial communication is carried out through two pins called Pin 0 (Rx) and Pin 1 (Tx).
- Rx pin is used to receive data while Tx pin is used to transmit data.
- External Interrupts. Pin 2 and 3 are used for providing external interrupts. An interrupt is called by providing LOW or changing value.
Communication and Programming

Applications of Arduino UNO
Arduino Uno comes with a wide range of applications. A larger number of people are using Arduino boards for developing sensors and instruments that are used in scientific research. Following are some main applications of the board.- Embedded System
- Security and Defense System
- Digital Electronics and Robotics
- Parking Lot Counter
- Weighing Machines
- Traffic Light Count Down Timer
- Medical Instrument
- Emergency Light for Railways
- Home Automation
- Industrial Automation


