
C# Button Control


Button are reusable components such as the exit and quit buttons which will perform the same functionality in each form and able to reuse again and again. The button will give end-user quite a clear navigation of software. The shape of the button is unique and have its own appearance properties by which its user can easily judge where is the button located. In short, the button is the controller which is used to create interactivity between user and application. Did you know that button is directly inherited from its base class? which is ButtonBase. You can click the button with the mouse and even with keyboard keys, it depends on the situation. So, let's have a look at How to sue C# Button Control:
C# Button Control
There are two ways using which you can add the C# button into your program. First one is the programming way to create a button.It's quite difficult one. The second way is to drag the button directly from the toolbar and place it on your application. Which is much easier than the programming one. When you drag the button you will get the default name of the button as button1 which you can change from the right panel under the properties tab.
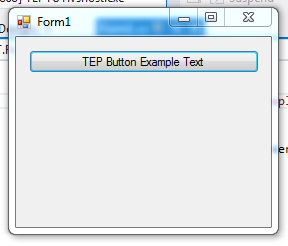
- If you want to change the button text during the run time or dynamically then you have to write the code, as shown below:
button1.Text = "TEP Button Example Text";
- After the name of a button when you will insert the (.) dot, lot of functions will pop up.
- You have to select the Text attribute and after the (=) equal sign just place the text inside double quotation which will become the string.
- You can also try the other attribute which comes after the (.) dot.
- I have already explained, how you can change the background color and foreground color of the C# Label Control, these properties are exactly same for C# Button Control.
- If you want to show the image inside the button then you have to use the Image property.
- FromFile is used to set the path of an image which you want to set.
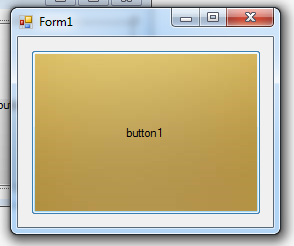
- Here is the example code where we have set the brownImage.jpg inside button.
button1.Image = Image.FromFile("C:\\Users\\Jade\\Pictures\\brownImage.jpg");
- Here is the image after the execution of above code.
- You just have to drag the button on the form and set the dimensions by drag the coordinates of the button to make it larger.
- Then place the above code in the main function and don't forget to change the path along with an extension of an image and you have done to set image for the button.
- If you want to set the background color of the button then you have to use the BackColor property.
- With BackColor property we can change the colors.
- Here is the demo code in which we have changed the color of the button.
- You can use the builtin color attributes to set colors.
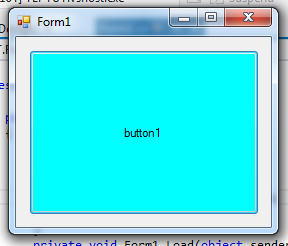
button1.BackColor = Color.Aqua;
- Here is the image of the code after execution, there are many colors which you can be used and we have select Aqua for the demonstration purpose.
- Now you have done with a Background color, what about the foreground color.
- If you want to change the color of foreground or text then you have to use the ForeColor property which will help us to set text color.
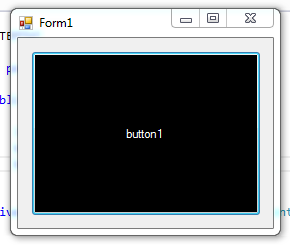
- Below is the example code which will change the foreground color. I'm going to set the foreground color to white.
button1.ForeColor = Color.White;
button1.BackColor = Color.Black;
- In the above code, we have used BackColor as black to prominent the effect of a foreground.
- Here is the image after executing the above code:
- If you want to change the size of button text, then you have used the Font property.
- The above codes are easier to remember but this code is difficult.
- Because you have to change the font size with technical parsing.
- It's mean you can observed the below code, that we have used the Font property and allocate new Font object and passed the button.font.fontfamily and after the comma, there is the size of the button text.
button1.ForeColor = Color.White;
button1.BackColor = Color.Black;
button1.Font = new Font(button1.Font.FontFamily, 33);
- You can do the above code in an alternative way which is easier to understand.
- First, take the integer type variable and allocated the size and then pass as the reference in Font Object constructor, as shown in below code:
int newSize = 33;
button1.ForeColor = Color.White;
button1.BackColor = Color.Black;
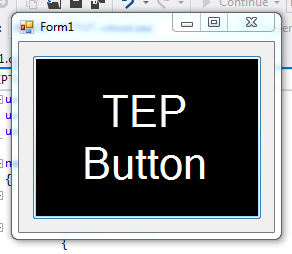
button1.Font = new Font(button1.Font.FontFamily, newSize);
- Here is the output image of the above code, you can clearly get the concept from this:
- Click Event
- Text Changed Event
- MouseHover Event
- MouseLeave Event
Now we will create the code of above-listed events and handle them with their methods. You can create separate methods and appoint them in replacement of built-in methods. But that's some difficult, so we will simply use the built-in methods.
C# Button Click Event
This event will occur when end user will click on the button once. If you want to perform any functionality when user will click on the button then we will use the _Click event to handle this functionality. After the name of a button, you have to write the _Click, suppose you go with default name which is button1. Then you have to create the method with name button1_Click. In the following code, I have used the button when user will click, it will generate the message box.
using System;
using System.Drawing;
using System.Windows.Forms;

namespace TEPTUT
{
    public partial class Form1 : Form
    {
        public Form1()
        {
            InitializeComponent();
        }
        private void Form1_Load(object sender, EventArgs e)
        {

        }

        private void button1_Click(object sender, EventArgs e)
        {
            MessageBox.Show("C# Button Click Event Executed");
        }


   }
}
C# Button Text Changed Event
This event occurs when the text of the button is changed. This is the built-in method with the name _TextChanged. In the following code, there is a button1_TextChanged event which will generate the message popup when the text of the button is changed. Button1_Click event is used to change the text when user will click. Logic is when user will click the button, the text of button will be changed and button1_TextChanged is performed.
using System;
using System.Drawing;
using System.Windows.Forms;

namespace TEPTUT
{
    public partial class Form1 : Form
    {
        public Form1()
        {
            InitializeComponent();
        }
        private void Form1_Load(object sender, EventArgs e)
        {

        }

        private void button1_Click(object sender, EventArgs e)
        {
            button1.Text = "New Text";
        }


        private void button1_TextChanged(object sender, EventArgs e)
        {
            MessageBox.Show("C# Button TextChanged Event");
        }


   }
}
C# Button MouseHover Event
This event occurs when user will hover the mouse cursor on the button. This is a built-in event with the name _MouseHover after the default name of the button or your desired button named. Here in this code, we have used the default name of a button which is button1. When user will hover the mouse cursor over the button it will generate the message popup.
using System;
using System.Drawing;
using System.Windows.Forms;

namespace TEPTUT
{
    public partial class Form1 : Form
    {
        public Form1()
        {
            InitializeComponent();
        }
        private void Form1_Load(object sender, EventArgs e)
        {

        }


        private void button1_MouseHover(object sender, EventArgs e)
        {
            MessageBox.Show("C# Button MouseHover Event");
        }


   }
}
C# Button MouseLeave Event
This event is occurring when user will leave the button or move the cursor from the button boundaries. In the following code, we have created the _MouseLeave event with the default name of the button. When user will remove the mouse cursor out of button it will get executed and generate the message popup.
using System;
using System.Drawing;
using System.Windows.Forms;

namespace TEPTUT
{
    public partial class Form1 : Form
    {
        public Form1()
        {
            InitializeComponent();
        }
        private void Form1_Load(object sender, EventArgs e)
        {

        }

        private void button1_MouseLeave(object sender, EventArgs e)
        {
            MessageBox.Show("C# Button MouseLeave Event");
        }


   }
}
- Here's the video in which I have shown How to use these codes:
Now you are able to add functionalities in C# button. We have tried to explain you the major concepts so that you can get the idea to work with C# button. By using the above events you can make your software more accurate and interactive. We have described the basic two major functionalities. Now you are able to change text, color, style, and handle the events. If are facing any kind of problem regarding the codes, let us know through the comment section.


 1 user


 Continue Wishlist


 Getting Started Guide
 Help Center
 Contact us
 Doist Blog
 Privacy
 Security
 Terms of Service
 What's new: Channel Descriptions


 C#
C# junaidshahid
 0 Comments


 2.3k
2.3k
 953
953
 921
921
 2.1K
2.1K
 C# Button
Csharp Button
C sharp Button
Button C#
Button CSharp
Button C Sharp
 Thursday, October 5, 2017


