
Power Factor Measurement Using Microcontroller

There are many ways for power factor measurement and today's the method we are gonna use is called zero crossing detection. We will first detect the zero crossing of our signal and then we are gonna do the power factor measurement based on the detection of zero crossing of our voltage and current signal. Seems bit difficultdon't worry we are gonna do everything and in quite full detail so stay with me and enjoy the tutorial. But before going into the details of power factor measurement, let's first discuss the basics of power factor measurement because before that you wont understand a bit.
We have designed this simulation after quite a lot of effort so its not for sale but has a quite small cost of $20 so that engineering students can buy it easily. You can buy the simulation along with hex file and code by clicking on the above button and it will lead you to Product page of this product. So, let get started with it.
Basics of Power Factor
- In AC circuits, there are total three types of loads which are normally bear by an AC current, named as:
- Resistive Loads.
- Capacitive Loads.
- Inductive Loads.
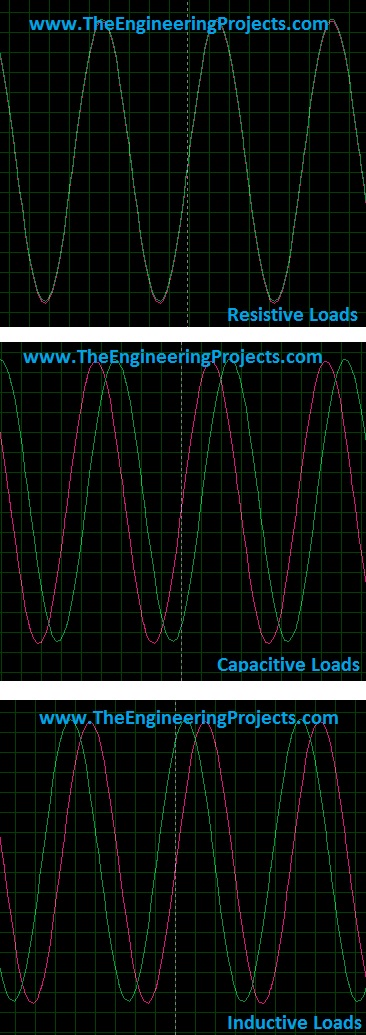
We are all quite well aware of these and if you are not then I must say you wont read further and must first get some basic knowledge about these loads. Among these three loads Resistive loads are known as the most decent loads as they don't mess up with the current and just simply let the current pass through it and that's why there's no such power loss in these types of loads. But when it comes to Capacitive or Inductive loads. they are quite disturbing types of loads and hence they don't let the current easily pass through them and slightly distort the current signals. In case of Capactive loads, the current waveform got ahead of the voltage waveform and hence got a lead angle. In other words, current waveform leads the voltage waveform. While in case of Inductive loads, the scenario is quite the opposite. In Inductive loads, current waveform lags the voltage waveform. The below figure shown the difference between these loads output.
- In the above figure, Red waveform is showing the current wave, while the green waveform is showing the voltage wave. So its quite obvious from above three figures that in case of resistive load there's no angle difference but in case of capacitive load, current waveform leads the voltage waveform while in Inductive load current waveform lags the voltage waveform and in this case I have used a constant angle of 60 degrees for both capacitive and inductive loads.
- Now because of this angle difference there's quite an energy loss which is not quite good for any system so the best scenario for any system is that this angle should be 0 which is the case of resistive loads.
- Now question is why we are reading this stuff while we are actually interested in power factor measurement so yes now I am coming towards it.
- Power Factor is simply the cosine of this leading or lagging angle. In simple words, if you get this leading or lagging angle between current and voltage waveform, which in the above figure is 60 degrees, and then take the cosine function of that angle, you will get the Power factor for your system.
- So, if we calculate the power factor for the above waveform, for which the leading or lagging angle (both) are 60 degrees, then we get:
Power Factor = Cos ( 60 degrees )
Power Factor = 0.5
- So, the power factor of our above system is 0.5 which is quite bad.
- Now, whats the meaning of this 0.5 power factor, it means that our system's efficiency is 50% and the energy dissipation is also 50% so our system's efficiency is as well 50%.
- So, if we want to improve our systems' efficiency, then we need to increase the Power Factor of our system.
Power Factor Measurement with Zero Crossing Detection
- There are many methods available for Power Factor measurement and in this post we are gonna use the zero crossing detection in order to measure it .
- As we all know, the voltage and current waveform are basically the sine waves so they must cross the zero point at some time.
- And what we need to do is to detect the zero crossing of both these waves. So, first of all we are gonna do this in Proteus.
- So, design a circuit in Proteus for Power Factor Measurement as shown in below figure:
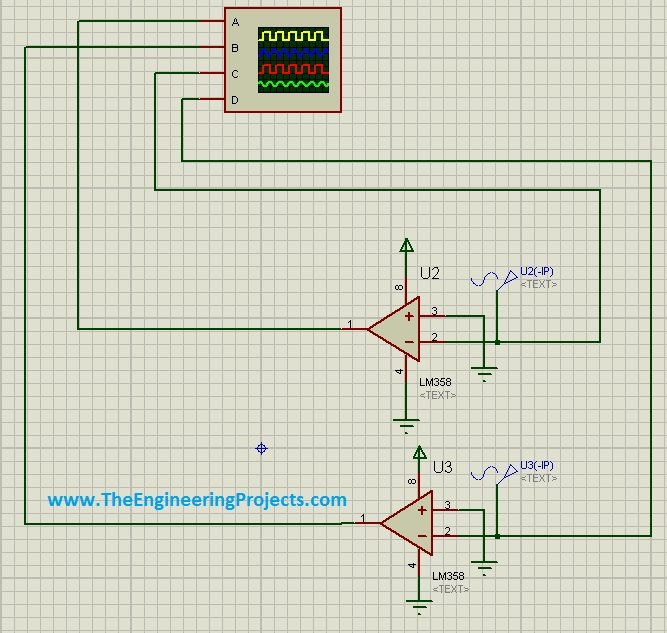
- In the above circuit design, I have used two voltage sources which are U2 and U3, I have considered U2 as the voltage transformer while the U3 as the current transformer, when you are designing the actual circuit in hardware then you need to use the current and voltage transformer.
- The reason why we need to use CT and PT is because the normal voltage is normally of 220V or 110V which we can't directly give to our microcontroller because it will burn our microcontroller.
- So, we need to lower this voltage level and needs to bring it to such level which is easily operatable by microcontroller, which in normal case is below 5V.
- So, now I suppose you have used the CT PT and you are getting your current and voltage waveforms in the order of 5V but now again there's another issue that the voltage we are getting is AC while our microcontroller works on DC so we need to find some way to convert this AC into DC.
- So,in order to do, I have used this 8 pin amplifier LM358 as a comparator.
- What LM358 is doing ?? Its simply comparing the voltage coming at its inverting pin to the voltage at its non inverting pin and whenever both voltages match it will send a HIGH pulse to the output.
- You can see clearly that I have placed a GND on the non inverting pin of LM358 so whenever we get zero crossing on the inverting side it will send us a HIGH pulse at output.
- That's how we are converting our AC signal into DC signal as well as detecting the zero crossing. Let's have a look at these waveform in Oscilloscope.
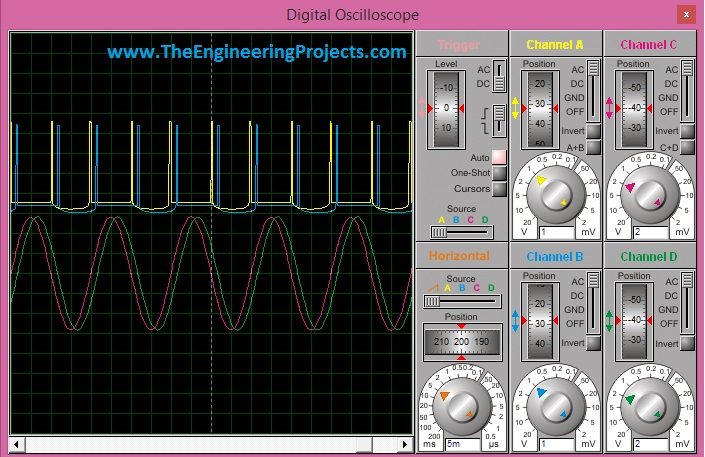
- The below two waveform are the current and voltage waveform, red one is current while the green one is voltage and I have placed a lagging angle of 30 degrees that's why current waveform is lagging the voltage waveform.
- While the above two waveform are the output of LM358 and we can see clearly they are giving the high peaks when the lower waveform cut their zero axis.
- So that's how we are doing the zero crossing detection.
- We have got the zero crossing detection and now what we are gonna do in programming is to first detect the zero crossing of current waveform and then we will start counting the time until we get the zero crossing of voltage waveform.
- So, basically what we are gonna do is we are gonna count the time difference between current wave and voltage wave zero crossing.
- When we got the time difference between these two waves, we can get the angle quite easily using the below formula.

- We have got the time difference and we have already know the frequency of our system which is normally 50 HZ or 60Hz.
Power Factor Measurement Using Microcontroller in Proteus
- Now we have already detected the zero crossing so now next thing is to calculate the time difference which we are gonna do in our microcontroller.
- So, in order to do the time calculation, first of all we will detect the zero crossing of current wave.
- Then we will start a timer which will start counting and we will stop this counting when we get the voltage curve.
- So, in order to do these tasks, I have used the below code:
void pf_func(){
while(1)
{
       if ( PINC.4==1 )
       {
           TCNT1=0;
           TCCR1B = 0x01;
           break;
       }
       else {
               continue;
             }
}
while(1){
     if ( PINC.3 == 1 ){
     TCCR1B = 0x00;
     g=TCNT1;
     break;
}
else {
continue;
}
}
}
- Now, when we detect the zero crossing of current waveform, we simply start the timer and start counting and when we get the zero crossing of voltage waveform, we simply stop the counter and we get the total time difference between the current waveform and the voltage waveform.
- Now, next thing we need to do is to calculate the power factor, which is now quite easy because we already got the time difference.
- So, what I do in order to do that is simply used the below simple code:
int powerfactor(){
k=0;
// To complete number of counts
g=g+1; //Value from the timer
//To convert into seconds
pf=(float)g/1000000;
//To convert into radians
pf=pf*50*360*(3.14/180);
//power facor
pf = cos(pf);
//power factor into percentage
k=abs(ceil(pf*100));
return k;
}
- So, that's how we are calculating the Power factor.
- We have done quite a lot of effort to design this simulation and code so its not for free but you can getit easily just for a price of $20.
- Now when you get the code then make your hex file and upload it in Proteus.
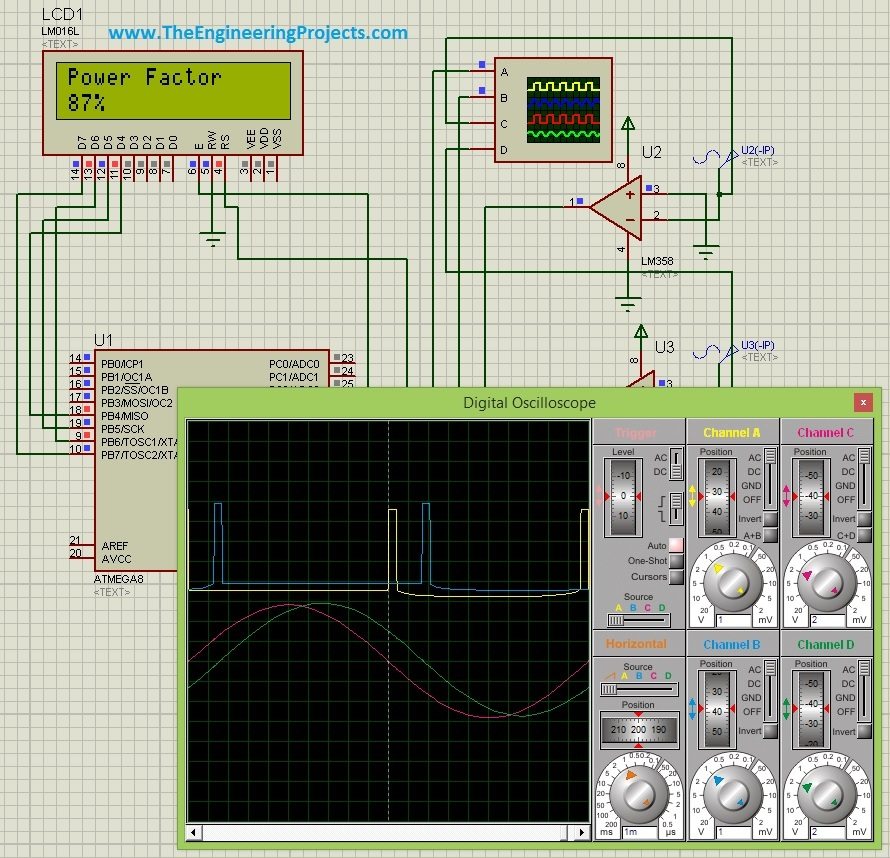
- Now run your Proteus simulation and you will get something like this:

- In the above figure, current waveform leads the voltage waveform by 30 degrees and that's why we are getting a power factor of 0.87 which is 87%.
- Now let me reduce the difference between current and voltage waveform to 0 and we will get a power factor of 1 as shown below:
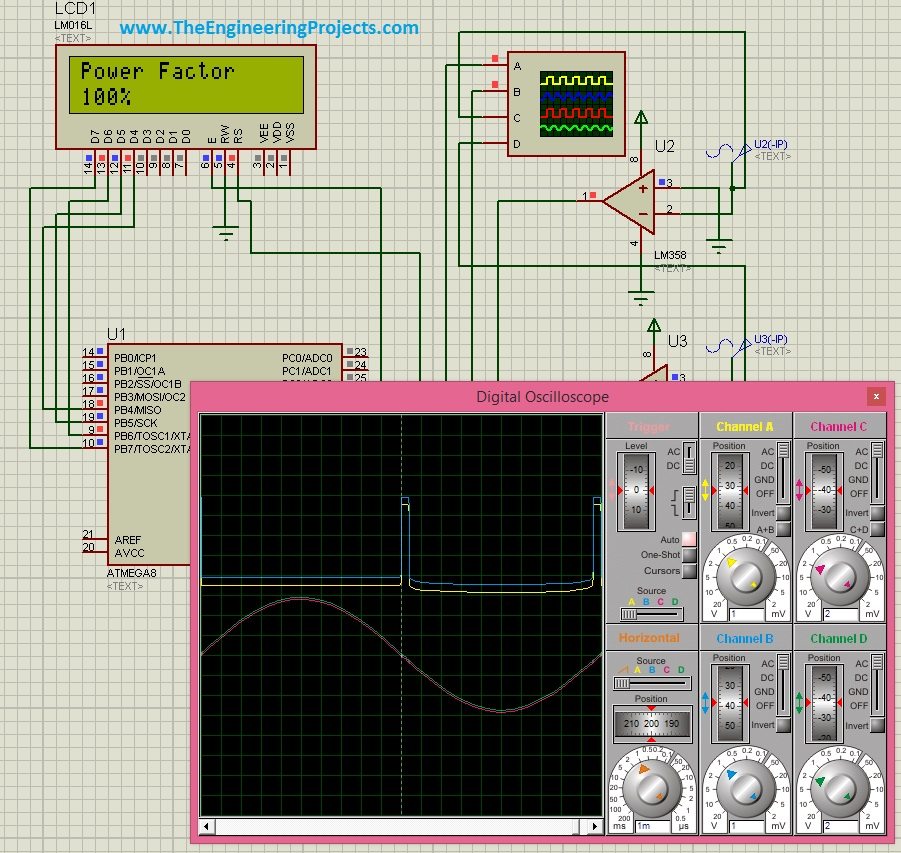
- Now, you have seen as we reduced the distance between current and voltage waveform the power factor has increased and as the angle between current and voltage waveform is 0 so its 100%.
So, buy it and test it and hopefully you will get something big out of it. So that's all about Power Factor Measurement using Atmega. I will post it on Arduino as well quite soon and may be on PIC Microcontroller as well. So, till next tutorial take care !!! :)


 1 user


 Continue Wishlist


 Getting Started Guide
 Help Center
 Contact us
 Doist Blog
 Privacy
 Security
 Terms of Service
 What's new: Channel Descriptions


 Arduino
 syedzainnasir
 2 Comments


 2.3k
2.3k
 953
953
 921
921
 2.1K
2.1K
 PF measurement in proteus
PF proteus simulation
power factor measurement
power factor proteus design
how to get power factor
calculate power factor
measure power factor
 Monday, December 7, 2015


