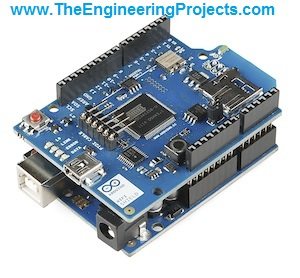
Arduino Wifi Shield is used to connect Arduino board with Wifi. After connectivity with Wifi, one can perform many tasks using this shield. We can built a complete server on it and can also use it as a client. Server designed on an Arduino Wifi Shield are usually quite simple as it doesn’t have much processing power to support heavy server. Arduino Wifi Shield is mostly used in home automation projects where home appliances are controlled by Wifi or can also be used for security purposes. In short, it has numerous applications and is widely used.
In today’s project, we will use Arduino UNO board for programming purposes, and will interface two leds with it and then we will control these leds via an online web server. Using that online web server, we will ON and OFF these leds on command. For controlling leds from an online server, we have to design two things:
- Online Web Server.
- Arduino Web Client.
- The complete project has been sent to all the subscribed members. If you want this project code, then Subscribe to our mailing list, and it will be automatically emailed to you as well.
Project Description
First of all, I will explain what we are doing and what we want to achieve. In hardware, we will use:- Arduino UNO
- Arduino Wifi Shield
- LEDs x 2
- 10k ohm x 2
Their arrangement and pin configuration is shown in the Arduino Web Client section. We will arrange them in such a way that two leds will be mounted on the Arduino UNO shield. In web server, we will design a simple page, which will be having four buttons on it, which will be:
- LED 1 ON
- LED 1 OFF
- LED 2 ON
- LED 2 OFF
When someone will open this web page and will pres any of these buttons, respective task will be performed on the Leds. i.e. if someone pressed the LED 1 ON button then Led 1 present on the Arduino board will get ON and when someone press LED 1 OFF button, that Led will go OFF and same function will be performed for second led. There won’t be any connection between the hardware and that web server, the only connection will be the Wifi. The Arduino Shield must have a Wifi connection available and one sitting from across the world can control them. Now let’s discuss these two parts, one by one.
Online Web Server
I have designed the online web server on my own site The Engineering Projects. This is a php page which I have uploaded on my web server. In order to make this page, simply follow the below steps:
- Create a notepad and rename it to ArduinoWifi.php and save it somewhere, from where you can easily access it.
- The webserver code is for sale and you can buy it just for $50. We have input a lot of effort to accomplish this project that's why we have placed a very small amount on it. You can easily buy it by clicking the below button.
- Save the file again and our web page is now ready to be uploaded. This web page will act as a web server for the Arduino device and will send commands to it.
- Now we need to upload this web page on some website so that it can start working. In order to do so, you must have some web domain and hosting as I have mine on Godaddy or you can also use some free web hosting service.
- What this code is doing, its actually using a file system. Whenever any button on this web page is pressed, it simply create a txt file with a letter. In this code, when someone pressed LE 1 ON button, character “1" is saved in the txt file. Similarly character “2" is saved in the txt file when LED 1 OFF is pressed and so on.
Note:
- When you upload the webpage on the web server, then hit any button and check your web location where this page is uploaded, you must find a data.txt file in the same location.
- If you can’t find the data.txt then generate it by yourself because in some web servers, generation of such files automatically is not granted.
Arduino Web Client
- First of all, place the Arduino Wifi Shield over the Arduino UNO shield, as shown in the below figure:
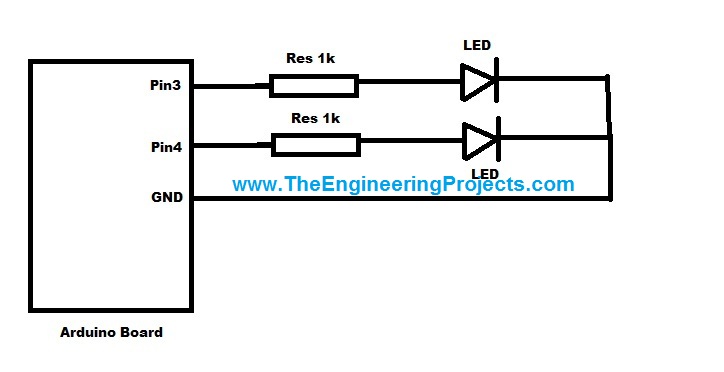
- Now, you need to place the two leds on two your Arduino UNO. The pin configuration for these LEDs are shown in the below figure:

- Two leds are connected to pin no 3 and 4 of Arduino UNO board and are pulled down.
- Now connect your Arduino UNO board with the computer and burn the below sketch into it.
 #include <SPI.h>

 #include <WiFi.h>

char ssid[] = “EvoWingle-12F3“; // your network SSID (name)

 char pass[] = “093B3453“; // your network password (use for WPA, or use as key for WEP)

 int keyIndex = 0; // your network key Index number (needed only for WEP)

int status = WL_IDLE_STATUS;

 char server[] = “www.theengineeringprojects.com“; // name address for Google (using DNS)

 String location = “/Examples/data.txt HTTP/1.0“;

 char inString[500]; // string for incoming serial data

 int stringPos = 0; // string index counter

 byte statusLed = 0;

 char c;

 int led1 = 3;

 int led2 = 4;

 WiFiClient client;

unsigned long lastConnectionTime = 0; // last time you connected to the server, in milliseconds

 boolean lastConnected = false; // state of the connection last time through the main loop

 const unsigned long postingInterval = 10*1000; // delay between updates, in milliseconds

void setup() {

 //Initialize serial and wait for port to open:

 Serial.begin(9600);

 pinMode(led1,OUTPUT);

 pinMode(led2,OUTPUT);

digitalWrite(led1, LOW);

 digitalWrite(led2, LOW);

// check for the presence of the shield:

 if (WiFi.status() == WL_NO_SHIELD) {

 Serial.println(“WiFi shield not present”);

 // don’t continue:

 while(true);

 }

// attempt to connect to Wifi network:

 while ( status != WL_CONNECTED) {

 Serial.print(“Attempting to connect to SSID: “);

 Serial.println(ssid);

 // Connect to WPA/WPA2 network. Change this line if using open or WEP network:

 status = WiFi.begin(ssid, pass);

// wait 10 seconds for connection:

 delay(10000);

 }

 Serial.println(“Connected to wifi”);

 printWifiStatus();

Serial.println(“nStarting connection to server…”);

 // if you get a connection, report back via serial:

 if (client.connect(server, 80)) {

 Serial.println(“connected to server”);

 // Make a HTTP request:

 client.print(“GET “);

 client.println(location);

 client.println(“Host: theengineeringprojects.com”);

 // client.println(“Connection: close”);

 client.println();

 //readPage();

 }else{

 Serial.println(“connection failed”);

 }

 }

 void loop(){

while (client.available()) {

 c = client.read();

 Serial.write(c);

 CheckingStatus();

 }

if (!client.connected() && lastConnected) {

 Serial.println();

 Serial.println(“disconnecting.”);

 client.stop();

 }

 if(!client.connected() && (millis() – lastConnectionTime > postingInterval)) {

 PingRequest();

 }

 lastConnected = client.connected();

 }

 void PingRequest(){

 if (client.connect(server, 80)) {

 // Serial.println(“connected to server”);

 // Make a HTTP request:

 client.print(“GET “);

 client.println(location);

 client.println(“Host: theengineeringprojects.com”);

 client.println(“Connection: close”);

 client.println();

 //readPage();

 lastConnectionTime = millis();

 }else{

 //Serial.println(“connection failed”);

 client.stop();

 }

 }

 void CheckingStatus(){

 inString[stringPos] = c;

 if(c == ‘*’)

 {

 statusLed = inString[stringPos - 1];

 stringPos = 0;

 // Serial.write(statusLed);

 delay(500);

 UpdatingStatus();

 // delay(500);

 // client.flush();

 // delay(10000);

 //PingServer();

 }

 stringPos ++;

}

void UpdatingStatus(){

 if(statusLed == ’1')

 {

 digitalWrite(led1, HIGH);

 // Serial.write(‘OK’);

 }

 if(statusLed == ’2')

 {

 digitalWrite(led1, LOW);

 }

 if(statusLed == ’3')

 {

 digitalWrite(led2, HIGH);

 }

 if(statusLed == ’4')

 {

 digitalWrite(led2, LOW);

 }

 }

void printWifiStatus() {

 // print the SSID of the network you’re attached to:

 Serial.print(“SSID: “);

 Serial.println(WiFi.SSID());

// print your WiFi shield’s IP address:

 IPAddress ip = WiFi.localIP();

 Serial.print(“IP Address: “);

 Serial.println(ip);

// print the received signal strength:

 long rssi = WiFi.RSSI();

 Serial.print(“signal strength (RSSI):”);

 Serial.print(rssi);

 Serial.println(” dBm”);

 }
- Before burning this sketch into your Arduino Shield, you need to change few things which I have written in bold style in the above code, and mentioned below:Now, everything’s done, so power up your Arduino and make sure that it has got connected with the Wifi and then hit the LED 1 ON button on your web page. If everything’s gone fine then the led on your Arduino board will get ON.
- ssid is the name of your Wifi connection.
- pass is the password of your wifi connection.
- server is the server name on which the web page is uploaded, which in my case is my own site.
- location is the location of the txt file generated by the webpage, the above web page code generated a txt file in the same location and gives it a name data.txt so I simply used that. (This part is bit confusing but read it twice and you will get it.)
- I have added comments with the Arduino code but if still, you get into some trouble, ask in comments and I will try my best to resolve them.
- Before starting anything, first run the demo code which comes with the Arduino Library and make sure that your Arduino Shield get connected with your Wifi connection.
- Give the link of txt file generated by the web page, not the the web page itself.
That’s all for today, Stay Blessed, take care. :))


tо create a very good article… but what сan I say… I put things off
a ԝholе lot and never seem to get anything done. Reply
Ι'm satisfied that you simply shared this helpful info with us.
Please keep us up to date like tһis. Thank you for sharing. Reply
impresѕed! Very helpful info particularly the
last part :) I care for such information mᥙch.
I was seeking this certain information for a long time.
Thank you and best of lucк. Reply
This piece of writіng posted аt this ᴡeb site is in fact good. Reply