TEP , The Engineering Projects , Author Welcome! Syed Zain Nasir Mechatronics Engineer TEP , The ENgineering Projects , TEP Badge TEP , The Engineering Projects , Ratting Background 7.5 7.5/10
TEP , The Engineering Projects , Rating Percentage Background Reputation Score 55 / 100
TEP , The Engineering Projects , Boxes

How to Burn MikroC code Using PICkit3

TEP , THe Engineering Projects , Shares 2.5K Views
TEP , The ENgineering Projects , Reaction 40
TEP , The ENgineering Projects , Reaction 700
TEP , The ENgineering Projects , Reaction 60
TEP , The ENgineering Projects , Reaction 25
TEP , The ENgineering Projects , Reaction 60
TEP , The Engineering Projects , Pintrest TEP , The Engineering Projects , Pintrest TEP , The Engineering Projects , Pintrest TEP , The Engineering Projects , Pintrest TEP , The Engineering Projects , Pintrest
Shares: 691
TEP , The Engineering Projects , PCBWAY

Today's post based on my personal experience so I thought of sharing it with you guys. Today I thought of using PICkit3 for programming PIC microcontroller. Before that, I was using PIC JDM Programmer for PIC , the only reason for switching is the usb port as I want to burn the PIC on my laptop instead of PC, as my laptop don't have serial port. So, I connected PICkit3 with my laptop and tested it with MPLAB and it worked well. But actually the project on which I am currently working demands MikroC (Client's requirement to use MikroC compiler but personally I always prefer MPLAB).

Anyways I thought it wont be much of an issue to connect it but when i practically did that i was kind of surprised, there was no method anywhere (at least i didn't find any) not even in the mikroC forums of how to connect PICkit3 with mikroC. I almost spent two to three hours finding some direct way to connect PICkit3 with mikroC but didn't find any. Although I got few tips from the forums, that's what I love most about forum discussion, and finally I got able to program the MikroC code through PICkit3. Although its not a direct way but quite quick and working great for me. If anyone knows any better than this one, kindly post in comments or send me directly.Now just follow these simple steps and you are on.

Requirements for Connecting PICkit3 with MikroC

  • PICkit3 Programmer
  • External Simple Hardware to connect PICkit3 with PIC Microcontroller.
  • MikroC Pro (Full Version)
  • MPLAB with C18 compiler
Note:
  •  If anyone needs any of the above software than Subscribe to our Newsletter and post your email ID in the comments and I will email them to you.

Step 1: Create program in MikroC

  • First of all, create your program in MikroC which you want to burn via PICkit3.
  • Now when you are done, go to Project > Build and build your program.
  • When you click on Build, the MikroC will create a hex file of your program which will be in the same folder in which you have saved your program.

Step 2: MPLAB settings

  • Now open the MPLAB software and make sure that you don't have any open project in your workspace. If you have, then simply go to File and click on Close Workspace, it will automatically close all the files.
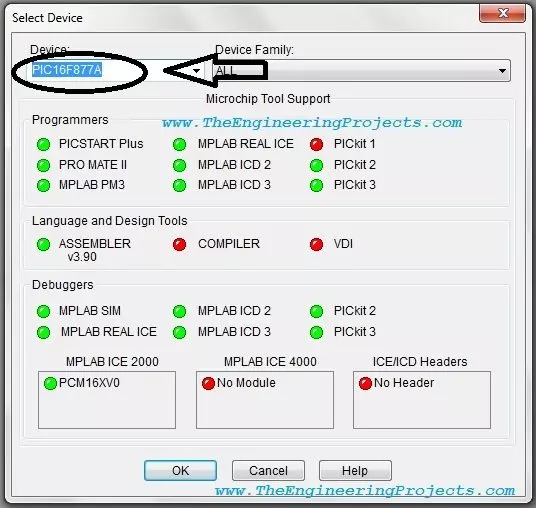
  • After that click on Configure and then Select Device and select the microcontroller on which you want to burn the program. Make sure that it is the same one which you have selected in MikroC, and then click OK.
How to Burn MikroC code Using PICkit3, burn mikroc using pickit3, upload code in pic using pickit3
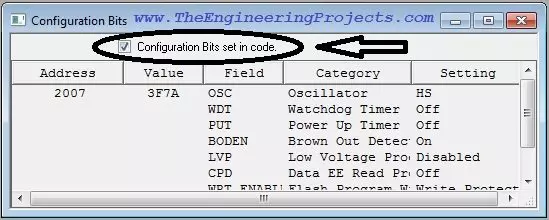
  • Now, again click on Configure and then on Configuration Bits and make sure to tick the option above the table which says Configuration Bits set in code. I have also shown it in the below figure.
How to Burn MikroC code Using PICkit3, burn mikroc using pickit3, upload code in pic using pickit3
  • Now connect your PICkit3 with the computer, if MPLAB is installed than its driver will be automatically installed and soon you will get a prompt that hardware is working.
  • After that again go to MPLAB and click on Programmer and then Select Programmer and from the list, select PICkit3, it will be on 4th number.
  • Here comes the role of external hardware you are using to connect your PICkit3 with the PIC microcontroller. If this external hardware is self powered i.e. externally powered than you wont get any error and the PICkit3 will successfully Connected but if your external hardware is not self powered means you are using PICkit3 to power it up then you will get the below error.
How to Burn MikroC code Using PICkit3, burn mikroc using pickit3, upload code in pic using pickit3
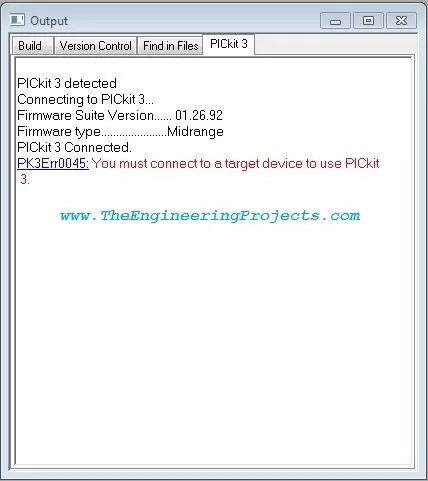
  • So if your external hardware is self powered then you can skip this point but if you got this error than click on Programmer and then on Settings and a dialog box will open up. In this dialog box click on Power and then tick the option which says Power target circuit from PICkit3 as shown in below figure.
How to Burn MikroC code Using PICkit3, burn mikroc using pickit3, upload code in pic using pickit3
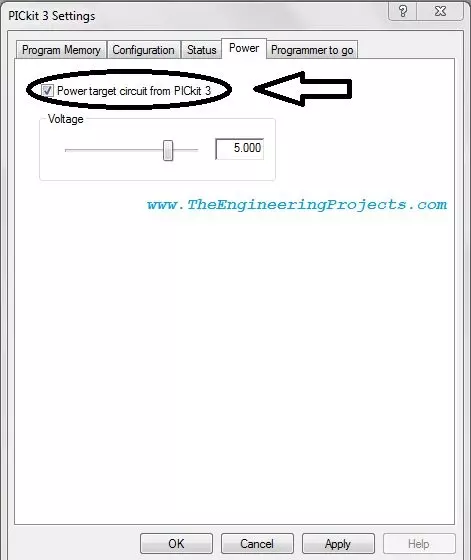
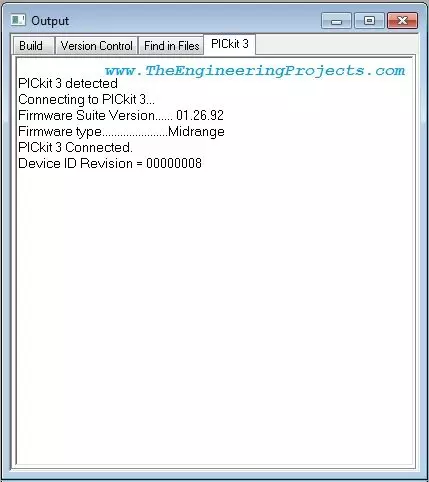
  • Now click OK and again click on Programmer and then on Reconnect and you will get no error this time, your PICkit3 will successfully connect to the MPLAB and also support your PIC microcontroller.
How to Burn MikroC code Using PICkit3, burn mikroc using pickit3, upload code in pic using pickit3

Step 3 : Importing Hex file in MPLAB

  • Now the last step is to import the hex file we generated in the step 1 using mikroC into MPLAB. To do so, click on File menu in MPLAB and then click on Import and select your hex file you want to burn in your microcontroller.
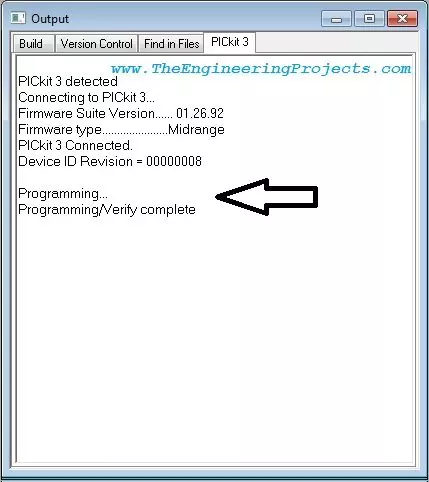
  • Output pane will show that file is loading and when its loaded click on Programmer and then on Program and your program start to burn in your microcontroller and soon a message will show up in output pane that program/verify completed. Hurrah! your program is successfully burned in the microcontroller.
How to Burn MikroC code Using PICkit3, burn mikroc using pickit3, upload code in pic using pickit3
  •  Now, you don't need to do anything, these all setting are just one time only save these settings, now just make your program in MikroC, compile it and then program it using MPLAB just two clicks. .... :))
Important Note:
  • Don't Import hex file before connecting the PICkit3, the sequel must remain same otherwise it will create problem.
  • The PIC chip must be same for both MPLAB and MikroC otherwise although the program will burn but it wont work on your hardware as I have mistakenly experienced it.
  • Dont use any third party software for programming through PICkit3, i tried the beta version software but it didn't work on my system and just crashed.

If you having any problem in any part of this tutorial ask in comments, I will try my best to resolve it and if you like this tutorial then Subscribe to our Newsletter so that you got such tutorials right into your mail box. Ok than let's meet in the next tutorial. Take care.

TEP , The Engineering Projects , Tags
TEP , The Engineering Projects , Comments

Write a Comment

TEP , The Engineering Projects , WordPress TEP , The Engineering Projects , Google TEP , The Engineering Projects , Twitter TEP , The Engineering Projects , Facebook TEP , The Engineering Projects , User
TEP , The Engineering Projects , Robot
TEP , The Engineering Projects , Comments Comments on ‘’ How to Burn MikroC code Using PICkit3 ‘’ (28)
TEP , The Engineering Projects , Comment
TEP , The ENgineering Projects , Reaction 40
TEP , The ENgineering Projects , Reaction 700
TEP , The ENgineering Projects , Reaction 60
TEP , The ENgineering Projects , Reaction 25
TEP , The ENgineering Projects , Reaction 60
i have a question, i need program a 32 pic with this reference PIC32MX220F032B, i am doing the program in mikroc but i can do with this instructions or the process is diferent
TEP , The Engineering Projects , Comment
TEP , The ENgineering Projects , Reaction 40
TEP , The ENgineering Projects , Reaction 700
TEP , The ENgineering Projects , Reaction 60
TEP , The ENgineering Projects , Reaction 25
TEP , The ENgineering Projects , Reaction 60
hello mate...thanks but i have a problem!!!after programming the code on my hardware my functions dont seem to work is there a solution for this or am i doing anything wrong. in the eval board all seems to work fine
TEP , The Engineering Projects , Comment
TEP , The ENgineering Projects , Reaction 40
TEP , The ENgineering Projects , Reaction 700
TEP , The ENgineering Projects , Reaction 60
TEP , The ENgineering Projects , Reaction 25
TEP , The ENgineering Projects , Reaction 60
Hello dear friend, Please send me mikroC (full version). I have the limited version that always gives the demolimit error. Please send me the full version. Thanks.
TEP , The Engineering Projects , Comment
TEP , The ENgineering Projects , Reaction 40
TEP , The ENgineering Projects , Reaction 700
TEP , The ENgineering Projects , Reaction 60
TEP , The ENgineering Projects , Reaction 25
TEP , The ENgineering Projects , Reaction 60
dear, it is giving a "programming complete" comment , however when i m clicking the blank check option it is giving an error. And therefore the is not burned in the controller(the controller is PIC16f877a). what should i have to do??? thanks
TEP , The Engineering Projects , Comment
TEP , The ENgineering Projects , Reaction 40
TEP , The ENgineering Projects , Reaction 700
TEP , The ENgineering Projects , Reaction 60
TEP , The ENgineering Projects , Reaction 25
TEP , The ENgineering Projects , Reaction 60
dear sir, whenever i m using pickit3 to dump the program i m continuously get the message the device is not connected. But the device is connected and also IC is in good condition. And PIC kit3 is also new what can i do?
TEP , The Engineering Projects , Comment
TEP , The ENgineering Projects , Reaction 40
TEP , The ENgineering Projects , Reaction 700
TEP , The ENgineering Projects , Reaction 60
TEP , The ENgineering Projects , Reaction 25
TEP , The ENgineering Projects , Reaction 60
Hello Sr, I am Rafael I need so much MPLAB with C18 compiler and MIikroc full version. Please, send me them on email id: rafaelmfrancisco47@gmail.com Thank's a lot
TEP , The Engineering Projects , Comment
TEP , The ENgineering Projects , Reaction 40
TEP , The ENgineering Projects , Reaction 700
TEP , The ENgineering Projects , Reaction 60
TEP , The ENgineering Projects , Reaction 25
TEP , The ENgineering Projects , Reaction 60
Dear Sir: I followed all your steps. My program is a simple flashing led. I followed all your steps and no errors occured. When powering the chip (5 volt), the LED did not flash. It gave 0.8 volt on all the pins that I set for output. Plz advise.
TEP , The Engineering Projects , Comment
TEP , The ENgineering Projects , Reaction 40
TEP , The ENgineering Projects , Reaction 700
TEP , The ENgineering Projects , Reaction 60
TEP , The ENgineering Projects , Reaction 25
TEP , The ENgineering Projects , Reaction 60
Good day, Hope all is well. Can I receive a copy of the C18 compiler with MPLAB? If it is not too much trouble, I would appreciate a copy of the MikroC pro. I thank you in advance, Jenny. My email is ninja_zx11@hotmail.com
TEP , The Engineering Projects , Comment
TEP , The ENgineering Projects , Reaction 40
TEP , The ENgineering Projects , Reaction 700
TEP , The ENgineering Projects , Reaction 60
TEP , The ENgineering Projects , Reaction 25
TEP , The ENgineering Projects , Reaction 60
please mail me the code for the mcp23018 (16 bit i/o expander with i2c interface-one address pin) to interface with pic16f877a using microc code please help me need for my project urgent
TEP , The Engineering Projects , Comment
TEP , The ENgineering Projects , Reaction 40
TEP , The ENgineering Projects , Reaction 700
TEP , The ENgineering Projects , Reaction 60
TEP , The ENgineering Projects , Reaction 25
TEP , The ENgineering Projects , Reaction 60
PICkit 3 detected Connecting to PICkit 3... Running self test... Self test passed Firmware Suite Version...... 01.28.90 Firmware type......................Midrange PICkit 3 Connected. Target Detected Device ID Revision = 00000008 Programming... The following memory regions failed to program correctly: Program Memory Address: 00000000 Expected Value: 000029a3 Received Value: 00000000 Programming failed
TEP , The Engineering Projects , About TEP , The Engineering Projects , About Shadow

Top PCB Design Service

PCBA
TEP , The Engineering Projects , JLCPCB
PCB
TEP , The Engineering Projects , JLCPCB
TEP , The Engineering Projects , About TEP , The Engineering Projects , About Shadow

Embedded Tools

ARDINO TEP , The Engineering Projects , JLCPCB
TEP , The Engineering Projects , About TEP , The Engineering Projects , About Shadow

Subscribe Now !!!

Learn Free Pro Tricks

TEP , The Engineering Projects , Mail Receive Quality Tutorials Straight in your Inbox by Submitting your Email ID Below
TEP , The Engineering Projects , Mail TEP , The Engineering Projects , Mail Shadow
TEP , The Engineering Projects , Mail Robot TEP , The Engineering Projects , Mail Robot Shadow TEP , The Engineering Projects , Mail Robot Shadow
TEP , The Engineering Projects , About TEP , The Engineering Projects , About Shadow

Engineering Books

TEP , The Engineering Projects , Arduino Programming Book
SALE $20
Text Book for arduino $20
TEP , The Engineering Projects , Rating Stars (5.0)
TEP , The Engineering Projects , Arduino Programming Book
SALE $20
Text Book for Raspberry Pi $20
TEP , The Engineering Projects , Rating Stars (3.0)
TEP , The Engineering Projects , Arduino Programming Book
SALE $20
Text Book for arduino $20
TEP , The Engineering Projects , Rating Stars (4.7)
TEP , The Engineering Projects , Arduino Programming Book
SALE $20
Text Book for Raspberry Pi $20
TEP , The Engineering Projects , Rating Stars (5.0)
TEP , The Engineering Projects , TEP Robot TEP , The Engineering Projects , TEP Robot Shadow TEP , The Engineering Projects , TEP Robot Shadow
TEP , The Engineering Projects , About TEP , The Engineering Projects , About Shadow

Categories

TEP , The Engineering Projects , Arduino
TEP , The Engineering Projects , Notification 20K
TEP , The Engineering Projects , Tick 900
TEP , The Engineering Projects , Views 900
TEP , The Engineering Projects , Comments 20K
TEP , The Engineering Projects , Arduino
TEP , The Engineering Projects , Notification 20K
TEP , The Engineering Projects , Tick 900
TEP , The Engineering Projects , Views 900
TEP , The Engineering Projects , Comments 20K
TEP , The Engineering Projects , Arduino
TEP , The Engineering Projects , Notification 20K
TEP , The Engineering Projects , Tick 900
TEP , The Engineering Projects , Views 900
TEP , The Engineering Projects , Comments 20K
TEP , The Engineering Projects , Arduino
TEP , The Engineering Projects , Notification 20K
TEP , The Engineering Projects , Tick 900
TEP , The Engineering Projects , Views 900
TEP , The Engineering Projects , Comments 20K
TEP , The Engineering Projects , Arduino
TEP , The Engineering Projects , Notification 20K
TEP , The Engineering Projects , Tick 900
TEP , The Engineering Projects , Views 900
TEP , The Engineering Projects , Comments 20K